Download
1 / 54
560 likes | 904 Vues
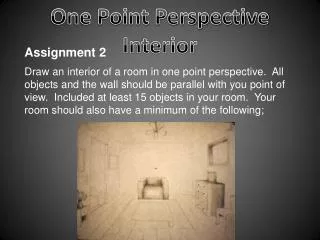
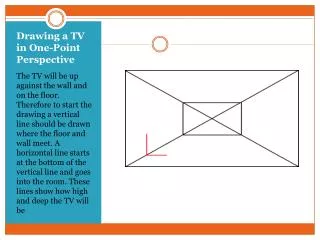
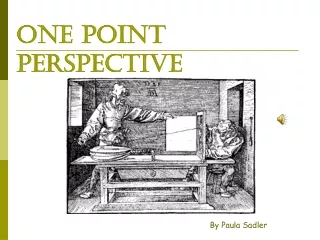
Learn how to draw a room in one-point perspective with step-by-step instructions. Create a realistic-looking space using orthogonal lines and a vanishing point. Add furniture and details to bring your drawing to life. Perfect for beginners!

E N D
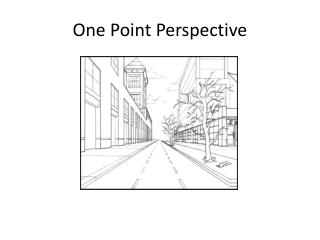
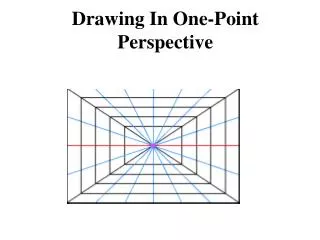
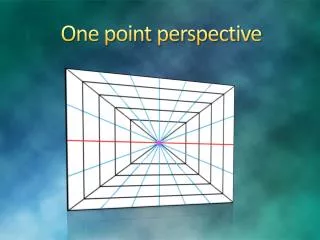
Orthogonal lines are “visual rays” helping the viewer’s eye to connect points around the edges of the canvas to the vanishing point.Here’s an example.
Begin with a horizon line across the page. P.S. The white represents your paper.
2. Draw a vanishing point on the horizon line. Let’s put it in the middle today. Did you know that the vanishing point represents where you are in relation to the things in your picture? X
3. Now we’ll draw the back wall, which is parallel to us. So, it will look like a rectangle. X
4. Connect the vanishing point to the corners of this rectangle, and draw away, out to the edges of the paper. This line doesn’t connect to the corner of the paper. Notice the line goes through this corner. X Begin at the vanishing point.
Continue connecting the other corners of the back wall to the vanishing point. X
Continue connecting the other corners of the back wall to the vanishing point. X
Continue connecting the other corners of the back wall to the vanishing point. X
Continue connecting the other corners of the back wall to the vanishing point. X
5. Erase the lines inside the back wall. You can erase the horizon line too. X
6. Let’s draw a window on the back wall. Anything laying flat on this wall is parallel to it, meaning that it is square too. X
7. Let’s draw a window on a side wall. Notice the side wall is not square. The top and bottom edges slant to the vanishing point, therefore the top and bottom of the window will slant there too. X
7. Let’s draw a window on a side wall. Notice the side wall is not square. The top and bottom edges slant to the vanishing point, therefore the top and bottom of the window will slant there too. X
8. To draw the sides of the window, just draw a vertical line in between the lines that went to the vanishing point. Make sure you draw in the side wall and not the back wall. X
8. To draw the sides of the window, just draw a vertical line in between the lines that went to the vanishing point. X
This room needs a door. Let’s put it on the left wall.Begin with the top of the door. It will be a line going to the vanishing point . Make it as high up as the window. X
11. Draw the left and right side of the door using vertical lines extending from the top, diagonal line to the bottom diagonal line. X
11. Draw the left and right side of the door using vertical lines extending from the top, diagonal line to the bottom diagonal line. X
13. Doors and windows have frames around them. Draw the frames the same way you drew the door and window. X
13. Doors and windows have frames around them. Draw the frames the same way you drew the door and window. X
13. Doors and windows have frames around them. Draw the frames the same way you drew the door and window. X
13. Doors and windows have frames around them. Draw the frames the same way you drew the door and window. X Add a door knob.
X The room structure is complete. X
X 14. This room needs some furniture. How-a-bout a table. Begin with the front edge (thickness) of the table. In this case, it will be a rectangle.
X X 15. Connect the top corners of the rectangle to the vanishing point.
X X 15. Connect the top corners of the rectangle to the vanishing point.
X X 16. Draw the back edge of the table in between the lines you just drew.
X X 17. Erase.
X X 18. Add legs, they begin as rectangles too.
X X 19. Connect the bottom corner of the legs to the vanishing point because we may see another side to them. We won’t see any other side to this leg because it is directly in front of the vanishing point, directly in front of you.
X X 20. Draw the vertical part of the leg’s side.
X X 21. Erase. This table is short, so we won’t see the back legs.
X X 22. We need a couch to sit on. Begin with the edge of the couch that faces you, the side. Make sure the bottom of the couch is on the floor.
X X 23. Now, to draw the side of the couch you sit on. Connect the corners or edges of the side you just drew to the vanishing point.
X X 23. Now, to draw the side of the couch you sit on. Connect the corners or edges of the side you just drew to the vanishing point.
X X 23. I am now just connecting parts on the side that change directions.
X X 23. I am now just connecting parts on the side that change directions.
X X 24. Draw the back edge of the couch in between the lines you connected to the vanishing point. Make the back edge similar to the front edge.
X X 25. Erase
X X 25. I am going to color this in. Isn’t it pretty?
X X This room is boring. Lets add a vase and plant.You’ll enjoy this, just draw the vase on the floor. Round up the bottom, and make an oval at the top.
X X This room is boring. Lets add a vase and plant.You’ll enjoy this, just draw the vase on the floor. Round up the bottom, and make an oval at the top.
X X Just draw the plant. No use of the vanishing point needed.
X X 26. I’m thirsty. Let’s draw a soda can. The top will be an oval, and so will the bottom.
X 27. Draw the sides and color. X
X 28. The couch needs pillows. Draw rounded rectangles for those. X