Download
1 / 29
290 likes | 423 Vues
HEAD START 2011 MISSION POSSIBLE. Module Two May 26 th , 27 th , 30 th , June 9 th , 10 th , 13 th. Introduction. Today’s lesson is your second Head Start training module After reading the slides you will proceed to an online quiz. Purpose. Introduce you to the student session

E N D
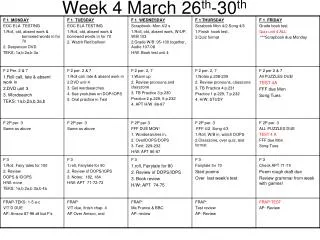
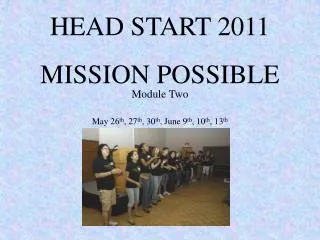
HEAD START 2011 MISSION POSSIBLE Module Two May 26th, 27th, 30th, June 9th, 10th, 13th
Introduction • Today’s lesson is your second Head Start training module • After reading the slides you will proceed to an online quiz. Purpose • Introduce you to the student session • Provide information on the events of the day
Today’s Mission Details • Goals of Student Session • Outline of the Student Session and Icebreakers • Student Session Power Point Presentation • Answering difficult questions on topics like Residence, OSAP, and Awards • Tips on Presentations
Goals of the Student Session • Help first year students to realize there are helpful people (like you) at the University of Windsor • Provide accurate information to help students prepare during the summer and first weeks of school • Provide a realistic view of university life from a student’s perspective • Give first year students a chance to meet other students
Goals of the Student Session • Represent the University of Windsor in a positive manner. Give a good first impression and be professional • Encourage students to make use of support services on campus and to attend the Information Fair • Be enthusiastic! • HAVE FUN!!!!
Outline of the Student Session • Introduction • Introduce yourself to the students • Icebreakers • Conduct the icebreaker (outside if possible) • PowerPoint presentation • Questions and Answers • Conclusion
Introduction • Introduce yourselves! (Name, Program etc.) • Provide an outline of the student session so they know what they will be doing • Make sure to encourage students to write questions down during the presentation. There will be a chance to ask them at the end. • Some questions they need ask will be addressed on a later slide • This allows you to maintain control of the time factor and will allow more discussion at the end
Icebreaker Guidelines • Explain the icebreakers importance • Research shows that making one connection during orientation improves your chances of finishing one year of university • This will allow you to see familiar faces throughout the school year. You might even find someone from your program or from courses you are taking. • Ask students to form a circle to conduct the icebreaker
Icebreaker #1 The Name Game • Step 1: Ask your group to form a circle (if the group is large, you may choose to make 2 smaller circles and one OL run each circle) • Step 2: The OL’s will introduce themselves – name, year, program of study - and then using their name, create an acronym with adjectives that describes their nature, personality or character • Step 3: Once the OL’s have introduced themselves, it is the students’ turns to introduce themselves – name, program they have applied for, city they are from – and then like the OL’s the students’ will say adjectives for each letter in their name • Make sure each student gets a chance to introduce themselves to the group and make sure to go in an orderly fashion (not to skip anyone) • To add to the game: as the next person introduces himself/herself, he/she must say the names of the students that went before him/her – remembering the students that were before them, getting to know people Joyful Enthusiastic Nice Noble Intelligent Funny Entertaining Real
Icebreaker #2 The Question Game • OL's take turns asking students, if you were a fruit which would you be? or a cartoon character or animal etc. • Step 1: Ask your group to form a circle. • Step 2: As each student introduces themselves to the group, ask them to answer one of the questions and explain why; when the OL’s do an example of this activity, make it funny so students also have fun with this game.
Icebreaker #3 Head Start Races • Step 1: Beforehand decide on a starting line and a finish line. • Step 2: Have all the students line up at the starting line. • Step 3: OL's make statements such as: "If your favorite colour is red, step forward." • Step 4: Students perform the associated action. For example, if your favourite colour is red, then they would step forward, if the statement applies to them. The first student to make it to the finish line (most of the statements should apply to him/her) is the winner.
Icebreaker #4 Beach Ball • Step 1: The students get into a large circle. • Step 2: The beach ball is thrown around the circle. When a student catches it they must say their name, and answer the question that their left thumb lands on.
Icebreaker #5 Find the Same Game • This is a mingling game. • Step 1: OL’s shout out characteristics and the object is to find people with the shared characteristics. For example, an OL could ask: “Find someone who has the same sized shoes.” • Step 2: Students introduce themselves to each other (name, where they are from, what they will be studying, etc.) after each statement. • Find someone with the same… as you : • Colour shirt, shocks, pants, etc.; Favorite food; Favorite TV show; Favorite magazine; Number of siblings; Favorite sport; Number of letters in their first name; Program; Hometown; Size shoe; Type of pet • Make sure students do not always go to the same people. Get them engaged and have them introduce themselves to someone new each round.
PowerPoint Presentation • Our goal is to make YOU an Excellent Presenter • The #1 Key to a GREAT Presentation is PRACTICE! PRACTICE! PRACTICE! • Please review the PowerPoint Presentation upon completion of this PowerPoint • Note: Some changes may be made before training
Questions and Answers If a student asks a question during the presentation: • And the question is about the topic • Keep your answer clear and concise • And the question is off topic • “Great question” we will be speaking about this later on in the presentation (if you know it is) or • “Great question” we will come back to it later on so your question can be better answered
Questions and Answers • Now that you have finished the power point it is time to invite questions. • After inviting questions, don’t rush ahead if no one asks a question • Allow the students to gather their thoughts • When answering the question, direct your remarks to the entire group
Questions and Answers When Answering Questions • Keep focused • Don’t lose track and continue to go off on a tangent • Keep responses 10-40 seconds, too short may appear abrupt, longer answers appear too elaborate • You may receive off the wall questions, don’t let them sidetrack you. Answer them to the best of your ability • Do not make the student feel stupid • If you don’t know the answer, ask another OL
Answering Questions • If asked a question about residence or the meal plan: explain that you are unable to answer Meal Plan and Residence questions. • There is a separate session available that will tour and address all questions and concerns
WHAT SHOULD YOU SAY IF YOU ARE ASKED A QUESTION ABOUT THE MEAL PLAN?
Tips on Presentation Skills & Answering Questions Answering Questions Use the following framework when you have to think quickly or organize your thoughts The P.R.E.P System P=point “ The Point I want to make is” R=reason “ The Reason I say this is” E=example “ For Example” P=point “ In summary, my Point is....”
TRY ANSWERING THESE QUESTIONS USING THE SKILLS PROVIDED ON THE PREVIOUS SLIDE! 1. WHAT ARE SOME OF THE PROFESSORS LIKE? 2. WHAT ARE SOME OF THE PROGRAMS I CAN JOIN TO BECOME INVOLVED IN THE SCHOOL? 3. WHERE DO I GO IF I AM STRESSING OVER CLASS WORK AND NEED HELP?
Presentation Skills Effective Body Language • WHILE PRESENTING BE AWARE OF YOUR: • Eye contact • Facial expressions • Gestures • Posture & body orientation • Pay attention to the message you send with your body language • Use positive body language
Presentation Skills Continued Effective Body Language • Proximity • Remember to move around, spread out in front of the room • Don’t stay standing behind the podium – spreading out encourages interaction • Vary your voice • Speak clearly and not too quickly • Word Fillers (um…., Like)…avoid them at all costs
Presentation Skills • View the following video. Watch carefully because you will need to be able to list 5 ways this student could improve his presentation. • http://www.youtube.com/watch?v=kql-pvnid0s&feature=related • DO NOT LET THIS BE YOU!!!!
Tips On Presenting the PowerPoint • During the presentation • DO NOT read off the power point screen. • This makes you appear unprepared • To avoid this, practice the slides before hand and only use it as a reference • Remember to divide the slides up before you begin • Talk to your group members and decide how the presentation will run • Do not talk over your group members. • You need to show a united front and show respect for one another
Presentation Skills • Some things you can do to spice up your presentation are: • Insert personal experience when talking about a slide. • Students often relate more to your experiences rather then dry reading off the slide • Be passionate about what you are talking about! • If you are excited that will ripple down and make them excited.
Conclusion After Presenting • Make sure to have them fill out the evaluation for the student session at the back of their handbook • Have students fill out Alumni forms and hand them back into you • Explain what will be happening the rest of the day • Direct them to their advising locations
Quiz • Minimize this presentation • Go to uwindsor.ca/sos • Fill out Quiz 2 • Please PRACTICE presenting the Student Session at least10 times before you attend the Head Start Training Conference. You will be presenting parts of the Student Session during the conference.