Javascript HTML5 - CANVAS
420-B63 Programmation Web Avancée Auteur : Frédéric Thériault. Javascript HTML5 - CANVAS. Balise pour les dessins en JS. Fonctionne par le même principe que paintComponent de Java. On parle cependant de “context”, au lieu de “graphics”. Application de dessins muro. deviantart.com.


Javascript HTML5 - CANVAS
E N D
Presentation Transcript
420-B63 Programmation Web Avancée Auteur : Frédéric Thériault JavascriptHTML5 - CANVAS
Balise pour les dessins en JS • Fonctionne par le mêmeprincipequepaintComponent de Java. On parlecependant de “context”, au lieu de “graphics” Application de dessins muro.deviantart.com
Les navigateurs qui supportent <Canvas> • Mozillafirefox (3.6) • Google Chrome • Safari • Opera • IE 9
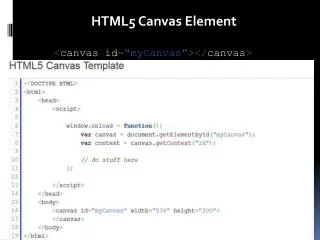
La base <canvas id="space" width="500" height="450"> <p>Votrenavigateurnesupporte pas les canvas</p> </canvas> Et en JavaScript : var drawingCanvas = document.getElementById('space'); ctx = drawingCanvas.getContext('2d'); … ctx.fillRect(0,0,150,150); …
Dessiner un carré • fillStyle = couleur/style • fillRec (x, y, largeur, hauteur); • strokeRect = seulement le contour. À utiliser avec strokeStyle. context.fillStyle = "rgb(255,0,0)"; context.fillRect(30, 30, 50, 50);
La transparence • En utilisantfillStyle, on peutchoisir un style de couleurayantunetransparence • La valeur de la transparenceestentre 0.0 et 1.0 context.fillStyle = "rgb(255,0,0)"; context.fillRect(30, 30, 50, 50); context.fillStyle = "rgba(0,100,100, 0.5)"; context.fillRect(60, 60, 50, 150);
Dessiner une ligne • Exemple : ctx.beginPath(); ctx.lineWidth = 1; ctx.strokeStyle = "black"; // ou ex: ‘rgb(0,0,0)’ ctx.moveTo(50,25); ctx.lineTo(300,250); ctx.closePath(); ctx.stroke();
Dessiner un polygone • Exemple : ctx.beginPath(); ctx.beginPath(); ctx.lineWidth = 2; ctx.strokeStyle = "rgb(200,0,0)"; ctx.fillStyle = "rgba(10,10,100, 0.3)"; ctx.moveTo(25,25); ctx.lineTo(150,105); ctx.lineTo(105,125); ctx.lineTo(25,105); ctx.closePath(); ctx.fill(); ctx.stroke();
Dessiner un Cercle • arc(x, y, rayon, angleDebut, angleFin, anti-horaire) ctx.beginPath(); ctx.arc(50,100,50,0, Math.PI*2, true); ctx.beginPath(); ctx.arc(50,30,20,0, Math.PI,true); ctx.fill(); ctx.beginPath(); ctx.arc(50,30,20,0, Math.PI/2,false); ctx.fill();
Écrire du texte • fillText(‘text’, x, y); // Pour un effetd’ombreportée (optionnel): ctx.shadowOffsetX = 4; ctx.shadowOffsetY = 3; ctx.shadowBlur = 3; ctx.shadowColor = "rgba(0, 0, 0, 0.5)"; ctx.font = "24px Times New Roman"; ctx.fillStyle = "blue"; ctx.fillText("Hellow World", 5, 30);
Utiliser un dégradé (carré) • Ctx.createLinearGradient(x1,y1,x2,y2) • Imaginonsuneligne • x1,y1 = point de départ • x2,y2 = point d’arrivé • Le gradient se fait tout au long de cetteligne. Mais pour spécifier de quellefaçonilfaut faire le dégradé, on utilise “colorStop” • addColorStop(%, couleur)
Utiliser un dégradé - carré (suite) var degrade = ctx.createLinearGradient(10,10,150,150); degrade.addColorStop(0.2,'rgb(255,100,200)'); degrade.addColorStop(0.8,'black'); ctx.fillStyle = degrade; ctx.fillRect(10, 10, 150, 150);
Utiliser un dégradé (radiant) • createRadialGradient(x1,y1,r1,x2,y2,r2) • Un peucomme le dégradélinéaire, maispermettant de faire un dégradé de style radiant • Il estconseilléd’utiliserunecouleurcomplètementtransparente pour la bordure extérieurdudégradé
Utiliser un dégradé – radiant (suite) var degrade = ctx.createRadialGradient(45,45,10,52,50,30); degrade.addColorStop(0, '#A7D30C'); degrade.addColorStop(0.9, '#019F62'); degrade.addColorStop(1, 'rgba(1,159,98,0)'); // couleur transparente ctx.fillStyle = degrade; ctx.fillRect(0,0,150,150);
Insérer une image • Pour insérerune image, ilfautd’abord la charger en mémoire. Lorsqu’elleestchargée, alors on peutl’afficher. • ctx.drawImage(imgVar, x1,y1, largeur, hauteur) var monImage = new Image(); monImage.onload = function () { afficherImage(); } monImage.src = "voiture.png"; functionafficherImage() { ctx.drawImage(monImage, 0, 0, 160, 75); }
Manipulation du contexte • Commeilest possible de faire des transformations au contexte (rotation, translation), ilpeuts’avérer utile de sauvegarder son étatàcertains moments. • ctx.save() • Sauvegardel’étatactuelducontexte • ctx.restore() • Remet le contexteàl’état de la dernièresauvegarde.
Les transformations (translation) • translate(x, y) ctx.translate(60, 60); ctx.fillStyle = "rgba(0,100,100, 0.5)"; ctx.fillRect(0, 0, 50, 50);
Les transformations (rotation) • Rotate(angle) • Pour le paramètre “angle”, utilisercela : • Ctx.rotate(x * Math.PI/180) • Où X estl’anglevoulu ctx.translate(60, 60); ctx.rotate(45 * Math.PI / 180); ctx.fillStyle = "rgba(0,100,100, 0.5)"; ctx.fillRect(0, 0, 50, 50);
Vider/Effacer un canvas • ctx.clearRect(x, y, width, height) • Cecipermetd’effacerle canvas (ouunepartie du canvas)