Cluster Computing: A Beginner's Guide to HPC
650 likes | 816 Vues
Understand the fundamentals of cluster computing, hardware components, parallel computing tasks, multi-threading, and tips for efficient resource usage. Learn about accessing the cluster, filesystem organization, and managing environmental variables.

Cluster Computing: A Beginner's Guide to HPC
E N D
Presentation Transcript
The HPC Cluster Data Analysis Group • Based on slides by Chris Cole
Key to slides…. • Descriptive text • Example commands – black monospaced text: ls /tmp • Commands to try – red monospaced text • Prompts/STDOUT/STDERR –green monospaced text • e.g. -bash-4.1 $ echo $USER jabbott • [ENTER] – press enter key • [username] – your username, not '[username]'
Desktop Computing • A single computer • A single user – usually • Exclusive access – not usually remotely • May be switched off – not necessarily intentionally • Expansion is limited • Lower Spec Memory and CPU • Mainly Windows or Mac – rarely Linux • Data, hardware back-up?
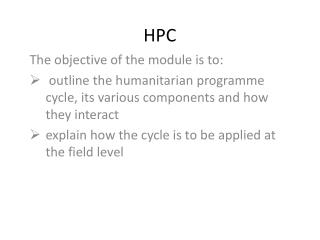
Cluster computing • Many ‘computers’ - nodes • Many users • Shared access – only remotely via a login ‘node’ • Always on – subject to maintenance, etc • Expandable to suit any type of computation • High spec memory and CPU – server grade • Almost universally Linux/Unix • Redundant hardware • Robust backups
Cluster computing https://www.hpc2n.umu.se/support/beginners_guide
“With great power... • ...comes great responsibility.” • Use all parts to best effect. • Poor use of the cluster can make processes run more slowly than on a desktop! • This is a shared resource, you can impact on others • Need to understand all aspects • Hardware • Filesystem • Software • Queuing system
The Hardware • Compute Nodes • Mixed economy of Intel Xeons or AMD Opterons and GPUs • 2-8 CPUs, 4-16 cores per CPU • 8-128 cores per node • 32GB – 1TB RAM per node • Connectivity • Or how fast can data get to/from the nodes... • Gigabit Ethernet (1Gbps) • 10 Gigabit Ethernet (10Gbps) • 10 Gigabit Ethernet + Infiniband (10Gbps + low latency)
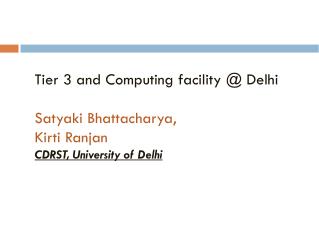
CPU vs CORES • A central processing unit (CPU) is a physical object. • Cores are an architectural design found within a CPU. • Can increase power with more CPUs or cores or both. • Each core has a small amount of cache memory https://www.guru3d.com/articles-pages/core-i5-750-core-i7-860-870-processor-review-test,2.html
Nodes • Simplest computing unit • Fixed amount of accessible: • CPU cores • RAM • Local disk • Important to consider this when submitting jobs
Parallel Computing Task Total time = t
Parallel Computing Task 2 Task 3 Task 4 Task 1 t2 t3 t4 t1 Total time = t1 + t2 + t3 + t4
Parallel Computing Task 2 Task 3 Task 4 Task 1 t3 t4 t1 t2 Total time = longest of t1, t2, t3, t4
Parallel Computing Pthreads OpenMP Java threads Task Total time = t
Parallel Computing Software needs to be adapted to work like this. Task Total time = t/4 Simplistic. Can be bottlenecks or overheads
Multi-threading • A process runs on an execution thread • A multi-threaded process can run on multiple execution threads simultaneously
Accessing the cluster • Need a Life Sciences username/password • Need a Cluster account – raise a ticket with IT • Need an SSH client • PuTTY/git-bash on Windows • Terminal/iTerm2 on Mac OSX • Terminal/Xterm/Konsole/etc on Linux • See ‘Intro To Linux’ notes … • Remember to start Xming before logging in if you want to use a GUI text editor • Try logging into the cluster: • Hostname: login.cluster.lifesci.dundee.ac.uk • Username/Password: Life Sciences Directory credentials • Now copy some files we’ll need later: -bash-4.1$ cp –R /tmp/cluster_intro ~ -bash-4.1$ cd cluster_intro
Filesystems • Cluster nodes have two file systems Local Disk Nodes Spectrum Scale(aka GPFS) /homes
Spectrum Scale/GPFS • Accessible by all nodes on the cluster • High capacity (440TB) • High performance and robust • Mixture of SSD (metadata and top-tier) and HDD (slower data pools) • Very fast for dealing with large files • Not efficient with small files - *do not* create directories full of small files • Backed up • Use NOBACK directories for temporary/scratch/downloaded data • Use of NOBACK being reviewed by IT – this may change
Local disk • Only accessible to jobs on a node • Temporary – files automatically deletedwhen job finishes • Limited capacity (100-900GB) • Shared between jobs on node • Offers greater performance that GPFS • Accessible via $TMPDIR environment variable
An aside – environmental variables • An environment variable is a dynamic-namedvalue that can affect the way running processes will behave on a computer. (Wikipedia) • Some are set on login: • $HOME – path to your home directory • $USER – your username • Values can be viewed with ‘echo’ -bash-4.1 $ echo $USER jabbott • Can be ‘interpreted’ within commands -bash-4.1 $ cd $HOME • The TMPDIR variable is set within the environment of a job executing through Grid Engine
Relative performance • Access speeds vary to different storage types • Cache memory: 1-5ns • Main memory: 50-150 ns • Local disk: 10-15 ms, 300MB/s • Network disk: 50-100ms, 125MB/s (Gigabit ethernet) • Aim to keep active data as close to CPU as possible • Avoid writing data to disk where possible • High IO jobs – use local disk rather than cluster filesystem • Copy input files to $TMPDIR at start of job • Copy output files from $TMPDIR to cluster filesystem at end of job
Accessing files • Windows: ‘Map Network Drive’ • \\smb.cluster.lifesci.dundee.ac.uk\[username] • Mac: Finder -> ‘Connect to Server’ • smb://smb.cluster.lifesci.dundee.ac.uk/[username] • Linux (you’ll need root/sudo access): • sudo mount –t cifs ‘\\smb.cluster.lifesci.dundee.ac.uk\[username]’ -o username=[username] /mnt/cluster • Only works within UoD network. Use VPN if external.
Quotas • Everyone has a limited amount disk allocated to them & their group • managed storage is expensive and your PI will get the bill. • You need to plan ahead when generating a lot of data. Your jobs will die, if you exceed your quota. • It’s your responsibility to manage your disk space efficiently • Compress all big files with gzip. Many programs can work with compressed files natively. • Quotas can be assigned to both users and groups • To see your quota, run -bash-1.4 $ lsquota --block-size=auto cluster • To see your groups quota, run lsquota -j [groupname] --block-size=auto cluster i.e. -bash-1.4 $ lsquota –j gjb –block-size=auto cluster
Centralised software installations • Environment Modules • Globally accessible software packages • Managed by IT • Multiple versions • High maintenance overhead • Conda • Install packages you require directly into your specified directory • Bioconda repository hosts >3000 bioinformatics packages: https://bioconda.github.io/ • Supports multiple environments • Enhances reproducibility • Not everything you need may already be packaged
Installing conda • Install miniconda: https://conda.io/en/master/miniconda.html • A centralised installation script is available on the cluster • -bash-4.1$ No /cluster/groupname space? Run 'bash /tmp/Miniconda3-latest-Linux-x86_64.sh' instead Welcome to Miniconda3 4.5.12 In order to continue the installation process, please review the license agreement. Please, press ENTER to continue Do you accept the license terms? [yes|no] [no] >>> setup-miniconda-env /cluster/[groupname]/[username]/[condaname] Group directory in /cluster Your username Directory name for installation yes
Installing conda Miniconda3 will now be installed into this location: /cluster/gjb_lab/jabbott/miniconda3 - Press ENTER to confirm the location - Press CTRL-C to abort the installation - Or specify a different location below >>> PREFIX=/cluster/gjb_lab/jabbott/miniconda3 installing: python-3.7.1-h0371630_7. ... Python 3.7.1 :: Anaconda, Inc. ……… installation finished. To load the newly installed conda environment, run: source "/cluster/gjb_lab/jabbott/test_miniconda3/bin/activate" [ENTER]
Installing conda • A .bash_profilefile is a hidden configuration file in your home directory which is normally run on login • Do you have a ~/.bash_profilefile? How can you tell? • Append the conda activate command to your ~/.bash_profile: -bash-4.1$ echo source "/cluster/gjb_lab/jabbott/miniconda3/bin/activate" >> ~/.bash_profile • Check that ~/.bash_profile was created and it's contents are correct… • Log out then log back in again (base) -bash-4.1$ • Conda should now be on your default path (base) -bash-4.1$ which conda
Installing conda • Conda can install packages from multiple repositories (channels) • Required channels must be added to configuration in correct order -bash-4.1$ conda config --add channels defaults -bash-4.1$ conda config --add channels conda-forge -bash-4.1$ conda config --add channels bioconda • Your ready to go
Conda environments • Conda supports multiple environments • Allow different packages/versions to be installed in isolated sandbox • Create separate environments for different projects/tasks • Different versions of package? No problem… • By default packages installed in ‘base’ environment • Create a new environment with current python version: -bash-4.1$ conda create --name myenv • Need a different python version? conda create --name myenv python=2.7
Conda environments • Once created, need to ‘activate’ an environment to use it (base) -bash-4.1$ conda activate myenv (myenv) -bash-4.1$ • To deactivate environment: (myenv) -bash-4.1$ conda deactivate (base) -bash-4.1$ • To see the environments you have: (base) -bash-4.1$ condaenv list # conda environments: # base * /homes/jabbott/miniconda3 myenv /homes/jabbott/miniconda3/envs/myenv • Reactivate your 'myenv' environment
Conda: Finding packages • (myenv) -bash-4.1$ • Loading channels: done • # Name Version Build Channel • clustalo 1.2.3 0 bioconda • clustalo 1.2.4 0 bioconda • clustalo 1.2.4 1 bioconda • clustalo 1.2.4 hfc679d8_2 bioconda • clustalw 2.1 0 bioconda • clustalw 2.1 1 bioconda • clustalw 2.1 h2d50403_2 bioconda • clustalw 2.1 h6bb024c_3 bioconda conda search clustal *
Conda: Installing packages conda install clustalo • (myenv) -bash-4.1$ • The following NEW packages will be INSTALLED: • argtable2 2.13-h14c3975_1001 conda-forge • clustalo 1.2.4-hfc679d8_2 bioconda • libgcc-ng 7.3.0-hdf63c60_0 conda-forge • libstdcxx-ng 7.3.0-hdf63c60_0 conda-forge • Proceed ([y]/n)? • Did it work? • (myenv) –bash-4.1$ clustalo --version • Need a specific version? • (myenv) -bash-4.1$ • The following packages will be DOWNGRADED: • clustalo 1.2.4-hfc679d8_2 --> 1.2.3-0 • Now install sambamba in your conda environment y conda install clustalo=1.2.3
Saving a conda environment • After project finished, environment can be removed to save space • May want to save state of environment • Share with others • Recreate environment for further work (myenv) –bash-4.1$ condaenv export –n myenv > myenv.yaml • YAML file is plain text format describing environment – keep this safe • Finished with an environment? (myenv) –bash-4.1$ conda deactivate (base) –bash-4.1$ condaenv remove --name myenv • Environment can be recreated from yaml file (base) –bash-4.1$ condaenv create –f myenv.yaml (base) –bash-4.1$ conda activate myenv • List the packages in the current environment (myenv) –bash-4.1$ conda list
Univa Grid Engine login.cluster.lifesci.dundee.ac.uk • Software managing jobs and cluster resources • Cluster contains different types of node: • Submit host • Qmaster (scheduler) • Execution host • Jobs are run in queues • Queues assigned to particular nodes • Have different resource availability • May have different maximum runtimes • Qmaster • asseses job requirements • assigns to queue • Job executed on node when sufficient resources available bigmem.q c6120.q
Queues • The Cluster is subdivided into queues • By architecture: CPU vs GPU • By computing type: memory vs CPU intensive • By responsiveness: fast vs slow • Etc. • Not all users have access to all queues • All jobs mustrun in a queue • Any intensive jobs running on the login node will be killed • Selection of appropriate queue generally best left to scheduler • We just need to specify resources required
Viewing queue status • Display cluster queue summary: (base) -bash-4.1$ qstat –g c • CLUSTER QUEUE CQLOAD USED RES AVAIL TOTAL aoACDScdsuE • -------------------------------------------------------------------------------- • 64bit-pri.q 0.12 0 0 0 8 0 8 • all.q 0.09 54 0 530 676 0 144 • c6100-inf.q 0.05 0 0 852 900 0 48 • c6100.q 0.05 4 0 848 900 0 48 • c6145-inf.q 0.02 0 0 384 384 0 0 • c6145.q 0.02 8 0 376 384 0 0 • long-cpu.q 0.07 0 0 508 530 0 22 • long-gpu-cpu.q 0.07 0 0 556 580 0 24 • long-gpu.q 0.05 0 0 138 140 0 2
Viewing queue status - qstat • View all users jobs: (base) -bash-4.1$ qstat –u "*" • job-ID prior name user state submit/start at queue jclass slots ja-task-ID • ------------------------------------------------------------------------------------------------------------------------------------------- • 1181066 0.60000 pbmpi.shkkin r 05/21/2018 18:12:54 all.q@c6320-4-1.cluster.lifesc inf.c7 26 • 1181085 0.60000 pbmpi.shkkin r 05/21/2018 18:14:56 all.q@c6320-4-2.cluster.lifesc inf.c7 26 • 1208952 0.59200 muthis_kclgtamburrino r 05/25/2018 09:15:49 short-gpu-cpu.q@gpu-20.cluster 24 • 1209398 0.59200 muthis_kclgtamburrino r 05/25/2018 10:30:06 short-gpu-cpu.q@gpu-09.cluster 24 • 1209319 0.56000 act_Kjabuerencala r 05/25/2018 10:22:15 t630-long-cpu.q@gpu-27.cluster 16 • 1203293 0.54400 equi_mut_2 egwhitehead r 05/24/2018 14:04:39 short-gpu-cpu.q@gpu-01.cluster 12 • 1203296 0.54400 equi_mut_2 egwhitehead r 05/24/2018 14:04:53 short-gpu-cpu.q@gpu-04.cluster 12 Node Job ID Slots Job name Start time Queue State r,t,T,qw,Eqw,d
Qstat output • Important to regularly monitor the queues. • Job states: • r – running. All good • t – transferring. OK. • qw – queuing. Be patient. • T – job has been suspended either because of a higher priority queue or requesting too many resources. Should restart in time. • d – job is being deleted. Worry, if it wasn’t by you! • Eqw – job has errored. Investigate. More later...
Univa Grid Engine Main commands to know: • qstat – show status of jobs and queus • qsub – submit a batch job to the scheduler • qalter – modify the requirements of (queuing) job • qrsh – submit an interactive job to the scheduler • qhost – show resources available on each node • qdel – delete a job (base) –bash-4.1$ qstat# view status of your jobs (base) -bash-4.1$ qstat –u "*" # view status for all jobs (base) -bash-4.1$ qstat –u auser# view status for a user’s jobs (base) -bash-4.1$ qstat –j 12345 # view details for specific job
Let’s write a test script • A script needs to be: • Plain text file • Readable and executable • Open your editor of choice (gedit?) • Enter the following: #!/bin/bash sleep 30 hostname • Save the script as 'sleep.sh' • Now make the script executable: (myenv) -bash-4.1$ chmod +x sleep.sh • Try running it directly • (myenv) -bash-4.1$./sleep.sh 'shebang' line – tells shell which interpreter to use to run the following commands Blank line at the end is required – indicates there is a newline at the end of the last command
Now, submit your script to the cluster… (myenv) -bash-4.1$qsubsleep.sh Your job 3654325 ("sleep.sh") has been submitted • Check the job status with qstat job-ID prior name user state submit/start at queue jclass slots ja-task-ID ---------------------------------------------------------------------------------------------------------------------3654345 0.50000 sleep.shjabbott r 02/11/2019 14:04:03 m600.q@fc-007.cluster.lifesci. 1 • Where is the job output? • By default, jobs run in your home directory, and create output files there… • Look for a ~/sleep.o[jobid] file and view the contents (myenv) –bash-4.1$ cat ~/sleep.sh.o3654345 fc-007
Job submission options • Submit with a 4Gb memory requirement • -bash-4.1$qsub –l mfree=4G sleep.sh • Submit with requirement for 50Gb local disk space • -bash-4.1$qsub –l local_free=50G sleep.sh • Submit job needing >24 hours runtime • -bash-4.1$qsub –jcinf –l mfree=4G sleep.sh • Submit to a specific queue (best not to do this…) • -bash-4.1$qsub –q c6145-long.q –l mfree=4G sleep.sh -l: resource request list mfree: amount of memory required -l: resource request list local_free: amount of free disk space required -jc: job class inf: infinite job class -q: queue to run job
Submitting jobs • Start job from current working directory rather than ~ • qsub -cwd –l mfree=4G myscript.sh • Give your job a name • qsub –cwd –N myJobNamemyscript.sh • Pass your environment to the job • qsub –cwd –V myscript.sh • Get email notifications • qsub –M a.user@dundee.ac.uk –m a –m b –m e -cwd: execute job from current working directory -N: set name of job -V: export all environmental variables to job -M: email address for notifications • -m: when to send notifications • -m a when job has aborted • -m b when job begins • -m e when job ends
More on GridEngine Outputs • Programs report two types of output: STDOUT and STDERR • GridEngine writes these to files rather than the screen • Written to job execution directory • STDOUT, by default, is named: <jobname>.o<jobid> • STDERR: <jobname>.e<jobid> • Either or both can be empty, but are always created • *DO NOT* delete them without checking their contents first
More on GridEngine Outputs • We can change: • Where these files are written • What they are named (myenv) –bash-4.1$ qsub –o outputs/ –e errors/ sleep.sh Writes STDOUT files to '~/outputs' directory and STERR files to '~/errors' (myenv) –bash-4.1$ qsub –cwd –o outputs/out.txt –e errors/error.txtsleep.sh Writes STDOUT to ./outputs/out.txt and STDERR to ./errors/errors.txt (myenv) –bash-4.1$ qsub –cwd –j y –o out_and_error.txtsleep.sh Joins STDOUT and STDERR in one file - ./out_and_error.txt