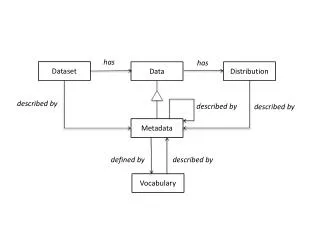
DataSet
DataSet. Your Database. student. Database Connection. test. score. Your program needs to establish a connection to the database. Click on “Add New Data Source.”. DataSet. student. Your Database. test. student. Database Connection. score. test. score.

DataSet
E N D
Presentation Transcript
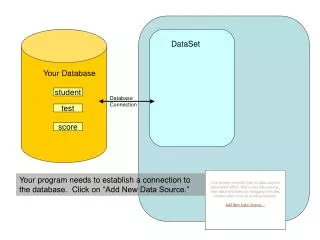
DataSet Your Database student Database Connection test score Your program needs to establish a connection to the database. Click on “Add New Data Source.”
DataSet student Your Database test student Database Connection score test score When you select the tables to import into the database via the connection, copies of them are created inside the DataSet.
DataSet student Your Database test student Database Connection score test score These tables are a local copy of the DataSet. When you change data inside the program, changes are made to the local copy. The database is not updated until explicitly told to do so. With the drag and drop graphical interface we will be using, this will be handled for us.
You can see these tables in your dataset with “Show Data Sources” which opens this view Or you can click on the .xsd file, and click “View Designer,” which opens this view
This view now shows not only the tables, but also the relationships that they share, which you build into the original database with the foreign keys. If you look closely, you can see a key at one end of the relationship line. This key shows the end of the relationship which is the controlling, or ‘parent’ source.
Let’s add a list box of all the students to our form. Click on “Data Sources,” and change student to display as “List Box.” Drag and Drop onto the form. The List Box appears on our form, and is already tied to the DataSet, and the database. If you click on the itsy-bitsy arrow at the top corner, you can see the settings.
Notice that “Display Member” is set to “first_name,” while “Value Member” is set to “sid.” This is so that, even though “first_name” may not be a unique field, the program can actually uniquely identify each row, because the row’s sid key is ‘hidden’ underneath, and is the real identifier. Notice also that the drop down box can only display one field. If you want multiple fields to display, you will need to use a datagrid.
Instead, let’s delete Form1, start with a clean form, and use a “details” view. Now, let’s show the tests each student took. I can simply click on Score (the table that is the subset of students) and drag and drop a grid onto my form.
If I were to click on the ‘score’ Table which was not a subset of ‘student,’ then all my data would appear for every student, not just the student at hand. If you don’t want to show all the columns in a table, you don’t have to. Right click and select “edit columns” to remove extras.
Running the program now looks like this! Because I did use the ‘scores’ table that was a subset of student, the only scores records which show are ones sharing the foreign key with the students – the sid field. You can successfully click through the records, as well as modify (student, not score) data. Make sure that you click the SAVE icon before exiting your database, because that is where the DataSet uploads it’s changes to the Database. Until then, none of your changes are permanent!
For Score, I have used a TID, or Test ID, as my test key instead of a name. Now, it is difficult to understand what test we are talking about. In order to view data from both score and test tables (so we can see the test_name for each score record) we will need to create a Query, and a new table.
In a database, we can combine tables based on their keys, and create a combined table. This process is called a ‘join.’ Student Score Join on “SID” As you can see, there are no rows for Jack Black, because he did not have any scores in the score table.
The Query to create this table in SQL is: “SELECT * FROM student, score WHERE student.sid = score.sid;” Or it’s equivalent: “SELECT * FROM score INNER JOIN student ON score.sid = student.sid;” Instead of SELECT *, we can choose the columns that we want to appear. Lets say we only want columns First and Score. Our Query would then look like this: “SELECT student.first, score.score FROM student, score WHERE student.sid = score.sid;”
These queries will be useful in our program. If you want to display a grid that holds data from multiple tables, you will first need to create the query. • Go into your DataSet Design, and right click in the blue area. Select “Table Adapter.” • Accept the default connection, and select “Use SQL Statements.” • Click on the “Query Builder” button. • Add the tables that you will be using for this query and say CLOSE. • In each of the tables that appeared in your query builder, click the boxes of the values you will be using. The Query Builder writes the SQL statement for you!
As you can see, the “Create methods to send updates directly to the database” is grayed out. This means this table can be used for viewing data, but not for updating the database.
You can try and add a relation for your new table by right clicking on the blue background . . . But you’ll notice that you cannot relate two tables if the child table does not include the parent’s key – in this case, the SID field.
But if you delete the table and start over, this time including the student.sid field, Your table will actually appear with the relation already in place! Note – you can edit grids in the program so that they only display the fields that you want to see.
So then after creating a table adapter (DataTable2) which contained both score and test tables, and creating a relation between student and DataTable2 on the sid field, I was able to drop a grid in which shows both the score and the test name, instead of just tid. The form, executing:
How about a menu table? How do we open one form from another? Let’s say we have a Menu form and a Students form Add a button to Menu, and double click it to get into it’s code. Then type: Students studentForm = new Students(); //New instance of form class studentForm.show(); // launches form