HAAS LATHE PANEL TUTORIAL
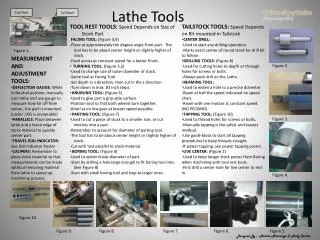
HAAS LATHE PANEL TUTORIAL. Safety First. Never wear loose clothing or long hair while operating lathe Ensure that tools and workpiece are clamped securely Don't touch a rotating workpiece

HAAS LATHE PANEL TUTORIAL
E N D
Presentation Transcript
Safety First • Never wear loose clothing or long hair while operating lathe • Ensure that tools and workpiece are clamped securely • Don't touch a rotating workpiece • If something isn't quite right, press the hold button and check it out (programmed operations can be resumed) • If something is really wrong, press the BIG RED E-Stop button • RAPID RULES: • Ensure that the drill chuck is out of the way (far right) • Ensure that nothing will intercept the tool during travel • Press the [25%] rapid override
HAAS Lathe Commonly Used Buttons HAAS CNC LATHE TUTORIAL Directional Pad Axis Buttons Manual Overrides
Door Button Override • Press [Setting /Graph] from main menu (hand jog menu) • Page down on directional pad • Press down key on directional pad to navigate to “door hold override” (setting #51) • Press right key on directional pad • Press [Enter] • Press [Hand Jog] to get back to main menu Setting /Graph
Turning it On • Ensure nothing is in the way of the X or Z axis • Press the [green] Power On button • Wait for the screen to indicate that the machine is on and started • Press the [Power Up/Restart] button • RAPID RULES: • Ensure that the drill chuck is out of the way (far right) • Ensure that nothing will intercept the tool during travel • Press the [25%] rapid override • Wait for the machine to return to home position Reset Power Up/Restart Cancel
Turning it Off • Stop spindle [Stop] • RAPID RULES: • Ensure that the drill chuck is out of the way (far right) • Ensure that nothing will intercept the tool during travel • Press the [25%] rapid override • Return tool carriage to home position [Home] • Press auto off button Auto Off Home Stop
Manual Operation Page 1 • Press Hand Jog • Use D-Pad to navigate to manual control tab, press enter • Press spindle speed • Enter desired speed [rpm] with numpad, press FWD • Stop spindle with STOP Hand Jog FWD NUM PAD STOP
Manual Operation Page 2 • In order to lock or unlock an axis in manual mode, press [shift] then desired axis key [+/-X or +/-Z] • Turn X or Z axis crank • To use the panel crank press an axis button [+/-X or +/-Z] and an increment [.1, .01, .001, .0001] • To set current position to manual zero: Switch to operator coordinates, press axis [X or Z] on alpha pad, then press [Origin] Increment Buttons Panel Crank AXIS PAD Shift Origin ALPHA PAD
Feeds and Speeds Overrides • To speed up or slow down the CNC/canned cycle feed or spindle speed rates, press the [+/-10%] feed rate or spindle keys • To return to original feed or speed rate, press [100%] feed rate or spindle key • When CNC or canned cycles are initiated, the tool will “rapid” to the starting position • To reduce the rapid speed press the desired percentage Increment Buttons Panel Crank AXIS PAD Shift Origin ALPHA PAD
Using Canned Cycles • Press Hand Jog • RAPID RULES: • Ensure that the drill chuck is out of the way (far right) • Ensure that nothing will intercept the tool during travel • Press the [25%] rapid override • Use D-Pad to navigate to desired cycle tab, press enter • Use D-Pad to navigate to desired sub-tab, press enter • Fill fields and press buttons as prompted by the cycle wizard • If you ‘hold’ the cycle and need to switch to another one, press [Reset] Tabs Sub-Tabs
Cutting Threads Page 1 • Press Hand Jog • RAPID RULES: • Ensure that the drill chuck is out of the way (far right) • Ensure that nothing will intercept the tool during travel • Press the [25%] rapid override • Use D-Pad to navigate to “Threading” cycle tab, press enter • Use D-Pad to navigate to “OD THREAD” or “ID THREAD”, press enter • Spin stock at half of speed indicated on speeds and feeds chart ({speed in RPM} [FWD]) • Touch tool off in the X axis and press [X dia MESUR] Tab Tab
Cutting Threads Page 2 • Stop spindle, measure and input diameter ({measured diameter} [Enter]) • Restart spindle, align tool edge with edge of stock and press [Z face MESUR] • Enter desired threads per inch • Enter desired thread length • Ask Russ or Mentor about Depth of Cut and Feed Rate • Use chart on right side of panel to determine minor diameter • (Major Diameter- 2*thread height) Input Fields
Position indication modes • Use [page up]/[page down] to cycle between modes • Operator: indicates position relative to specified zero’s • Remaining: indicates travel left to reach (programmed) goal position • Machine: indicates position relative to home position • Work G154: Default CNC coordinate system
Tool Offsets (CNC Cycles) • Press Hand Jog • Use D-Pad to navigate to Tool offsets, press [Enter] • Enter desired spindle speed {rpm} with num pad, press [FWD] • Skim surface of part (use X and Z axis cranks to move tool) • Press [X DIA MEASR] or [Z Face MEASR] • For X axis, manually measure diameter and enter with num pad, press [Enter] • Note: Spindle must be spinning to avoid damage to delicate tools X DIAMEASUR Z FACEMEASUR Hand Jog FWD NUM PAD
Using CNC Cycles Page 1 • Ensure that material is secured in the spindle • RAPID RULES: • Ensure that the drill chuck is out of the way (far right) • Ensure that nothing will intercept the tool during travel • Press the [25%] rapid override • Transfer program from Master Cam computer (see MasterCam Tutorial) • Have Mentor or Russ check code • Press [List Prog] and navigate to program with D-pad, Press [Select Prog] MEM List Prog Select Prog Hold
Using CNC Cycles Page 2 • Press [MEM] • Press [Cycle Start] • Pause cycle with [red] Hold button (keep your hand near this when you first use new code) • Cycle can be resumed by navigating to desired block and pressing [green] Cycle Start button • Origin can be specified to G154 or to an alternate coordinate system to allow parts to avoid interrupting the coordinate system of someone else’s part. MEM List Prog Select Prog Cycle Start Hold