Main Menu
Main Menu. Eye-Pal Ace Plus . ABiSee proprietary and Confidential. How to use Eye-Pal Ace Plus Buttons while in Main Menu. Whenever in doubt, press Home Button to return to the Main Menu. Use the Right Wheel to make a selection Use the Left Wheel to zoom in – zoom out the Menu


Main Menu
E N D
Presentation Transcript
Main Menu Eye-Pal Ace Plus ABiSee proprietary and Confidential
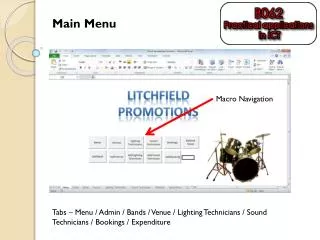
How to use Eye-Pal Ace Plus Buttons while in Main Menu • Whenever in doubt, press Home Button to return to the Main Menu. • Use the Right Wheel to make a selection • Use the Left Wheel to zoom in – zoom out the Menu • Use the Action Button to confirm your selection • Back Button is disabled in the Main Menu Mode. In any other Menus, Back Button brings you one step up in the Menu Tree • Turn Clockwise the Volume Knob to increase the Volume, and turn counter clockwise the Volume Knob to decrease the Volume • Press Central Round Daisy Button to see if your Battery is charged and Your Network is connected. • Left, Right, Top, and Bottom Daisy Buttons are disabled in Main Menu. Wheel Wheel ABiSee proprietary and Confidential
Main Menu – Scan and Read • Scan and Read Function allows you to scan the document and read it instantly. • Scan and Read is the Default action. So all you need to do is to press the Action Button to confirm your selection. • To learn how you can actually scan and read documents, please refer to the Scan & Read Power Point Tutorial. • To return to the Main Menu, press the Home Button ABiSee proprietary and Confidential
Main Menu – Library • Library Function allows you to download, store, and read books from Bookshare. • Press the Home Button to return to the Main Menu • Using your right Wheel, select Library • Confirm your selection by pressing the Action Button • To learn how you may actually browse and download books, please refer to our Eye-Pal Ace Plus features presentation • Press the Home Button to return to the Main Menu ABiSee proprietary and Confidential
Main Menu – Email • Email Function allows you to send and receive emails, browse emails, and attach voice recorded message and scanned pictures to your email. • Press the Home Button to return to the Main Menu • Using your Right Wheel, select E-mail. Confirm your selection by pressing the Action Button. • Learn more about sending and receiving email functions in the Eye-Pal Ace Plus Features presentation. • Press the Home Button to return to the Main Menu. ABiSee proprietary and Confidential
Main Menu – Address Book • Address Book allows you to add new or edit the existing email contacts. • Press the Home Button to Return to the Main Menu • Using your right wheel, select Address Book. Confirm your selection by pressing the Action Button • Learn more about how to add new or edit existing email contacts in the Eye-Pal Ace Plus features presentation • Press the Home Button to return to the Main Menu ABiSee proprietary and Confidential
Main Menu – Calendar – Step 1 • Calendar shows you today’s date and add multiple reminders to your daily schedule. • Press the Home Button to Return to the Main Menu • Using your Right Wheel, select Calendar. Confirm your selection by pressing the Action Button • Once confirmed, the Device will announce the today’s Day, Month, and Year. ABiSee proprietary and Confidential
Main Menu – Calendar – Step 2 • Use your Right Wheel to select “Add Reminder” function. Confirm your selection by pressing the Action Button. • Use your Right Wheel to select the Correct Date. Confirm, by pressing the Action Button. • Use your Right Wheel to select the Time. Confirm by Pressing the Action Button. • Press Action Button again to Record a Message. Press Action Button to stop Recording. Your message will be read back to you. • No additional action needed to return to the Reminders Menu. Use your Right Wheel to select all reminders, next 7 days reminders, next 31 day reminders, or reminders by Day. • Press the Home Button to return to the Main Menu ABiSee proprietary and Confidential
Main Menu – Zoom • Zoom Function allows you to significantly magnify the objects and documents you want to see better. • Press the Home Button to Return to the Main Menu • Using your Right Wheel, select Zoom. Press Action Button to confirm your selection. • The screen acts like a camera – showing you everything you place next to the front of the device. • Adjust your setting using the following buttons: • Action Button – to focus • Right Wheel – to make it darker or lighter • Left Wheel – to Zoom In or Zoom Out • Right and Left Daisy Buttons – to change the Contrast • Press the Home Button to Return to the Main Menu ABiSee proprietary and Confidential
Main Menu – Photo Album • Photo Album function allows you to create multiple albums, upload and store images, view images in different modes and zoom options. • Press the Home Button to return to the Main Menu • Using the Right Wheel, select Photo Album. Press the Action Button to confirm your selection. • The Device will announce the default option: View Album. Besides this option, you will be able to Add Photos to Album, Delete Album, or Rename Album. ABiSee proprietary and Confidential
Main Menu – View Album • After the device announces: View Album, press the Action Button to Confirm. You will be taken to the screen with the existing albums. • Use your Right Wheel to scroll between Albums. Press the Action Button to confirm your selection. • The first image in the collection appears. Use Eye-Pal Ace Plus Buttons to manipulate pictures: • Right Wheel will allow you to jump from one picture to another • Left Wheel will allow you to magnify picture • Once magnified, the picture fits the screen only partially. Use all four Daisy Buttons (Top, Bottom, Left, Right) to move the magnified image. The magnification only last for the current image. Once you jumped to another picture, you’ll need to start the magnification process again. • Back Button returns you to the previous menu. Press it twice to return to the Photo Album Menu. ABiSee proprietary and Confidential
Main Menu – Add Photos to Album – Step 1 • In Photo Album Menu, using the Right Wheel, select “Add Photos to Album”. Confirm your selection by pressing the Action Button. • You’ll be taken to the screen where you’ll see your existing albums and an option to Create New Album. Using the Right Wheel, select the option you need. Confirm your selection by pressing the Action Button. • If you selected one of the existing Albums, you’ll be prompt to insert a device with photos. Eye-Pal Ace Plus has a USB slot, however you may only use USB Flash Drive and no other devices to upload your photos. USB slot is located on the left side of your device and looks like: ABiSee proprietary and Confidential
Main Menu – Add Photos to Album – Step 2 • Or, you may choose an option: “Create New Album”. Press Action Button to Confirm your selection. • You’ll be prompt to press Action Button to record a name of your new Album. Press the Action Button again to stop recording. • You’ll now have your new album added to the list of existing albums. ABiSee proprietary and Confidential
Main Menu – Delete Album • Press the Back Button to return to the Album Menu. • Using your Right Wheel, select Delete Album. Confirm, by pressing the Action Button. • Your device will read you the first Album name. Use the Right Wheel to delete to Album you no longer need. Confirm your selection by pressing the Action Button. • The Device will Announce “Album Deleted!”. • Press the Action Button again to return to the Album Menu. ABiSee proprietary and Confidential
Main Menu – Rename Album • You are in the Photo Album Menu. Using your Right Wheel, select the option “Rename Album.” Press the Action Button to confirm your selection. • Using the Right Wheel, select the album you want to rename. Press the Action button again to confirm your selection. • You’ll be prompt to press action button to record a new name. Record a new name, than press Action Button again to stop recording. Your new name will be read back to you and you will be automatically back to the list of albums. • Press the Back Button to return to the Photo Album Menu. • Press the Home Button to return to the Main Menu ABiSee proprietary and Confidential
Main Menu – Clock • Press the Home Button to return to the Main Menu • Using your Right Wheel, select “Clock” option from the Menu. • Click Action Button to confirm your selection. • The Device will prompt you with the current time. • Press Home Button to return to the Main Menu • You’ll be able to set up your Clock and Alarms in the Settings later on. ABiSee proprietary and Confidential
Main Menu – Settings Select this function from the main menu when you need to change general and system settings. ABiSee proprietary and Confidential
General Settings allows you to change such parameters, as fonts, backgrounds, reading speed and mode, voice, and format. • Status allows you to check the battery, model, version, serial number, and network connectivity. • System Settings allows you to customize main menu, upgrade software, set up Wi-Fi and network accounts, and set data and time. • Reset all settings function will return to the default setting values. • Settings are explained in greater detail in a separate presentation. ABiSee proprietary and Confidential
Main Menu – Help In the Main Menu, please select Help, and confirm your selection by pressing the action Button. Once selected, you’ll hear a voice on the background, explaining to you that when you are in Help Mode, any button you press – allow you to hear the function of this button. To escape from the Help Mode, and go back to the Main Menu, press the Yellow Home Button on top of your device. ABiSee proprietary and Confidential
Main Menu – Conclusion This concludes Eye-Pal Ace Plus Main Menu Presentation. ABiSee proprietary and Confidential
855-354-4080 855-354-4080 For additional information/Demo: info@abisee.com ABiSee, Inc. 30 Sudbury Rd., Unit 1B, Acton, MA 01720. www.ABiSee.com ABiSee proprietary and Confidential