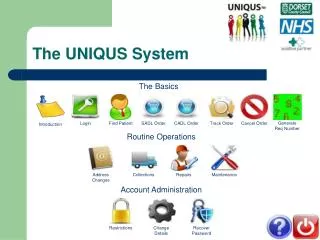
The UNIQUS System
The UNIQUS System. The Basics. Generate Req Number. Login. Find Patient. SADL Order. CADL Order. Track Order. Cancel Order. Introduction. Routine Operations. Address Changes. Collections. Repairs. Maintenance. Account Administration. Restrictions. Change Details. Recover Password.

The UNIQUS System
E N D
Presentation Transcript
The UNIQUS System The Basics Generate Req Number Login Find Patient SADL Order CADL Order Track Order Cancel Order Introduction Routine Operations Address Changes Collections Repairs Maintenance Account Administration Restrictions Change Details Recover Password
Simple Aids for Daily Living (SADLs) Basic Rules • All orders must be put on UNIQUS • For over the Counter Prescriptions use DRM number • For all delivered orders create a Requisition number • You can only order items listed in the catalogue • Items become the property of the client • Clients can dispose of items as they wish • Every client will receive a copy of the client Leaflet following assessment
Complex Aids for Daily Living (CADLs) • Items often have electrical or hydraulic parts and require servicing and maintenance. • Where to find catalogue • How does the rental model work • Collections • Collections of pre-Contract Stock • Gantry and Ceiling Track Hoists
Special Items • Items not listed on the SADLs or CADLs catalogue and are specially designed for a specific client • Not ordered through UNIQUS • A new form will be designed and placed on the website shortly. This will enable the Central Team to carry out the specials order. • The Central Team will keep the prescriber up to date on deliveries etc via email. • The Central Team will put the item on the client’s record. • The cost of the item inclusive delivery will be charged against the appropriate budget holder.
UNIQUS System The Basics
Logging on to UNIQUS • Navigate to www.ices.dorset.nhs.uk • On the left side select “UNIQUS Prescriber Portal” • Enter your PIN Number and password • You are now logged on to UNIQUS
4 – This is your home screen Past orders can be found here Current orders can be found here Expenditure at point of login Any comments, feedback and responses to those can be found here If you are an authorizer, this is where you find any authorization requests Orders input by you still waiting for authorization
On UNIQUS Home Screen click on “Patients” Type in the “Forename” and “Surname” of the client UNIQUS will narrow down the results Click on the green icon next to the patient Patient screen with options opens Finding a client
Find the patient as per previous slides From dropdown menu at the top of patient’s screen select “Make a new delivery for client” and press “Go” Fill all the details at the top Input item(s) code(s) and quantities of if in doubt, browse the catalogue and add the items from there Select the speed for the order. Select the retailer group (only applicable for deliveries). If the item has a default tick on install, please select an installation postcode. Add any instructions to the activity Input requisition number. If it is an over the counter prescription, number comes from prescription pad, otherwise, please generate a number on the “prescription number generator” on the IESD website. Click “Place order”. You will receive a confirmation message and the option to print the prescription or attach a document to it. Creating a SADL Order
2 – From dropdown menu at the top of patient’s screen select “Make a new delivery for client” and press “Go”
4 – Input item(s) code(s) and quantities or if in doubt, browse the catalogue and add the items from there
6 – Select the retailer group (only applicable for deliveries). If the item has a default tick on install, please select an installation postcode.
8 – Input requisition number. If it is an over the counter prescription, number comes from prescription pad, otherwise, please generate a number on the “prescription number generator” n the IESD website.
9 – Click “Place order”. You will receive a confirmation message and the option to print the prescription or attach a document to it. (Quotes, installation diagrams, etc.)
Find the patient as per previous slides From dropdown menu at the top of patient’s screen select “Make a new delivery for client” and press “Go” Fill all the details at the top Input item(s) code(s) and quantities or if in doubt, browse the catalogue and add the items from there Select the loan period, if you know roughly when the equipment will no longer be necessary. Select the speed for the order. Add any instructions to the activity Input requisition number. Generate a number on the “prescription number generator” on the IESD website. Click “Place order”. You will receive a confirmation message and the option to print the prescription or attach a document to it. Creating a CADL Order
2 – From dropdown menu at the top of patient’s screen select “Make a new delivery for client” and press “Go”
4 – Input item(s) code(s) and quantities, or if in doubt browse the catalogue and add the items from there
6 – Select the loan period, if you know roughly when the equipment will no longer be necessary.
8 – Input requisition number. Generate a number on the “prescription number generator” on the IESD website.
9 – Click “Place order”. You will receive a confirmation message and the option to print the prescription or attach a document to it.(Quotes, installation diagrams, etc.)
Click on “Track Orders” from your home screen Click on “Track your orders” if it is an order done by yourself Click on “Track orders by client” to search for orders for a specific client Click “Track orders by order number/requisition number” if you have any of those Tracking an Order
Click on “Track Orders” from your home screen Click “Track orders by order number/requisition number” Input the Order number/requisition number and press search A new screen will come up with the order and you should click on it On the order screen click on the section labelled “Item details” If the retailer/PLUSS has not locked the order you can cancel the order by clicking the “Cancel Activity” button. Cancelling an Order
3 – Input the Order number/requisition number and press search
4 – A new screen will come up with the order and you click on it
5 – On the order screen click on the section labelled “Item details”
6 – If the retailer/PLUSS has now locked the order you can cancel the order by clicking the “Cancel Activity” button. If this button is greyed out you need to get in contact with the Central Team
Navigate to www.ices.dorset.nhs.uk Click on “UNIQUS Prescription number generator” A unique number is generated for you. Generating a prescription number
3 - A unique number is generated for you. Please note that if you are inputting more than one prescription, you need to refresh the page by either pressing F5 or clicking refresh on your browser window.
UNIQUS System Routine Operations
Find the patient as per previous slides From dropdown menu at the top of patient’s screen select “Add an extra address to a client” and press “Go” Click on “Add New Address” Input all details and press “Add as new Address”. If this is the current address, tick the box “Make this address as default” Changing a client’s address