Download
1 / 18
180 likes | 202 Vues
This instructional guide provides step-by-step instructions for accessing and using the online entry system for reporting nursing facility admissions. It includes information on logging in, changing passwords, entering resident data, and submitting admission notices.

E N D
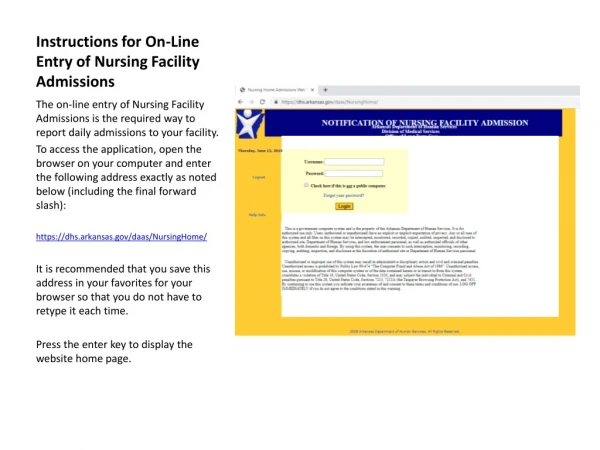
Instructions for On-Line Entry of Nursing Facility Admissions The on-line entry of Nursing Facility Admissions is the required way to report daily admissions to your facility. To access the application, open the browser on your computer and enter the following address exactly as noted below (including the final forward slash): https://dhs.arkansas.gov/daas/NursingHome/ It is recommended that you save this address in your favorites for your browser so that you do not have to retype it each time. Press the enter key to display the website home page.
SIGN IN SCREEN User name: Your user name is your facility’s four digit vendor code. Password: If you do not have a password, please contact Lori at 501-508-8922. A default password will be set for you to access the site and establish your password.
The next step After you enter the user name and password and click Enter, you will be presented with this display. You must change your password so that the initial, generic password is no longer valid. Click on Yes.
Create your new password Type the generic password in the field for Old Password. For security purposes, a complex password is required which must be at least 8 characters in length and contain at least one upper case letter, one lower case letter, one number, and one character or punctuation mark. The new password must be entered twice to confirm. Click on Change Password.
Create your new password continued Once you have clicked on Change Password, the system will determine if you have entered a properly formed password. If the password does not meet the criteria, you will see a display message to that affect. You must construct a new password. If the password is properly formed, you will receive a message that the password has been changed. You must now log in with the new password. Enter your new password and click Login. You will be locked out of the system if there are three incorrect attempts at password entry. Contact the administrator to unlock your account.
Beginning Data Entry For Notice of Admission, enter resident’s data. All fields are required. For dates, you must use the slash (/) to separate the month, day, and year. For telephone numbers, use the hyphen (-). Include all relevant data for the resident’s designated contact person.
Data entry continued The county field is automatically populated for you. Do not use dashes when entering the social security number. A referral date is required. This is the date when the new resident was referred to your facility. If the resident does not have a Medicaid ID #, enter not applicable (na or NA); do not use a hyphen or slash between letters.
Indicate the type of placement by clicking on the appropriate category. If Other, provide additional information . For example: Respite Care Enter the resident’s admission date. Indicate payment source; click all that apply.
Options Counseling Desired? If the resident or family is not interested in receiving information about long term care options, click the box stating “I DO NOT WISH TO RECEIVE LONG TERM CARE OPTIONS COUNSELING”. If there is interest, do not click. Click on the appropriate area to indicate If the resident or designated representative has read this form. Enter your name; the date and time of data entry will automatically be inserted for you.
Remember to click on the appropriate boxes if Resident’s Representative and Facility Representative have signed a copy of this form.
What if something is wrong? When you have completed the data entry, click on Confirm Notice Admission If there are errors in the data entry or all fields are not filled, you will see indicators of the incorrect or missing information at the bottom of the form, as well as beside the field which must be corrected. When all data is correct, click on Confirm Notice Admission
Second Screen Once all data is correct and you have clicked on Confirm Notice Admission , you will see a second screen which is identical to the first with the exception that there are two buttons at the bottom of the screen: Back to Change and Submit+Print. Clicking on Back to Change provides you with the opportunity to review the information before submission. Clicking on Submit +Print will send the information to the data base.
Print a Copy It will also bring up a “Print” box so that you can print a copy of the form for your file. Click on Print to send the form to your printer or Cancel if you do not need a copy of the form.
Close Out Close this screen.
The Next Step If you have additional admissions to submit, click on Back to Notice of Admission. You will be returned to the first screen for data entry. If you want to check that the information entered is in the data base, click View History.
View History This will provide you with a listing of all individuals at your facility whose data has been submitted to the website. If an admissions record is not found, it did not reach the data base and you will need to reenter the information. When you have completed your data entry or review of history, click Logout.
FYI At any time, you may view also view the history of your facility’s admissions by clicking on View History of Admissions at the top, left of the first screen.
For Questions, Problems, Password Reset, and Other Website Issues Lori Raines 501-508-8922 Lori.Raines@arkansas.gov