Tracheostomy Care
Tracheostomy Care. What is a Tracheostomy?. “ A surgical opening in the anterior wall of the trachea to facilitate ventilation” Surgical or Percutaneous. Tracheostomy. Anatomy of the trachea

Tracheostomy Care
E N D
Presentation Transcript
What is a Tracheostomy? “ A surgical opening in the anterior wall of the trachea to facilitate ventilation” Surgical or Percutaneous
Anatomy of the trachea • The trachea is a fibromuscular tube supported by 20 hyaline cartilages which are opened posteriorly. • The soft tissue posterior wall is in contact with the oesophagus. • Three layers of tissue clothe the cartilages: • A fibrous elastic outer layer. • A middle layer of cartilage and bands of smooth muscle that wind around the trachea. There is some tissue containing blood and lymph vessels and autonomic nerves. • An inner lining consisting of delicate ciliated columnar epithelium containing mucous secreting globlet cells. • The blood supply is primarily supported by the bracheocephalic artery and through the inferior thyroid and bronchial arteries. • The nerve supply is by parasympathetic and sympathetic fibres.The sympathetic system acts in the flight or fight response stimulated by adrenaline. It causes an increase in heart rate and relaxes the bronchi and muscle of the gut wall.The parasympathetic supply to the trachea is by the recurrent laryngeal nerve – a branch of the vagus nerve – it can slow the heart rate, increase the acidity to the stomach and constrict the bronchi. (Brunt, (1986), p33-34)
Position • The trachea begins just below the larynx at approximately the 6th cervical vertebra. • It is flexible to accommodate varying depths of ventilation, coughing and speech. The length and width is continually changing to accommodate head, neck and diaphragmatic movements. • In adults it is 12-16 cm long and 13-16 mm wide in women and 16-20 mm wide in men. (Minsley and Wren 1996) • It is slightly to the right of the midline and divides at the carina into the right and left bronchi. • The carina lies under the junction of the sternum at the level of the 4th thoracic vertebra. (Kumar and Clark, 1994 p 631)
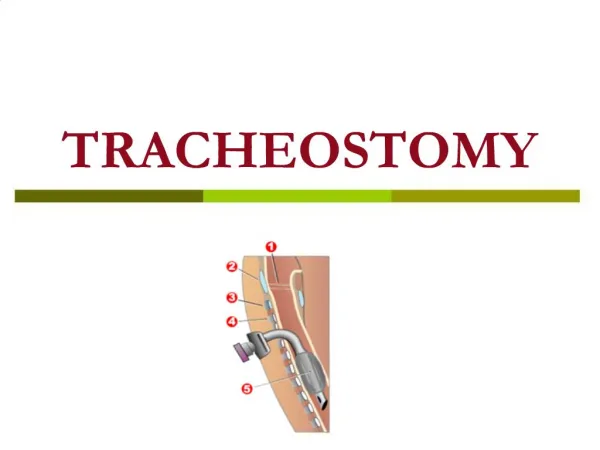
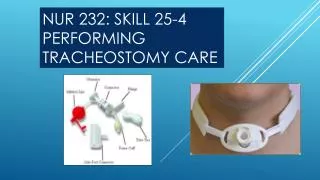
Tracheostomy TRACHEOSTOMY TUBES All tracheostomy tubes consist of a main shaft and a neckplate or flange. The flange rests between the clavicles. Holes on each side allow you to attach tracheostomy ties to secure the tube in place. Tubes are made of semi-flexible plastic, rigid plastic or metal. Semi-flexible plastic tubes conform to the patients’ anatomy during movement – good for patients with tracheal deviations. Rigid tubes are typically used when neck swelling is a problem. The tubes don’t bend or collapse with local oedema. Plastic tubes have a built-in 15mm adaptor that extends from the neck plate. This allows respiratory equipment e.g. an ambubag, a T piece oxygen delivery system or a mechanical ventilator, to be attached. Synthetic tubes are made from a non-irritant substance.
The most commonly used cuffed tube in the hospital is the Portex Blue-Line Profile Cuffed Tube, available from stores – cost approximately £13 each. Cuffed Portex tubes, with inner tubes are now available in stores and cost approximately £35.
Types of Tubes • Cuffed tubes • Un-cuffed • Fenestrated • Inner cannula • Adjustable flange • PVC, Silver, Silicone and Rubber • Mini Tracheostomies
Cuffed Tubes • Allows ventilation and prevents aspiration • High cuff pressure can be damaging • Check pilot cuff • DO NOT BLOCK THIS TUBE
Cuffed Tubes • Tubes with inflatable cuffs • Inflatable cuffs are used when an air-tight seal is required around the tube. The cuff is not to hold the tube in position – it is usually required: • when the patient is unable to breathe on their own and requires artificial respiration. Unless there is an air-tight seal around the tube, the air being blown into the lungs by the respirator escapes around the sides of the tubes.or • when an air-tight seal is necessary to prevent blood and other secretions from running down the sides of the tracheostomy tube into the lungs. During and following surgery to the head and neck, such complications are a real danger and it is for this reason that a cuffed polythene tube is used for the first couple of days post-operatively.
Cuffed Tubes • Cuffed tubes have an inflation line leading to the cuff and pilot balloon that inflates when the cuff contains air, giving an indication of the volume of air in the cuff. What the pilot balloon does not tell you is how much air pressure is in the cuff. You can confirm the correct inflation by listening for air leak or by measuring intracuff pressure with a manometer, (Weilitz and Dettenmeiir, 1994). The presence of an air leak may indicate that the cuff is inadequately inflated.
Disadvantages of Cuffed Tubes • Traditionally single tubes with no inner tubes are used. These can easily become blocked. Initially, medical staff prefer tubes to be in situ for 7-10 days before changing, to allow a tract to be established for ease of changing. • The cuff exerts a pressure on the surrounding tissues when it is inflated. In time, this pressure can cause damage to the tissues, resulting in necrosis, a fistula or stenosis in the trachea.Hourly deflation of the cuff was thought to lessen tracheal damage but this was shown to be ineffective.(Powaser, 1976, Bryant et al, 1971, Jenicek, 1973). Over inflation of low pressure cuffs, even by the addition of only a few mls of air above the minimal occluding volume can dramatically raise intracuff pressures, (Regan, 1988). If an adequate seal cannot be obtained with such pressures it may be necessary to switch to a larger sized tracheostomy. An accurate way of checking the pressure is to use a manometer (Caruna 1990). • The patient cannot speak when the cuff is inflated as no air can go past the vocal cords – this has a massive psychological impact on the patient.If a patient with a cuffed tube can speak it could be a sign that the tube is displaced, or the cuff inadequately inflated.
Un-cuffed Tubes • Maintains airway once aspiration risk has passed • Increase airflow to the larynx • Which patients: • Long term tracheostomy pts • Patients who do not require a seal • Paediatrics
Uncuffed Tubes • Unable to maintain seal in an emergency situation
Fenestrated Tube • Increases airflow to larynx/ vocalisation • Cuffed or un-cuffed • These are used for weaning • Enables phonation (speaking) • The fenestrated tube can be used as such if the patient is tolerating the cuff down • To suction always use the non fenestrated inner tube for suctioning • Fenestrated are the only tubes (when inner fenestrated tube insitu and cuff is down) that can be intentionally occluded
Inner Cannula • Allows maintenance of tube patency • Aids tube hygiene • Close observation • Allows fenestrated tubes to be used earlier
Inner Cannula • Use of an inner cannula: • The inner cannula provides a vital safeguard against life-threatening complications of tube obstruction in a cuffed tube and must be present at all times. Tracheostomy tubes without an inner cannula should be avoided wherever possible particularly in the ward environment; this may, however, be impossible to achieve with all patients.
Changing the Inner Cannula • If copious secretions- check every 4 hours (more if indicated) • Remove and clean using sterile water and replace as soon as possible • If tube is kinked or damaged replace with new sterile inner tube • Other issues- brushes, cleaning fluids, infection and storage of inner cannula
Adjustable Flange • Provide a longer tube – offer secure placement of tube in a deep-set trachea • Essential for patients with difficult anatomy and on whom the insertion will be complicated; insertion of this tube is usually via the surgical technique (considered to be an unsuitable tube for the percutaneous insertion technique) • The Portex PVC adjustable flange tube does not have an inner cannula. • These tubes are inserted in patients with very difficult anatomy and therefore subsequent tube changes should be considered carefully.
Silver Negus • Metal Tracheostomy Tubes • These are made of silver because the metal is inert and does not irritate the tissues. The most commonly used silver tube is the ‘Silver-Negus’. The sizes of the tubes for adults vary from 28-36 FG. The letters FG stand for ‘French gauge’. The number represents the circumference of the inner tube measured in millimetres. As a rough guide, the FG size is 4 times the portex size. • The tubes have a normal inner tube and a speaking tube with a small valve on. • Speaking tubes should not be used to sleep in because of the danger of the valve blocking and occluding the airway. Silver tubes cost approximately £200 each. Each set is individual and pieces are not interchangeable. If a piece is lost it can cost £100 at least to replace. The tubes also need repairing and maintaining occasionally. Manufacturers of plastic tubes claim silver tubes are not as comfortable as plastic but they have no evidence to support this.
Mini Tracheostomy • Minitracheostomy (cricothyroidotomy) is for the treatment or prevention of sputum retention after thoracotomy, laparotomy or neurological insult. It is an alternative to naso-laryngeal suction or regular flexible bronchoscopy. • A cannula with an internal diametre of 4 mm is inserted.
Mini Tracheostomy • Patient able to breathe normally • Patient can talk and eat / drink • The tube does not prevent expectoration Use only size 10 or less suction catheter. Suction will take longer but patient can breathe during the procedure
Deflating the Cuff • Why? • To assess the patient’s ability to maintain their own airway. • To assess the patient’s ability to cope with their secretions. • Follow trache guidelines ie. Cuff down 24 hours prior to decannulation • Blue dye test should be performed at this stage to assess swallow.
Deflating the Cuff • Who? • Doctor, nurse or physio, who are competent. • How?
Removing the Tracheostomy Tube • When? • Joint decision with doctor, nurses + physio. • Following tracheostomy guidelines: • (1) able to expectorate independently. • (2) minimum of 1 deep suction per shift. • (3) no sign of chest infection. • (4) FiO2 of less than 60%. • (5) Deflation of cuff for more than 24 hours.
Removing the Tracheostomy Tube • Who? • Doctor, Nurse or Physio who are competent. • How? • Ensure cuff fully deflated • Explanation to patient • Equipment – dressing, gauze, O2 mask, stitch cutter. • Oximeter