DNS Basics: Resolve IPs, Configurations, and Commands
Learn about DNS, configuring DNS servers, testing domain names, DNS resolution methods, and how to start and configure a DNS server.

DNS Basics: Resolve IPs, Configurations, and Commands
E N D
Presentation Transcript
Resolve IP to a Name /etc/hosts • The /etc/hosts file is just a list of IP addresses and their corresponding server names. • Your server will check this file before referencing DNS. • Add following contents to your /etc/hosts: • 68.142.197.84 myyahoo • You can open browser and type ‘myyahoo’ in the URL. • Usually use to resolve IP addresses of other hosts in the same network.
Basic Commands to test domain name • host www.vtc.edu.hk • The host command accepts arguments that are either the fully qualified domain name or the IP address of the server when providing results. • host 202.75.80.237 • To perform a reverse lookup • nslookup www.vtc.edu.hk • Same result as host but can be run in WindowsXP
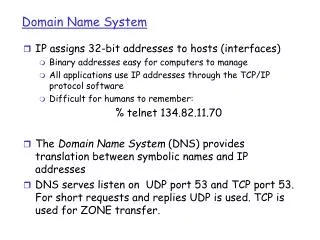
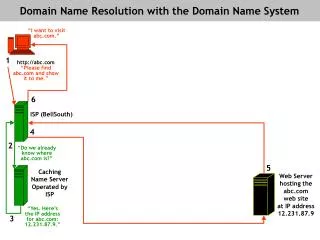
Basic Concept of DNS • Domain Name System (DNS) converts the name of a Web site (www.vtc.edu.hk) to an IP address (202.75.80.237). • DNS Clients • A DNS client doesn't store DNS information; it must always refer to a DNS server to get it. • The only DNS configuration file for a DNS client is the /etc/resolv.conf .
Authoritative DNS Servers • Authoritative servers provide the definitive information for your DNS domain • There are 13 root authoritative DNS servers (super duper authorities) that all DNS servers query first. • For example, when you register your domain my-site.com, you are actually inserting a record on the .com DNS servers.
DNS Caching Name Server • Most servers don't ask authoritative servers for DNS directly, they usually ask a caching DNS server. • The caching DNS servers then store (or cache), the most frequently requested information to reduce the lookup overhead.
Forward, reverse lookup • Forward Lookup • DNS resolution maps a fully qualified domain name (FQDN), such as www.vtc.edu.hk, to an IP address. • Reverse Lookup • DNS can determining the fully qualified domain name associated with an IP address. • Many different Web sites can map to a single IP address, but the reverse isn't true.
Start DNS server • Use the ‘chkconfig’ command to configure DNS to start at boot: • chkconfig named on • Use ‘service named’ to start,stop, and restart DNS after booting: • service named start • service named stop • service named restart • Configuration file: /etc/named.conf
Configure a Cache-Only DNS server • Change the named.conf to: • pid-file • Process ID file, filename to store its processes. options { pid-file "/var/run/named/named.pid"; forward only; forwarders { 168.95.1.1; 139.175.10.20; }; allow-query {any;} allow-transfer { none; }; };
Configure a Cache-Only DNS server(2) • forward only • Cache Only, no other function. • forwarders • Real DNS servers’ IP address. • allow-query {any;} • Allow other hosts to query your DNS server. • allow-transfer {none;} • Do not allow other DNS server to copy your DNS server’s data.
Configuring named.conf • named.conf only contains the information of ‘Zone’. • Each ‘Zone’ should contain a forward lookup zone file and a reverse lookup file. • All these files will store in ‘/var/named’ (by default, you can change it) • A well defined named.conf and a group of Zone files can let you easily setup your DNS.
Configuring named.conf(2) • root ‘.’ Zone • A file which connect to 13 root authoritative DNS servers. • Zone filename is “named.ca” • type hint; • ‘Type’ for root zones. • You can find this file in /var/named. zone "." IN { type hint; file "named.ca"; };
Configuring named.conf(3) • Zone “localdomain” • A sample zone for your local network. • allow-update {none;} • Do not allow to update this zone to root DNS. • Omit this line for a REAL ZONE. zone "localdomain" IN { type master; file "localdomain.zone"; allow-update { none; }; };
Configuring named.conf(4) • Reverse Zone for “localdomain” • ‘in-addr.arpa’ is the predefined zone name for a fixed IP address. zone "0.0.127.in-addr.arpa" IN { type master; file "named.local"; allow-update { none; }; };
Configuring named.conf(5) • To create a Virtual Zone “alanpo.com” for network 192.168.1.0/24, add these statements to named.conf: zone "alanpo.com" { type master; file "named.alanpo.com"; }; zone "1.168.192.in-addr.arpa" { type master; file "named.192.168.1"; };
Configuring Zone • Read the content of “localdomain.zone”: • TTL 86400 • Time to Live Value, default is 86400 seconds • The live time of this DNS record in a Cache DNS Server. • Other values: 3D (3 days), 3W (3 weeks) or 3M (3 months) $TTL 86400 @ IN SOA localhost root ( 42 ; serial (d. adams) 3H ; refresh 15M ; retry 1W ; expiry 1D ) ; minimum IN NS localhost localhost IN A 127.0.0.1
Configuring Zone(2) • The SOA Record • The first resource record is the Start of Authority (SOA) record, which contains general administrative and control information about the domain. • The format is: • Since the format is too long, usually we can use parenthesis to change them to multi lines and give a comment after a ‘;’. Name Class Type Name-Server Email-Address Serial-No Refresh Retry Expiry Minimum-TTL
Configuring Zone(4) • NS, MX, A And CNAME Records
Configuring Zone(5) • Zone file for “alanpo.com” (filename is “named.alanpo.com”) $TTL 3D @ IN SOA ns1.alanpo.com. root.ns1.alanpo.com. ( 2006070101 ; Serial 8H ; Refresh 12H ; Retry 1W ; Expire 1D ) ; minimum @ IN NS ns1.alanpo.com. @ IN MX 10 ns1.alanpo.com. ns1 IN A 192.168.1.254 www IN CNAME ns1 ftp IN CNAME ns1 forum IN A 192.168.1.253
Configuring Zone(6) • Reverse Zone file for “named.192.168.1” $TTL 3D @ IN SOA ns1.alanpo.com. root.ns1.alanpo.com. ( 2006070102 ; Serial 8H ; Refresh 12H ; Retry 1W ; Expire 1D ) ; minimum @ IN NS ns1.alanpo.com. 254 IN PTR ns1.alanpo.com. 253 IN PTR forum.alanpo.com.
Slave DNS Server • A Slave DNS server can decrease the workload of Master DNS server (load balancing). • Add ‘allow-transfer’ to the named.conf of Master. • 192.168.1.252 is the IP address of Slave. zone "alanpo.com" { type master; file "named.alanpo.com"; allow-transfer { 192.168.1.252; }; }; zone "1.168.192.in-addr.arpa" { type master; file "named.192.168.1"; allow-transfer { 192.168.1.252; }; };
Slave DNS Server(2) • Copy the named.conf from Master and then change the zone: • Zone file is not required in Slave. zone "alanpo.com" { type slave; file "named.alanpo.com"; masters { 192.168.1.254; }; }; zone "1.168.192.in-addr.arpa" { type slave; file "named.192.168.1"; masters { 192.168.1.254; }; };
Configuration of DNS Client • Configuration file of DNS Client is /etc/resolv.conf. • Add your private DNS at the first line. • Can you find any security problem in resolv.conf?
Firewall • Cars have a component that separates the engine block from the passenger compartment. • If the car explodes, this component protects the passengers. • This component is known as Firewall. • A firewall in computer terms protects your network from invalid access. • Most firewalls are filtering incoming datagrams based upon the datagrams source address, destination address, higher level protocol. • This kind of firewall is known as ‘packet filtering’.
ICF in WindowsXP • Microsoft XP designed the Internet Connection Firewall (ICF) for use in the home and small businesses. • To enable and configure ICF, do the following: • Go to ‘Control Panel’ and then click ‘Network’ Connection. • Click the network connection that you want to protect. • Under ‘Network Tasks’, click ‘Change Settings Of This Connection’. • In the ‘Advanced’ tab, select the ‘Protect My Computer And Network By Limiting Or Preventing Access To This Computer From The Internet’ check box. • To configure ICF, click ‘Settings’.
ICF in WindowsXP(3) • The ‘Services’ tab allows you to specify the services running on your network that Internet users can access. • The ‘Security Logging’ tab allows you to specify whether or not you want to log dropped packets and successful connections. • The ‘ICMP’ tab allows you to select which requests for information from the Internet this computer will respond to.
Important ICF considerations • ICF should be enabled on your shared Internet connection if your network is using ICS to provide Internet access to multiple computers. • ICF also protects a single computer that is connected to the Internet with a cable modem, a DSL modem, or a dial-up modem. • ICF should not be enabled on VPN connections or on client computers; it will interfere with file and printer sharing.
IP Filter in Linux • The IP datagram is received through a network adapter (usually known as eth0). (1) • The incoming IP datagram is examined to determine if it is destined for a process on this machine. • If the datagram is for this machine, it is processed locally.(2)
IP Filter in Linux (2) • If it is not destined for this machine, a search is made of the routing table for an appropriate route and the datagram is forwarded to the appropriate interface or dropped if no route can be found. (3) • Datagrams from local processes are sent to the routing software for forwarding to the appropriate interface. (4) • The outgoing IP datagram is examined to determine if there is a valid route for it to take, if not, it is dropped. • The IP datagram is transmitted out through a PPP driver or another network adapter (usually known as eth1). (5)
IP Chains in Linux (3) • INPUT and OUTPUT chain • The flows 1→2 and 4→5 represent the data input and output flows of a network program running on our local host. • FORWARD chain • The flow 1→3→5 represents our machine routing data (perform as a router) between a host on our Ethernet network to a host reachable via our PPP link (or other interface, e.g. another network adapter eth1).
iptables • The iptables is used to configure both IP filtering (filter) and Network Address Translation (nat). • Five built-in chains: • The INPUT and FORWARD chains are available for the filter table. • The PREROUTING and POSTROUTING chains are available for the nat table. • The OUTPUT chain is available for both tables. • In this chapter we'll discuss only the filter table. • The general syntax of most iptables commands is: • iptables command rule-specification extensions
Commands of iptables • -A chain • Append one or more rules to the end of the nominated chain. • -I chain rulenum • Insert one or more rules to the start of the nominated chain. • -D chain • Delete one or more rules from the specified chain matching the rule specification. • -D chain rulenum • Delete the rule residing at position rulenum in the specified chain. • Rule positions start at 1 for the first rule in the chain.
Commands of iptables(2) • -R chain rulenum • Replace the rule residing at position rulenum in the specific chain with the supplied rule specification. • -C chain • Check the datagram described by the rule specification against the specific chain. • -L [chain] • List the rules of the specified chain, or for all chains if no chain is specified. • -F [chain] • Flush the rules of the specified chain, or for all chains if no chain is specified.
Commands of iptables(3) • -X [chain] • Delete the specified user-defined chain, or all user-defined chains if no chain is specified. • -Z [chain] • Zero the datagram and byte counters for all rules of the specified chain, or for all chains if no chain is specified. • -P chain policy • Set the default policy of the specified chain to the specified policy. • Valid firewalling policies are ACCEPT, DROP.
Rule specification parameters • -p [!]protocol • Specifies the protocol of the datagram that will match this rule. Valid protocol names are tcp, udp, icmp. • If the ‘!’ character is supplied, the rule is negated and the datagram will match any protocol other than the specified protocol. • If this parameter isn't supplied, it will default to match all protocols.
Rule specification parameters(2) • -s [!]address[/mask] • Specifies the source address of the datagram that will match this rule. • The address may be supplied as a hostname, a network name, or an IP address. • The optional mask is the netmask to use and may be supplied either in the traditional form (e.g., /255.255.255.0) or in the modern form (e.g., /24). • -d [!]address[/mask] • Specifies the destination address and port of the datagram that will match this rule.
Rule specification parameters(3) • -j target • Specifies what action to take when this rule matches. • Valid targets are ACCEPT, DROP. • -i [!]interface-name • Specifies the interface on which the datagram was received, e.g. eth0. • -o [!]interface-name • Specifies the interface on which the datagram is to be transmitted.
Extensions • --sport [!] [port[:port]] • Specifies the port that the datagram source must be using to match this rule. • Ports may be specified as a range by specifying the upper and lower limits of the range using the colon as a delimiter, e.g. 20:25. • Again, the ! character may be used to negate the values. • --dport [!] [port[:port]] • Specifies the port that the datagram destination must be using to match this rule.
Extensions(2) • --icmp-type [!] typename • Specifies the ICMP message type that this rule will match. • Some valid names are: echo-request, echo-reply, source-quench, time-exceeded, destination-unreachable, network-unreachable, host-unreachable, protocol-unreachable, and port-unreachable. • --mac-source [!] address • Specifies the host's Ethernet address that transmitted the datagram that this rule will match.
Examples • Clear all the chains. • iptables -F OUTPUT • iptables -F FORWARD • iptables -F INPUT • iptables –X • By default, do not allow any connection! • iptables -P INPUT DROP • iptables -P OUTPUT DROP • iptables -P FORWARD DROP
Examples(2) • Allow all traffic at the interface lo. • iptables -A INPUT -i lo -j ACCEPT • iptables -A OUTPUT -i lo -j ACCEPT • Open ports 20 to 23 for INPUT and OUTPUT tables to the all hosts. • iptables -A INPUT -p tcp --dport 20:23 -j ACCEPT • iptables -A OUTPUT -p tcp --sport 20:23 -j ACCEPT • Open port 80 for INPUT and OUTPUT tables to the network 192.168.1.0/24 • iptables -A INPUT -p tcp -s 192.168.1.0/24 --dport 80 -j ACCEPT • iptables -A OUTPUT -p tcp -d 192.168.1.0/24 --sport 80 -j ACCEPT • Allow other hosts to ‘ping’ this machine • iptables -A INPUT -p icmp --icmp-type 8 -j ACCEPT