Download

1 / 4
50 likes | 425 Vues
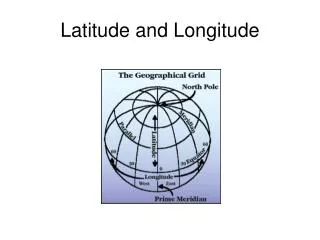
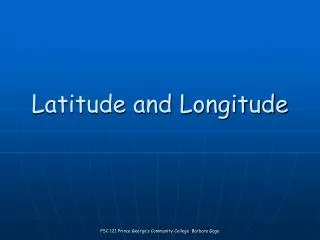
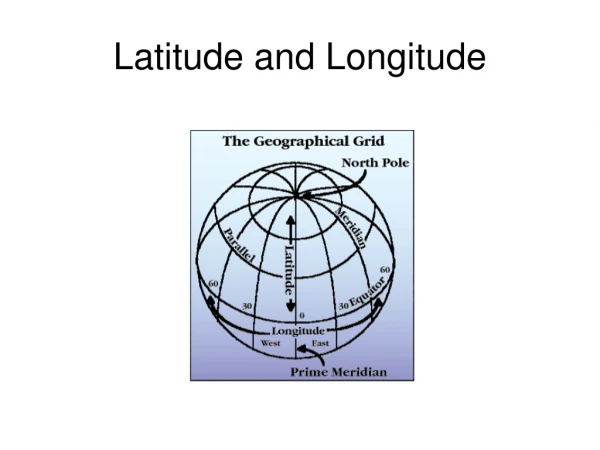
MAKE AN EQUATORIAL SUNDIAL For Your Latitude and Longitude. North American Sundial Society Created by: R.L. Kellogg rkellogg@comcast.net May, 2006 Modified by Larry McDavid lmcdavid@lmceng.com June, 2006

E N D
MAKE AN EQUATORIAL SUNDIALFor Your Latitude and Longitude North American Sundial Society Created by: R.L. Kellogg rkellogg@comcast.net May, 2006 Modified by Larry McDavid lmcdavid@lmceng.com June, 2006 This unusual PowerPoint presentation uses macros to create your own horizontal sundial. First, check your PowerPoint security setting: click on “Tools,” “Macro,” “Security…” Set the security level to “medium.” • Start PowerPoint and open Make an Equatorial Sundial. When the security dialog box appears, click “Enable Macros.” • Before starting the slide show, on Slide 2 (the sundial construction slide) you may optionally click on “NASS” and enter your name in the text box. Do not delete this box nor move it. • In the top Menu Bar of PowerPoint, select “Slide Show” and “View Show.” Advance to Slide 2. • Under Latitude, click the up and down arrows to select your latitude (+ for north, - for south). Under Longitude, click the up and down arrows to select your longitude (+ for east of Greenwich, - for west of Greenwich, including all of the United States) • Click the “Draw Dial” button. PowerPoint will draw your sundial. • You may select other latitudes and longitudes (click up/down arrows) and “Draw Dial” again and again. • End the slide show by pressing ESC on the keyboard. You may print your sundial by clicking the printer icon in the top toolbar. • Cut out the printed sundial plates. The one with North America is for summer. The one with South America is for winter. Glue these back to back so that the 12 am and 12 pm hours algin. • Place the Sundial in a sunny spot with the gnomon pointed toward true North (not the same as magnetic north). Read the time from the gnomon shadow. This is “local solar time” and may differ from your clock “standard time” by as much as 45 minutes. • Use the Equation of Time graph on Slide 4 to correct the sundial time to standard time. The shape of the earth’s orbit around the sun and the tilt of the earth’s axis cause a time difference that varies throughout each year. • Finally, if Daylight Saving or summer time is in effect, you must add one whole hour to the sundial time.
Cut a Rod This Size to Make Support and Gnomon ... Push Through Center of Dial Support End of Gnomon Gnomon 12 12 11 1 1 11 10 2 2 10 9 3 3 9 8 4 4 8 7 5 5 7 6 6 6 6 5 7 7 5 4 8 8 4 3 9 9 3 2 10 10 2 1 11 11 1 12 12 NASS Fold Line Lon° Lat ° Cut out, Fold Two Dial Faces Together at Mid Line Draw Dial Remember that Northern Hemisphere is Front 38 -77 With the Gnomon Rod Sticking Out (Only the Blue Part) Clear
Please do not alter or move maps Maps on this slide are used as “master maps” and are automatically copied by power point to the proceeding slide, including longitude rotation