Download
1 / 23
230 likes | 450 Vues
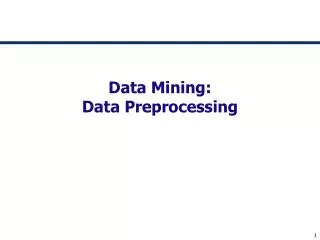
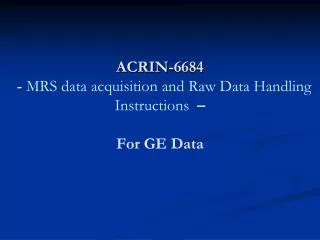
ACRIN-6684 - MRS data acquisition and Raw Data Handling Instructions – For GE Data. In vivo MR Spectroscopy. Representative MRS of a normal human brain @3T. NAA. Cho. Cr. Lipids, macromolecules. Glu/ Gln. MI. Proton MRS is able to detect the following metabolites:

E N D
ACRIN-6684 - MRS data acquisition and Raw Data Handling Instructions –For GE Data
In vivo MR Spectroscopy Representative MRS of a normal human brain @3T NAA Cho Cr Lipids, macromolecules Glu/ Gln MI
Proton MRS is able to detect the following metabolites: • N-Acetyl Aspartate (NAA) at 2 ppm: Marker of neuronal density and viability • Creatine (Cr) at 3 ppm: Energy metabolism, generation of ATP • Choline (Cho) at 3.2 ppm: Pathological alterations in membrane turnover, increased in tumors • Lipids (Lip) between 0.8 – 1.5 ppm: Breakdown of tissue, elevated in brain tumors - lipids indicate necrosis
Cho NAA Cr Lac • Lactate (Lac) at 1.3 ppm, inverted at 144ms: produced by an anaerobic metabolism, found in tumor containing zones of necrosis
The Sequence 3D Volumetric Spectroscopy preferred 2D CSI Spectroscopy is acceptable
Optimal Voxel Placement The ROI will be placed at the center of the enhancing tumor covering the lesion and the normal brain as much as possible but excluding the subcutaneous fat and sinuses.
Suboptimal Voxel Placement Proximity to sinuses can result in signal broadening and susceptibility artifacts Proximity to scull can result in contaminating lipid signal
Parameters • TR ~1100 ms and TE 144 ms, • Phase encoding arrays 12 x 12 x 8: • For GE scanners: Freq = 12, Phase = 12 and Locs per Slab = 8 • FOV > 160 mm2 • Click Graphic Rx and select • Spacing: 10 • Voxel Thickness: e.g. 60.0 • Make smaller than the width of the 8 slabs
Saturation Bands • Click SAT and place up to 6 SAT bands to eliminate signal from subcutaneous fat • Thickness of SAT bands 4 – 5 cm
Parameters • To accomplish partial or elliptical k-space sampling reduce NEX below 1 (there will be a drop down menu) which will reduce the acquisition time. • Prescan is recommended before the acquisition to check for full width at half maximum (FWHM)
Shimming “Shimming” = adjusting the magnetic field to make it more homogeneous 1.5T: Signal line width or full width at half maximum (FWHM): <15 Hz for 3D MRSI 3 T: FWHM < 25 Hz for 3D MRSI NAA Cho&Cr • Better signal separation, thus better quantification of metabolites • Better water suppression • Suboptimal shimming
In Browser, select spectroscopy exam Click on Functool Saving the dicom data
In Browser, highlight the image series used for localizing spectroscopy Click OK
To do that: right click on the image • A scroll down window will appear • Select save screen shot
How to save raw data (p files) Command Tool The GE spectroscopy data is saved as so-called p file on the scanner in a directory /usr/g/mrraw How to make sure that p-files will not be overwritten. On the MRI console, go to the Browser Right mouse-click on the background A scroll down window appears, select Service tools and Command Window In the terminal window that pops up type: cd /usr/g/mrraw (this is the directory in which all p-files are temporarily stored) Type: ls –ltr (this command lists all p-files including time stamps in chronological order)
How to save raw data (p files) Type: mkdir backup (this generates a backup folder in which p-files can be stored, this only needs to be done once) Type: cp Pxxxxx.7 backup (this command copies the p-file in your backup directory. The x’s represent the 5 digit code for the p file you are interested in.) Type: cd backup Type: mv Pxxxxx.7 PatientID.date.Pxxxxx.7 (this command renames your p file, this way you make sure that the file will not be overwritten during later experiments.)
How to transfer the P-Files • Open the program and setup: • Host name: IP address of your MRI scanner • Login and password will be likely sdc and adw2.0 • Login: sdc • Password: adw2.0 • Protocol: SFTP (allow SCP fallback) FIRST: Once isolated, the P-Files will need to be sent from your scanner to a PC You can use any PC with a network connection to transfer the p-files. An ftp client is required. The easiest way to transfer the files is by using a program called WinSCP which can be downloaded free at http://winscp.net/eng/index.php CONFIGURATION:
How to transfer the P-Files • On the right side you see your scanner’s directory and on your left side your own computer’s directory (see below) • Change the directory on the right site to /usr/g/mrraw/backup • Transfer the p-files from that directory to your computer by clicking on the file, then drag it to a designated data storage folder on your computer (to the left). A window will pop up, select the option to copy. • Done!
How to transfer the P-Files TIPS: • Once you have setup that connection you can save the session and you do not need to remember the IP address, login and password anymore. • Go to session, save session and type in scanner name. • Next time you want to transfer files you can you load the session.
Sending P-Files to ACRIN • Rename P file to “ACRINCase#, TimepointXweeks” • For example: case15_baseline OR case09_16weeks • Again, this MUST be the ACRIN CASE NUMBER assigned at registration. • Login to ACRIN via ftp: On your web browser, go to ftp://xray.acrin.org • User Name: (CONTACT ACRIN FOR USERNAME) • Password: (CONTACT ACRIN FOR PASSWORD) (If not prompted, click file, “Login As…”) • Find your folder: • It will be identified by your ACRIN Insitution Name • Contact Kesha Smith at ACRIN at ksmith@acr-arrs.org for assistance • Store your file in the folder: (BE SURE YOU HAVE NAMED IT as Case#,Timepoint)