Download
1 / 18
180 likes | 377 Vues
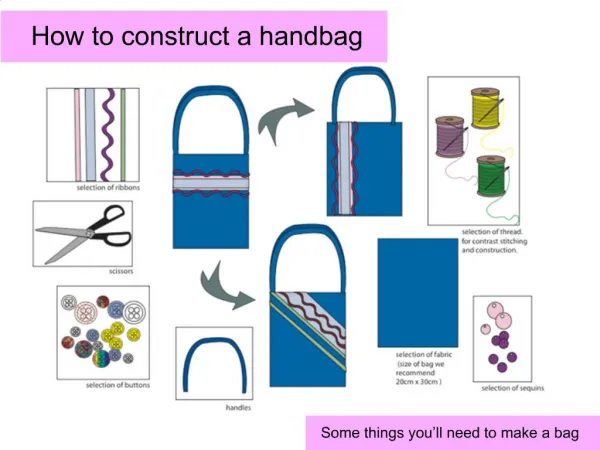
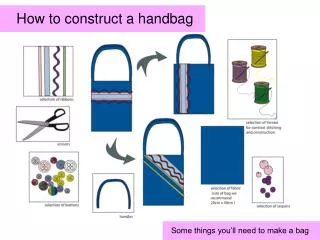
How to construct the draw string bag. Some things you’ll need to make a bag. STEP 1. Joining the two sections together. A nylon or thick canvas twill is ideal for this bag. The two pieces of fabric should be the same width.

E N D
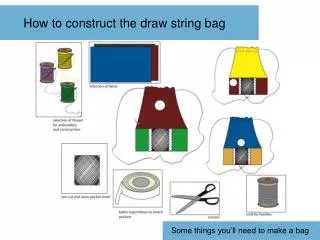
How to construct the draw string bag Some things you’ll need to make a bag
STEP 1 Joining the two sections together A nylon or thick canvas twill is ideal for this bag The two pieces of fabric should be the same width Select your fabric . This should be in contrasting/ complimenting colours depending on the effect you want. Thispiece should be longer 2. One piece of fabric should be longer thanthe other this is to create either the top or bottom of the drawstring bag.
STEP 2 Joining the two sections together Place the two fabric pieces on top of each other. The ‘right sides together’. Flip/place the base of the bag on the top section - right side facing – do you know why? Make sure that the fabric lines up together to create a neat seam. The top and the base of the bag need to be held together. To do this seams are used. A seam is two pieces of fabric stitched together.
STEP 3 Joining the two sections together Needle Pin the two fabrics together – why do the pin heads face away from the edges? Pins Using a running or tacking stitch. Tack down both pieces of fabric to hold them together. A running stitch is a simple in and out stitch Tacking stitch
STEP 4 Stitching the bag together Pins remove these before sewing Place the side of the machine foot on the edge of the fabric and straight stitch. Before machine sewing down the two pieces remove the pins. Tacking stitch The straight stitch will now make a seam. This will secure the fabric together and flat. Look at where the sewing machine foot is placed. You are then straight stitching the pieces together.
STEP 5 Neatening raw edges Zig zag top edge to neaten While the material is still folded (right sides together) zigzag the this edge to neaten the raw edges.- Why do we neaten the raw edges? Zigzag the top of the bag to neaten that edge. Look at where the sewing machine foot is placed. You are then zig zagging the edges of the fabric together.
STEP 6 Ready to attach the drawstrings Ask the teacher to sew button holes into the fabric Once you have zig zagged the edges. Open up the fabric and iron. Be careful not to have the iron to hot on some fabrics (such as Nylon) as it will melt. You must work carefully Remember the iron is hot Ask your teacher to help sew on button holes/ attach eyelets for the draw string to go through Right side of the fabric
STEP 7 Attaching the pocket Select pocket – place in the middle on base Cut strips of tape/ ribbon to use to attachment the pocket Pin the pocket both sides Mesh pocket. look at it’s position!! Pin down these tapes
STEP 8 Attaching the pocket Take a needle and thread and begin to run a tacking stitch on both sides of the tape. This fastens down the tape ready to sew . Once you have sewn the tacking stitch remove your pins to machine stitch.
STEP 9 Attaching the pocket With the removed pins you can machine stitch using straight stitch in a U shape. (Look at the diagram.) Look at where the machine foot is placed Remove the tacking stitches.- Why do we tack the strips down? 1. Bottom to top – STOP & TURN 2. Along the top – STOP to TURN A quick recap! 3. Down the side
STEP 10 Making a casing Turn under 4cms of the top edge. Just below above the eyelets/button holes. Fold over the top edge on the wrong side of the fabric. Turn the bag over to the wrong side On the next page there is a Safety Alert – something is wrong and it is an unsafe way to work – see if you can spot it! Fold over 4cm Wrong side
STEP 11 Making a casing Machine sewing foot Are these pins the right way round? pins Turn under 4cms of the top edge Add pins – which way are the pins heads placed ? Straight stitch on the edge of the edge of the fabric – where should the edge of the machine foot be placed ? Did you stop the unsafe practice. Your stitching should be under the eyelets Remove pins. Yes, your right the pins are facing the wrong way. Well done. The wrong side
Logo’s Designing a logo for the bag Because we will be using a hand scanner to create our logo. You will need to remember a number of things: 50mm 1. The maximum size of the logo must be: 50mm 2. You can only use black ink – why? 3. You must think about how detailed your designs are – the scanner is not able to cope with very fine lines or writing. Which one of these designs will scan in the best ?
Logo’s Applying the logo design to the bag • If you are using the computer to design you will need to think about the following aspects: • making sure your designs are not on the very edge of the page. The scanner will pick up the edge of the page and register it as a line and spoil your design. 1. Draw/print the design with plenty of space around it • check the size of your design before you print it to avoid wasting resources. • print two sizes of the design on one page – one slightly bigger but apart in the middle of the page. Consider the position of the logo on the bag – Why?
STEP 12 Applying a logo Logo can go here. Remember the idea of a logo is to be seen!! While the bag is still flat it is easier to apply a logo/decorative feature. The logo is represented by the circle in the picture and can be placed anywhere on the bag. A few ideas are represented here. The logo/ decorative feature can be in contrasting or complimentary colours. It must enhance your bag!! Other ideas for logo placement Click here for logo ideas
Straight stitch Machine foot Fold this bag so that it is inside out seam Bag inside out pins STEP 13 Stitching the bag together 1. Fold the bag in half – right sides together & pin – remember the pinning rule 2. Straight stitch – place the side of foot on the edge of the fabric. 3. There is a raw edge to the fabric? What do you think the next step is ?
STEP 14 Stitching the bag together 1. Place back seam in the middle of the bag & ask your teacher to place the cord in position. 2. Pin & straight stitch the seam again neaten the rawedge with zig-zag stitch. 3. Remove the pins and turn the bag the right way round. Machine foot Pin and straight stitch along this edge then neaten with zig zag stitch Cord to go into bag to attach the drawstring this goes here
A long piece Cord pulled through the casing, through button holes and then tied at the bottom knot You must work carefully STEP 15 Threading the cord Remember the iron is hot Give the bag a quick iron to improve presentation. Be careful of heat don’t melt the bag Take a length of cord and using a safety pin – carefully thread the cord through the buttonholes/eyelets and tie a knot that the base. 2. Cut off all excess threads to improve presentation. 3. You have then completed your bag- Well done! Your finished bag