How to Draw Faces
210 likes | 420 Vues
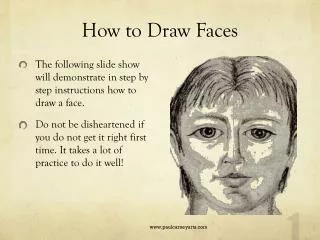
How to Draw Faces. The following slide show will demonstrate in step by step instructions how to draw a face. Do not be disheartened if you do not get it right first time. It takes a lot of practice to do it well!. 1.Sketch a simple oval shape. You should fill a large proportion of the page

How to Draw Faces
E N D
Presentation Transcript
How to Draw Faces • The following slide show will demonstrate in step by step instructions how to draw a face. • Do not be disheartened if you do not get it right first time. It takes a lot of practice to do it well! www.paulcarneyarts.com
1.Sketch a simple oval shape • You should fill a large proportion of the page • Take time to get the shape right • Do not press too hard with your pencil • You can ‘GHOST’ draw the circle first. www.paulcarneyarts.com
2. Measure the eye line and the line of symmetry. • The eye line is in the exact HORIZONTAL centre of the head • The symmetry line is in the exact VERTICAL centre of the www.paulcarneyarts.com
3.Measure the nose line and the mouth line • The nose line is HALF way between eye line and the bottom of the oval • The mouth is half way between nose line and the bottom of the oval www.paulcarneyarts.com
4. Divide the eye line into FIVE equal parts. • Take your time to divide this line exactly into 5 parts. • Check your measurements with a ruler • Do not make the marks too dark www.paulcarneyarts.com
6. Draw the eye shapes in. • The eyes should be open wide, not half closed • The bottom of the eye (in the nose side corner) has a slight kink in it. www.paulcarneyarts.com
7. Sketch in rough lines for the eye brows and nose • Eye brows should be at least a centimetre or more above the eye. • The sides of the nose line up with the corner of the eye • The sides of the mouth line up with the centre of the eye. www.paulcarneyarts.com
7. Add other lines for the ears, neck and mouth corners • Ears begin at the eye line and finish at the bottom of the nose • The neck lines up with the outside corners of the eye. www.paulcarneyarts.com
8. Draw in the pupils and Irises • Irises disappear into the eye lid • Pupils are full circles www.paulcarneyarts.com
9. Draw the nose more accurately. • The nose has lots of curves in it • The nostrils are NOT full circles, but rather they are ovals www.paulcarneyarts.com
10. Draw the lips • The top lip is usually thinner than the bottom lip. www.paulcarneyarts.com
11 Draw the corners of the eyes and eye brows • Eyes have tear ducts • And the eyes have lids that are visible in the corners • Eye brows are thick in the centre of the eyes then thinner as they go out. www.paulcarneyarts.com
12. Shade the eyes • The pupils are solid black with highlights • The iris has a dark rim around it then lots of light strokes pointing to the centre www.paulcarneyarts.com
13. Shade the side of the nose and the eye brows • Shade down one side of the nose and then blend it in to look natural www.paulcarneyarts.com
14. Shade the lips and around the eyes. • Shade the top lip darker than the bottom lip • Shade a shadow under the lip www.paulcarneyarts.com
15. Shade the cheeks, the neck and chin. • It is a good idea to add tone with the pencil then rub it with your finger to make it look smooth like skin www.paulcarneyarts.com
16. Draw the hair shapes • Draw the shapes the hair makes in clumps • Make sure the hair is growing out of the head. www.paulcarneyarts.com
17. Shade the dark tones on the hair. • Shade the streaks of dark shadow that are formed in the hair www.paulcarneyarts.com
18. Shade the tonal parts of the hair • Add mid tones to the hair being careful to leave some areas of highlight www.paulcarneyarts.com
19. Add any finishing touches • You can spend some time softening skin tones and making sure it looks right now. www.paulcarneyarts.com