Microbiology Instrumentation
Microbiology Instrumentation . By: Norazli Ghadin. Lesson Objectives. 1. Introduce to basic microbiology instrument. 2. Know how to use instrument. 3.Naming parts of microscope. 4.Know the function of microscope parts. 5.Know how to observe microbiology slides using microscope.

Microbiology Instrumentation
E N D
Presentation Transcript
MicrobiologyInstrumentation By: NorazliGhadin MLT 1222
Lesson Objectives 1. Introduce to basic microbiology instrument 2. Know how to use instrument 3.Naming parts of microscope 4.Know the function of microscope parts 5.Know how to observe microbiology slides using microscope
The instrument • In microbiology the instruments are designed to • Maintain sterility • To provide easy manipulation of bacterial culture • To maintain pure culture • To ensure bacterial growth are controlable
Biosafety cabinet • Enclosed, ventilated workspace for safely working with materials contaminated with (or potentially contaminated with) pathogens • There are 3 level of biosafety cabinet • 1. Biosafety level 1 • 2 .Biosafety level 2 • 3 .Biosafety level 3
Biosafety cabinet • Works Principle • Provide protection to operator and sample(class II & III) • Air came out of cabinet are filtered, • Remove microbe
Biosafety cabinet • Biosafety level I • Protect operator • Air entering did not HEPA filtered • Air coming Out are filtered. Samples e.g • Special equipment • Culture aeration
Biosafety cabinet • Biosafety level II • Protect operator and samples • Incoming air and waste air is HEPA • filtered • Samples • All types of microorganisms • excludevirus, volatile chemicals, • gases
Biosafety cabinet • Biosafety level III • Protect operator and samples • The enclosure is gas-tight. • All materials enter and leave through a dunk tank or double-door autoclave. • Gloves attached to the front prevent direct contact with hazardous materials. • the lab equipment installed inside custom-built as well.
Biosafety cabinet • Samples • Highly contagious • Such as Ebola, air borne virus, H1N1
Microbiology Incinerator • Use for sterilizing wire loop • Electrical change to heat • High temp destroys living organisms
Bunsen burner • Alternative for microbiological incinerator
Wire Loop/Stab • For inoculating microbes • Sterilize with microbe incinerator
PETRI DISH • Use to culture microbe • Fill with media such as nutrient agar
Bijou bottle • Use to culture microbe on Slant agar/liquid broth
Microscope SLIDE • Use to put on sample • Prepare microbe for staining and microscope observation
Conical FLASK • For culturing microbes • Cotton gauze, • Membrane filtered cap.
Staining Rack • To put glass slide for staining.
To prepare media, solution, or broth in large volume. • High resistant to temperature and preasure
Culture Tube • For culturing microbes • Small volume solution. • Can also use 96 wells • plate
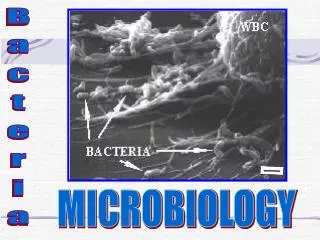
Microscope • A microscope (from the Greek: μικρός, mikrós, "small" and σκοπεῖν, skopeîn, "to look" or "see") is an instrument to see objects too tiny for the naked eye. • The science of investigating small objects using such an instrument is called microscopy. Microscopic means invisible to the eye unless aided by a microscope. LAB INSTRUMENTATION MLT 1102
Eyepiece: Magnifies material being viewed by 10X The part of the microscope you look into Sometimes contains a pointer that can be seen as you look into the eyepiece. May also be called the ocular. Component LAB INSTRUMENTATION MLT 1102
Nose piece: • Part of microscope to which the objectives are attached • Rotates to allow for the changing of objectives to increase or decrease magnification. LAB INSTRUMENTATION MLT 1102
Arm: Part of microscope to which the nosepiece is attached A secure part of the microscope to hold on to when the microscope is being carried. Sometimes includes a cord hanger for power cord storage LAB INSTRUMENTATION MLT 1102
Objectives: • Magnify material being examined • Scanning • magnifies 4X • 10X • magnifies 10X • High dry • magnifies 40X • Oil immersion • magnifies 100X Total magnification = magnifying power of eyepiece times the magnifying power of the objective in use. LAB INSTRUMENTATION MLT 1102
Stage: Platform on which microscope slide rests • Mechanical Stage: • Used for adjusting the position of the slide for viewing • Slide holder: • Secures slide to the mechanical stage • Mechanical Stage control knobs: • Move the slide LAB INSTRUMENTATION MLT 1102
Coarse adjustment knob: Coarse focusing • Fine adjustment knob: • Precise focusing LAB INSTRUMENTATION MLT 1102
Substage condenser concentrates light & directs it through opening in microscope stage • Iris diaphragm: • regulates the amount of light passing through the substage condenser • increases resolving power of the microscope LAB INSTRUMENTATION MLT 1102
Iris diaphragm lever: • adjusts the iris diaphragm to increase or decrease microscope resolution • Condenser control knob: • raises & lowers condenser LAB INSTRUMENTATION MLT 1102
Illuminator Light source • Illuminator control: • Controls the intensity of light • Serves as the on/off switch for some microscopes • Base: • provides support for microscope LAB INSTRUMENTATION MLT 1102
Using Microscope • Put stained slide on stage, secure with clip • Rotate nosepiece so 4X objective face the slide, • Use coarse focusing to focus the image, • Change to 10X objective, use fine focusing to get sharp image. • Change to 40 X use fine focus knob • Rotate objective to 100X halfway, • Drop an immersion oil to the slide • Continue rotating the nosepiece to 100X objectives. • Slowly use fine focusing to get the sharp image.