Measuring Instruments
This comprehensive guide explores the science of metrology, focusing on measuring instruments and their calibration processes. Learn the principles of measurement discrimination and the significance of using instruments that adhere to the 10-to-one rule for accuracy. Discover various types of direct reading and comparison instruments, such as calipers and micrometers, as well as angle measuring tools like protractors. Emphasizing careful handling and maintenance, this resource prepares you for proficient use in precision measurement applications across multiple fields.

Measuring Instruments
E N D
Presentation Transcript
Metrology • science of weights and measures
Discrimination • degree to which a measuring instrument divides a basic unit of length
10 to one rule for discrimination • a measuring instrument should discriminate 10 times finer than the smallest unit that it will be used to measure • instrument lands between two lines - do not use to measure
Parallax error • the apparent shift of an object when viewed from different angles
Calibration • Process by which a measuring instrument is compared to a known standard • The international prototype kilogram is a platinum iridium alloy, created in 1879, that is the standard by which all the world’s weight measurements are calibrated. It is lock in a Paris vault and is only brought out on very rare occasions • The length of a meter is defined by the distance light travels in a vacuum in 1/299,792,458 seconds
Use of precision measuring instruments • keep calibrated • when possible, take readings while the instrument is in contact with the work piece • on cylindrical work pieces, check twice - 90 degrees apart • best temperature is 68 degrees F.
2. Calipers (Can be Vernier, Dial, or Digital Reading) • Outside • Inside • Depth
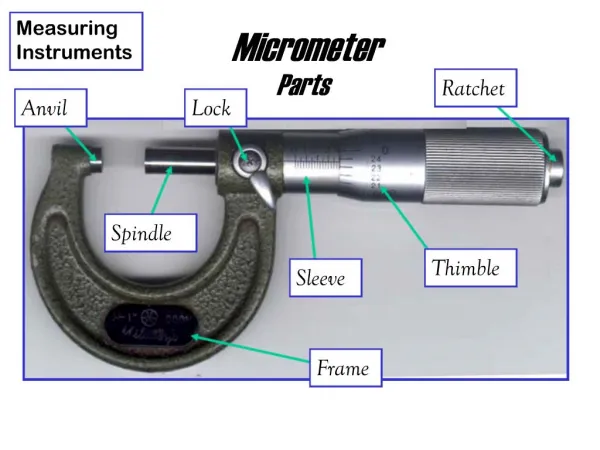
3. Micrometers (Can be Vernier, Dial, or Digital Reading) • Outside • frame, anvil, spindle, sleeve, thimble • Inside • Depth
Comparison measuring instruments • comparing to a known standard • represents a known distance • used in conjunction with an instrument that has the capability of showing measurement • sometimes referred to as transfer measurement • direct reading instruments should be used whenever possible
Common types • 1. spring calipers • 2. telescoping gages • 3. small hole gages • 4. adjustable parallels • 5. radius gages • 6. thickness gages • 7. planer gages (similar to adjustable parallels)
8. Squares • a. machinists combination square set • protractor • centering head • b. solid beam square • c. cylindrical square
9. Indicators • balanced vs. continuous readings • mounting must be rigid • magnetic bases • flexible link holding arms • height gage applications (test)
2 types of indicators • a. dial • some can be used to make linear measurement • discriminations range from .00005 to .001” • ranges are from .003 to 2.0” • b. test • used for comparisons only (no direct measurements) • discrimination approx .0005” • range of about .030”
Angle Terminology • acute angles = < 90 degrees • right angles = 90 degrees • obtuse angles = > degrees • full circle = 360 degrees • 1 degree = 60 minutes of an arc • 1 minute = 60 seconds of an arc • radian = metric unit of angular measurement
1. Plate protractor • discrimination of 1 degree
2. Bevel protractor • part of the machinists combination set - discrimination of 1 degree
3. Universal bevel protractor • includes a vernier scale • measure to accurately to within 5 minutes of a degree (remember there are 60 minutes in one degree
4. Sine bar • 5” and 10” center spacing of cylinders
To find angles with the sine bar: • elevate the sine bar with adjustable parallels until the indicator reads zero at each end of the workpiece • parallel is removed and measured with a micrometer • transpose the sine bar elevation formula and solve for the angle • sin of the angle = elevation / sin bar length (5 or 10”)
Gage blocks • permit comparison between working measurement and instruments of mfg.
Uses: • calibration of measuring instruments • establishment of precise angles (with sine bars) • positioning of machine tools and cutting tools • used to set snap gages
3 Grades • grade 1 = lab • grade 2 = inspection • grade 3 = shop
Tolerance on a stack of 30 gage blocks assembled to represent 20”?
Care • avoid unnecessary contact with hands • clean with proper solvents • handle and lay on lint free cloth • don’t leave blocks rung for extended periods of time • spray with a preservative
Main cause of gage block wear is wringing poorly cleaned blocks
Wear blocks • used in applications where direct contact is made • usually .050” or .100”
Accessories • scribes • bases • screw sets
Other machines • Optical comparator • Coordinate measuring machine (CMM)