Glogster Tutorial: Learn How to Create an Online Interactive Poster
Access a step-by-step guide on creating interactive posters with Glogster. Learn how to log in, use the dashboard, tools, editing options, add text, graphics, images, videos, and sound. Enhance your poster with animations, frames, and players. Save, publish, and share your creations. Explore the features for a creative project.

Glogster Tutorial: Learn How to Create an Online Interactive Poster
E N D
Presentation Transcript
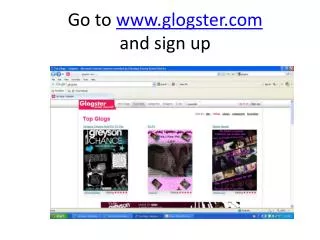
Glogster Tutorial Learning How to Create an Online Interactive Poster using http://edu.glogster.com/
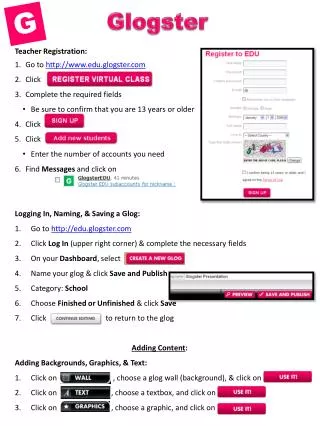
Login Information The first thing you need to do is log in. This is what the “Log In Screen” looks like. Remember to get teacher permission and login information prior to using this website. Click on login at the top right corner of the screen to access the login screen. Your teacher has already registered you as a class. Use the user nickname and password given to you by your teacher.
THE Dashboard This is what your dashboard looks like once you login. Now the fun begins! Click on CREATE A NEW GLOG to begin!
THE Tools This is the page you will see when you begin to create your Glog. You can remove these images from the page by clicking on them and hitting the delete button. Use the black tool box to add graphics, text, image, video and sound. Begin with the WALL first. It will set your background. Keep on building from there. Be creative and have fun!
THE WALL The wall has many options! Be sure to choose something simple and not too busy. Once you choose a background you like be sure to click on “Use It”.
THE TEXT Here is your text box. There are many choices and styles. Have fun, be creative, and try out all of the different options. Once you choose a text style click on “Use It” to apply.
EDITING TOOLS The editing tools allows you to do a variety of things to your poster. The first editing tool bar allows you to bring images to the front and back and clone. You can also cancel changes. The other tool menus allow you to change the color, font style, add special effects or add a link. Make sure you click on “APPLY” to save changes. When adding a link you will not be able to view link until after you save/publish the poster.
THE GRAPHICS You can add graphics to enhance the overall appeal of your poster. Some of the graphics are even animated with motion. Once the graphic has been selected be sure to click on “Use It”.
THE IMAGES When adding images you can upload them from your computer or click on link and paste the URL in the box. Be sure to click on the tab to add a FRAME to enhance the appearance of your picture. Be sure to click on “Use It” to apply frame.
ADDING VIDEO When adding a video you can upload from your computer or link to an existing website. Be sure to add a PLAYER to enhance the overall appearance of the video. After selecting player be sure to click on “Use It”.
ADDING SOUND When adding sound to your Glog you can upload an audio file from your computer or link to a website. Be sure to click on the PLAYER tab to enhance the overall appearance of your poster. After selecting a player click on “Use It”.
GRABBING AUDIO VIDEO & IMAGES If you have a webcam you can take short video clips or still images and use them in your poster. You can also record your voice using a microphone and include that in your poster as well. Just click on “GRAB”. This is a newer feature and is not a necessary component of your research project.
Save & PUBLISH Before saving your Glog you can click on PREVIEW to view your poster. When you are happy with your poster click on SAVE and PUBLISH. This screen will appear. First you will need to name your Glog. Then pick a category for it and set your Glogster’s privacy settings to Private. You may also choose to tag your Glog. Now go ahead and SAVE it. Once saved you will be given your link to your Glog so you can share with others.
THE POSTER Now it is time to get busy creating. A few things to remember: Use your note-taking graphic organizer to keep track of audio, video, and images used in poster. Make sure to cite all of the sources you use just as I have in my sample poster. When you save your poster keep it PRIVATE. Be sure to include multiple images and text. Audio and video clips used in posters will be given extra bonus points. Remember your poster can be longer than one page.