Highmark Provider Portal Access Guide | User Instructions
660 likes | 686 Vues
Learn how to log in and access the Supplier Portal on www.highmark.com, including the Services Procurement functionality. Follow detailed steps for system access, changing passwords, submitting bids, and managing candidate profiles.

Highmark Provider Portal Access Guide | User Instructions
E N D
Presentation Transcript
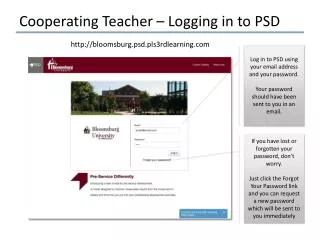
Accessing the Supplier Portal via www.highmark.com Provider Contacts may access PRISM (including Services Procurement functionality) via the links maintained within the Procurement section of the www.highmark.com website Step 1: Click the Procurement link to view the Procurement System Access page Step 2: Click the System Access Information link
Accessing the Supplier Portal via www.highmark.com (Cont.) Step 3: Click the login in to the system link Step 4: Enter your userid and password and click the Sign In button
First Time Login The first time that provider contacts login to the external PRISM website, they will be presented with electronic terms and conditions • If you agree with these terms and conditions, perform the following: • ensure that your user ID is populated • enter your password, • click the I Accept box and • click the Sign In button Note: you cannot utilize PRISM as an external user until you have agreed to the electronic terms and conditions
Editing the General Profile – Password Change The General Profile allows the provider contact to change their password, set up forgotten password functionality, and change the email address where there forgotten password will be sent Step 1: Click the My System Profile link Step 2: Click the Change password link Step 3: Enter your current password, new password and click the OK button
Editing the General Profile – Setting Forgotten Password Question Step 1: Click the My System Profile link Step 2: Click the Change or set up forgotten password help Step 3: Select a question from the drop down menu, enter a response and click the OK button
Understanding Requisition Statuses and Bidding Requisition statuses
Accessing the Review Reqs/ Submit Bids Page Step 1: Navigate to Services Procurement > Submit Bids Requisitions (open Highmark contractor positions) are displayed at the bottom of the page
Performing Searches within the Review Reqs/ Submit Bids Page Initially, all incoming contractor positions will be associated with the primary provider contact. If you are not the primary provider contact, either search using their userid in the Last Worked on by field or perform a search with the Assign Status dropdown blank Leaving the Assign Status dropdown and Last Worked on by fields blank when clicking the Search button shows you all requisitions regardless of who from your company has worked on them
Understanding the Additional Information Tab The Additional Information tab tracks the number of positions represented by the requisition line, the number of candidates you are permitted to submit, and the number of candidates you have submitted Number of positions that still need to be filled Number of candidates you are allowed to submit Number of requisition positions filled by your company Number of positions originally needed Number of candidates you have submitted
Submitting a Bid Step 1: Step 2: Click the submit bid icon to begin the bidding process View the initial rate that was defined within the requisition for this position Note: in the case of a blind bid, this rate will be hidden
Submitting a Bid (Cont.) Step 3: Observe the Service Information tab to see the consultant role, location being sought and the scope of work
Submitting a Bid (Cont.) Step 4: Note: you may need to click the link to see all of the desired competencies Review the competencies, years of experience and educational level (if specified) for this contractor position Note: some types of Spro job families/ job codes will not have an competencies specified
Submitting a Bid (Cont.) – Existing Candidate The vendor contact has a choice submitting an existing candidate or submitting a new candidate, However, you should always check the Submit Existing Candidate option first to see if the candidate you wish to propose has an existing profile. Step 5a: Select submit existing candidate, click the magnifying glass and click the desired candidate from the Lookup page Selected existing candidate is populated within the bid
Submitting a Bid (Cont.) – New Candidate Step 5b: Select submit new candidate, click the Create Candidate button, enter the First Name and Last Name and click the OK button New candidate is populated within the bid
Submitting a Bid (Cont.) Enter your proposed rate for the candidate Note: systematically, you can enter whatever rate you choose, but you will receive a warning message if your bid is 10% above or below the requisition rate at time of bid submittal Step 6: Step 7: Answer the bid factors (standard questions) and click the Submit button Note: you cannot submit a bid until you have entered a response to all bid factors and you must answer yes to the signed RTR question
Understanding Communications for Existing Candidates Once you have submitted a candidate, you communicate with Highmark regarding your submission by utilizing the Maintain Bids page Your outgoing communications to Highmark (including the initial candidate submission) are identified with a folder type of Outgoing Bids. Incoming communications from Highmark regarding your candidate submission are identified with a folder type of Incoming Bids The same candidate will be associated with either the Outgoing Bids or Incoming Bids folder depending upon whether you or Highmark has performed the last communication Once a work order has been generated for the open position, candidates submitted to it disappear from the Maintain Bids page The flow below shows the simplest path of communications for generating a work order. However, other communications are possible between Highmark and a vendor regarding a candidate Offers Position for Candidate Fills Requisition Generates Work Order Highmark Service Coordinator Submit Candidate (from Submit Bids page).\ Candidate now viewable with a Last Action of “Submit as an Outgoing Bid within the Maintain Bids page Highmark Response now in Incoming Bids within the Maintain Bids page with a Last Action of “Offer Position) Accept Highmark’s Offer Candidate now viewable with a Last Action of “Accept Offer” as an Outgoing Bid within the Maintain Bids page Highmark Response now in Incoming Bids within the Maintain Bids page with a Last Action of “Fill Bid.. No Action required of Vendor Candidate submittal now disappears from Maintain Bids page Vendor
Accessing the Maintain Bids Page Step 1: Navigate to Services Procurement > Maintain Bids Maintain Bids page is displayed
Viewing Initial Candidate Submissions via Outgoing Bids When a candidate has initially been submitted, identified with a folder type of Outgoing Bids and a last action of Submit The ID of the vendor representative who submitted the candidate is a required field when performing a search within the Maintain Bids page, and may be changed as appropriate Additional search criteria, such as the requisition ID, can be used to refine the search results as well Candidate names and the requisition they have been submitted for are displayed here Folder type indicates whether vendor (Outgoing Bids) or Highmark (Incoming Bids performed the last action on the candidate submission The last action performed is indicated here
Viewing Submittal History Step 1: Step 2: Step 3: Click the submittal history icon Review the comments (if any) associated with the bid by clicking the twisty Review communication history and click the Return to Maintain Bids link at the bottom of the page once complete
Responding to Incoming Communications Step 1: Step 2: Step 3: Click the create bid icon Select the desired Action from within the Current Bid Response panel (about half-way down the page) Note: it possible to change your bid rate when responding to Highmark. Unlike Spro 9.0, it is no longer necessary to Withdraw a candidate in order to change the bid rate. However, you should NOT change your bid rate when using Accept Offer Click the button at the bottom of the page once complete
Understanding Bid Response Communications Highmark declines candidate Highmark ends communication
Understanding Bid Response Communications (Cont.) Highmark replies
Understanding Bid Response Communications (Cont.) Highmark schedules interview
Understanding Bid Response Communications (Cont.) Highmark offers position
Accessing the View Services Work Orders Page Provider contacts have the ability to view all of the work orders associated with their contractors, regardless of the status of the work order Step 1: Navigate to Services Procurement > View Services Work Orders
Accessing the View Services Work Orders Page Step 2: Leave the Date From and work order status fields blank and Search button
Understanding Work Order Statuses Internal Work Order Statuses External Work Order Statuses
Viewing A Work Order Click the Work Order ID link if desired to view the work order details Step 1: Step 2: Step 3: The requisition associated to the PO is normally reflected in the name field Within the work order details page, scroll down to the Duration Information. Click the Return to Work Order Roster link at the bottom left of the page to return to the View Services Work Orders page
Understanding Replacement Bids Occasionally, Highmark will need to replace existing contractors that still have remaining time on their work orders This is equivalent to an early ending of the contractor’s work contract with Highmark When these early terminations occur, Highmark will re-open the contractor’s position for bidding via the Replacement Bids functionality. Email notifications to provider contacts informing of the ability to submit candidates for a replacement bid differ slightly from normally bid notifications
Accessing the Work Order Sourcing Review Page Step 1: Navigate to Services Procurement > Submit Bids Step 2: Click the Work Order Sourcing Review tab from within the Submit Bids page Requisitions/ work orders requiring replacement (open Highmark contractor positions) are displayed at the bottom of the page
Understanding the Additional Information Tab The Additional Information tab tracks the number of positions represented by the replacement requisition line/ work order, the number of candidates you are permitted to submit, and the number of candidates you have submitted Number of requisition positions filled by company Number of positions that still need to be filled Number of candidates you are allowed to submit Number of candidates you have submitted Number of positions originally needed This tab is identical to the Additional Information tab within the Review Reqs/ Submit Bids page
Submitting a Replacement Candidate Click the submit bid icon to begin the bidding process You will follow the same process and answer the same questions as though you were submitting a candidate for a new requisition Once you have submitted a candidate, you will interact with the Highmark Service Coordinator via the Maintain Bids page just as you would for any other bid
Accessing the Manage Invoice Approval Page Step 1: Navigate to Services Procurement > Approve Service Invoices
Accessing the Manage Invoice Approval Page (Cont.) Remove the value within the From Date field and click the Search button Step 2: Invoices meeting the search criteria will be displayed
Understanding Invoice Statuses Note: provider contacts can only take action on invoices in Submitted to Supplier status
Viewing Invoice Line Summary Information Step 1: Step 2: Step 3: Step 4: Click the invoice approval line summary link to the right of the desired invoice The Manage Invoice- Approval Line Summary will be displayed Scroll down to the Invoice Line Information panel Click the work order details tab to view the work order, timesheet/ expense report associated with an invoice line Click the Return to Manage Approvals link or refer to the next slide to add your own invoice number to the Spro invoice
Adding Your Own Invoice Number to an Spro Invoice Click the invoice line icon to the right of a given invoice line Step 1: Step 2: Step 3: Step 4: Step 5: Click the link Enter your invoice number for each invoice line Click the button at the bottom left of the page Click the Return to Manage Approvals link at the bottom of the page
Approving an Invoice Step 1: Step 2: Step 3: Click the Select box next to the desired invoice Note: do not select multiple invoices at once Click the Approve button Click the OK button
Rejecting an Invoice– Not Recommended Note: invoice amounts match exactly the dollar values of the timesheets and expense reports submitted by contractors. There should be no reason for a provider contact to reject an invoice and it is highly recommended that they do not do so. Rejecting an invoice will delay payment Step 1: Step 2: Step 3: Click the Select box next to the desired invoice Click the Reject button Select the desired reason code, edit the comment text as desired and click the OK button
Managing Service Provider Profile Information Once a service provider (e.g. contractor) has become associated to a given supplier, even if the contractor has not yet performed work for Highmark, provider contacts have the ability to add attachments the service provider’s profile. This access would primarily be used by the provider contact to add the following documents to the service provider’s profile • Signed vendor code of business conduct • Resume • I9 collection/ eVerify - should be signed by both the provider contact and service provider Other types of sensitive HR documents (e.g. drug screen, background check) should NOT be attached to a contractor’s profile
Accessing the Manage Service Providers Page Step 1: Navigate to Services Procurement > Manage Service Providers
Accessing the Manage Service Providers Page (Cont.) Perform a search for service providers. Note: leaving the provider contact field blank and click the Search button to obtain the greatest number of service provider results Step 2: