Download
1 / 16
160 likes | 522 Vues
An Introduction to Scanning and Editing Images digital Images Things to consider when getting started: Determine how you’ll use the image Monitor display: PowerPoint or Web page Determine what size you’ll use the image Original size, larger or smaller

E N D
An Introduction to Scanning and Editing Images digital Images
Things to consider when getting started: • Determine how you’ll use the image • Monitor display: PowerPoint or Web page • Determine what size you’ll use the image • Original size, larger or smaller • Knowing this information will help you choose the best settings for your image.
Image Resolution • Resolution is the sharpness or clarity of the image. • Measured by Pixels per Inch (ppi) or Dots per Inch (dpi). • Pixels are the smallest unit or element displayed on a monitor or captured by the scanner.
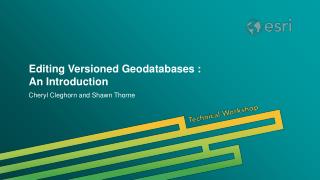
Scanned images are raster images. They are made of pixels (tiny squares of color). Image: Adobe Photoshop Software “Extras”
Resolution Standards • Monitors display between 72 and 96 dpi • Scanning an image for PowerPoint or a webpage • 72 to 75 dpi • Printers on average print around 1200 dpi • Scanning an image for print • 150 to 300 dpi
Scaling and Resampling • The higher the resolution, the more “information” you are collecting from the image. • To enlarge an image, scan it at a higher resolution, scale the image and then resample. • The larger you scale the image the more detail and quality you loose, the computer has to “add” fake information to fill in the gaps. • About 1/4th of the original images size or 25% is about the largest an image should be enlarged.
Scaling an Image • Microsoft Photo Editor • Image (menu) > resize • Resizing using pixel size for monitor display Resampling an Image • File (menu) > Resolution
Color True-Color (16.7 million colors) – 24-bit 16.7 million possible colors Best for photographs, complex clip-art, gradients 256 – 8-bit 256 maximum colors good for clip art, simple images with solid fields of color Creates a smaller file size Web palette – 216 colors Grayscale black & white photography or clipart Black & White line drawings basic clipart
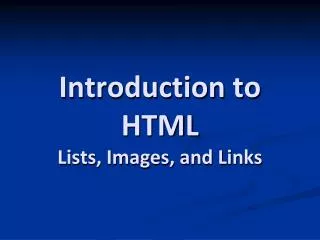
True Color (jpg) – 299kb 256 color (gif) 256 color (gif) - 53.9kb Image: Adobe Photoshop Software “Extras”
Resolution and File Size More information = larger file size !!! Choose the most appropriate balance of quality and file size for each image and its use. • The higher the resolution, the larger the file size. • The more colors, the larger the file size. • I don’t need to scan and save an image at 300 dpi to display it in a PowerPoint. • I do need to scan an image and save it at 300 dpi if I’m going to reprint the image.
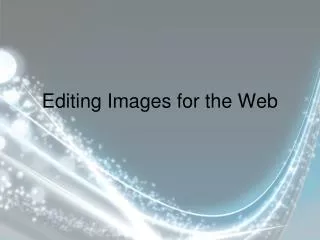
1MB = 1000KB 300 DPI Image 2.02mb 75 DPI Image 44.3kb Image: Popular Photography Magazine – John Lewis
Saving your image Image formats: • JPEG (.jpg) • true color • photographs or complex artwork • GIF (.gif) • 256 Color, grayscale or black & white art • simple images for use in PPT, web pages, etc.. • images with few colors, solid colors, no gradients • TIFF (.tif) • images to be printed • photography, line art,etc.. • large file size
Tips and Techniques Determine what the image will be used for and what size you’ll want the image to be, before getting started. Scan at a higher resolution for enlarging an image and resample. Getting rid of the moiré pattern. Adjusting the color, contrast, etc… Want to learn more techniques for making great images, take the Photoshop workshop on October 22.
Getting rid of the Moiré pattern: • Most scanners, have a descreen feature • From the HP Precisionscan Pro menu bar, click Advanced. A drop down menu will appear. A check mark next to a line item indicates that option is already active. • Choose “DeScreen” • Using the Effects > Despeckle filter in Microsoft Photo Editor Image: HP Website
Adjusting the exposure, contrast, brightness: • On the HP Precisionscan Pro menu bar, click Advanced. A drop-down menu will appear. • Click Adjust Exposure. The Adjust Exposure window will open, you can manually adjust the highlights, shadows and midtones by the slide bar or you can use the auto feature. • Adjusting the brightness and contrast in Microsoft Photo Editor: • 1. Image menu > brightness, contrast, and gamma slider bars
Questions? • Or for more information or advanced techniques contact: Brandy ThatcherInstructional Graphic Designer Rm. 239B, East Peoria Campus 309-694-5306 bthatcher@icc.edu