Interrupts and Using Them in C
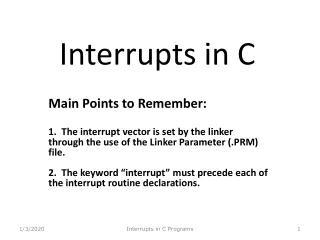
Interrupts and Using Them in C. Lecture 10. Interrupts How they work Creating and debugging C interrupt routines Sources M16C Hardware Manual P&P 8.1 and 8.5 Readings New Renesas C Language Programming Manual pp. 109-114 M16C Hardware Manual pp. 44-48 If not already done, read…

Interrupts and Using Them in C
E N D
Presentation Transcript
Interrupts and Using Them in C Lecture 10
Interrupts How they work Creating and debugging C interrupt routines Sources M16C Hardware Manual P&P 8.1 and 8.5 Readings New Renesas C Language Programming Manual pp. 109-114 M16C Hardware Manual pp. 44-48 If not already done, read… “Introduction to Interrupts,” Russell Massey “Interrupt Latency,” Jack Ganssle “Introduction to Interrupt Debugging,” Stuart Ball “Twiddle Bits,” Gauland “Studs and Duds,” Umansky In These Notes . . .
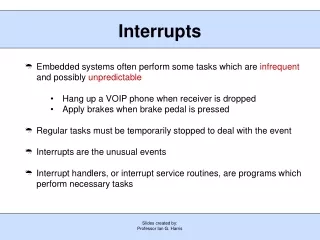
Interrupts and Polling • Consider the task of making coffee • We need to boil water, but don’t knowexactly how long it will take to boil • How do we detect the water is boiling? • Keep watching the pot until we see bubbles • This is called polling • Wastes time – can’t do much else • Put the water in a kettle which will whistle upon boiling • The whistle is an interrupt • Don’t need to keep watching water. Instead you can do something else until the kettle whistles. • Much more efficient
Breakfast Timeline Start preparing breakfast: Put water in kettle and turn on burner Put ground coffee in filter in cone Put cone on cup Get milk out of fridge Get cereal from cabinet Interrupt Service Routine Water boils and kettle whistles An interrupt occurs Put down whatever isin hands Turn off burner Pour boiling water into coffee filter Pick up whatever was put down Resume breakfast preparation: Get bowl from cabinet Pour cereal into bowl Get spoon Put milk back in fridge
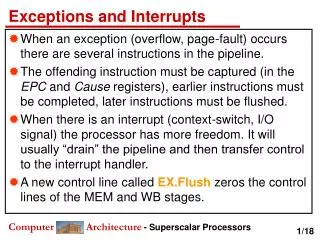
Interrupt Service Routines • An interrupt service routine (ISR) is a subroutine which is called when a specific event occurs • Hardware interrupts are asynchronous: not related to what code the processor is currently executing • Examples: INT0 input becomes active, character is received on serial port, or ADC converter finishes conversion • Software interrupts are the result of specific instructions executing • BRK, INT, undefined instructions • overflow occurs for a given instruction • After ISR completes, MCU goes back to previously executing code • We can enable and disable most interrupts as needed, others are non-maskable
Sequence of Interrupt Activities • Finish or interrupt current instruction • Read address 00000h for interrupt source information • Save flag register FLG in temporary register: FLG TMP • Clear certain flags in FLG: • Interrupt enable - I • Debug – D • Stack pointer select – U (except for sw ints 32-63) • Push the temporary register (which has old FLG) and PC onto stack (see left) • Set interrupt priority level in IPL • Fetch interrupt vector from vector table • Start executing ISR at the target of the vector • ISR should save any registers which will be modified (compiler does this automatically) • M16C26 Hardware Manual, p. 45-62
Prioritization • Interrupts are considered simultaneous if they occur between the same two clock ticks • Interrupts are prioritized to sort out simultaneous interrupts • Reset (highest priority) • NMI • DBC • Watchdog timer • Peripheral I/O • Single step • Address match • Priorities shown in a schematic in M16C26 Hardware Manual pp. 57-58
Returning from an ISR • Restore any saved registers • Execute REIT instruction (6 cycles) • Pop FLG from stack • Pop PC from stack • Resume executing original code
Interrupt Response Time • Why do we care? • This is overhead which wastes time, and increases as the interrupt rate rises • This delays our response to external events, which may or may not be acceptable for the application, such as sampling an analog waveform • How long does it take? • Finish executing the current instruction (up to 30 cycles for DIVX) or freeze it • Push various registers on to the stack, fetch vector (18 to 20 cycles) • Depends on alignment of stack pointer and interrupt vector • odd pointers are unaligned (words start at even addresses) so they take 2 cycles each to dereference (follow to memory) • If we have external memory with wait states, this takes longer • Maximum 50 cycles to respond • 50 / 16 MHz = 3.125 microseconds -- > need to design for this • If we assume that we need 20 cycles for the body of the ISR and 6 for REIT, the maximum interrupt frequency is 16 MHz / 76 cycles = 210.5 kHz
Interrupt Vectors • Need a table to list where the ISRs are located in memory • Each table entry is called a vector • M16C26 Hardware manual p. 46 • Vector format -- four bytes hold address of each ISR • Two kinds of interrupts: fixed and variable (M16C feature) • Fixed have vectors to ISRs at hardware-defined address • Examples: undefined instruction, overflow, BRK, address match, single step, WDT, DBC, UART1, Reset • Variable have vectors to ISRs at user-definable address • Why have two kinds? • Flexibility for programmer, can use different ISRs in different operating modes • Different MCUs have different interrupts
Fixed Vector Table RESET: .lword start makes RESET vector point to the function “start”
Checklist for Using Interrupts in C • Read • Software Manual, pp. 247-262 • C Language Programming Manual, pp. 109-114 • Configure MCU • Set up peripheral to generate interrupt • Enable interrupts for system (set I bit in FLG) • Write ISR my_isr and identify it as an ISR using#pragma INTERRUPT my_isr • Register ISR in interrupt vector table
Configure MCU • Configure Peripheral to Generate Interrupt • XXXic is interrupt control register for the peripheral (M16C26 Hardware Manual p. 49) • At least four fields – look in sfr262.h for field names • Interrupt level (3 bits) • Sets priority of interrupt. If 0, is disabled. Processor will not respond to interrupts with priority level < processor interrupt priority level • ilvl0_XXXic, ilvl1_XXXic, ilvl2_XXXic. • Interrupt Request (1 bit) – if 1, the condition for generating an interrupt is true (can read this field even if interrupt is disabled) • Configure MCU to respond to the interrupt • Set global interrupt enable flag I (in FLG) • This flag does not enable all interrupts; instead, it is an easy way to disableinterrupts • Use inline assembly code to set the flag: _asm(“fset i”)or use ENABLE_IRQ macro in skp_bsp.h • MCU has eight interrupt priority levels (IPL bits in FLG), is 0 after reset • Set using inline assembly code • To respond to interrupt, I flag must be 1, interrupt request bit must be 1 and interrupt priority level must be > processor IPL
Rules for writing ISRs No arguments or return values – void is only valid type Keep it short and simple Much easier to debug Improves system response time Tell compiler it’s an ISR ISR has a different stack frame compared with subroutine Saves all registers Flag register saved Different return needed (REIT vs. EXITD) So use #pragma INTERRUPT my_isr Register bank switching Issue: ISR needs to save all registers which it may modify – may be too slow! Use INTERRUPT/B for faster interrupt response Compiler inserts code to switch to register bank 1 for ISR and back to bank 0 on return (fset B, fclr B) This only works if interrupts can’t be interrupted (don’t set I flag while in ISR) Write Interrupt Service Routine #pragma INTERRUPT my_isr /* or INTERRUPT/B */ void my_isr(void) { /* do whatever must be done */ }
Modify vector table in sect30.inc to point to our ISR so MCU vectors to our code when our interrupt occurs Find the correct interrupt vector to replace Replace dummy_int vector with _my_isr (address of the function) dummy_int is an ISR which returns immediately, doing nothing All unused vectors are filled with this by default in sect30.inc Compiler prepends _ to C symbol names for uniqueness when compiling So, we need to prepend _ when referencing C symbols (functions and variables) from asm Add .glb _my_isr directive to tell assembler the symbol _my_isr is defined elsewhere (“global”) .section vector ; variable vector table .org VECTOR_ADR … .lword dummy_int ; TIMER B1 (for user) (vector 27) .lword dummy_int ; TIMER B2 (for user) (vector 28) .lword dummy_int ; INT0 (for user) (vector 29) .lword dummy_int ; INT1 (for user) (vector 30) .lword dummy_int ; Reserved … Register the Interrupt Vector
Modify vector table in sect30.inc to point to our ISR so MCU vectors to our code when our interrupt occurs Find the correct interrupt vector to replace Replace dummy_int vector with _my_isr (address of the function) dummy_int is an ISR which returns immediately, doing nothing All unused vectors are filled with this by default in sect30.inc Compiler prepends _ to C symbol names for uniqueness when compiling So, we need to prepend _ when referencing C symbols (functions and variables) from asm Add .glb _my_isr directive to tell assembler the symbol _my_isr is defined elsewhere (“global”) .section vector ; variable vector table .org VECTOR_ADR … .lword dummy_int ; TIMER B1 (for user) (vector 27) .lword dummy_int ; TIMER B2 (for user) (vector 28) .glb _my_isr .lword _my_isr ; INT0 (for user) (vector 29) .lword dummy_int ; INT1 (for user) (vector 30) .lword dummy_int ; Reserved … Register the Interrupt Vector
Program requirements: Req1: When SW1 is pressed, toggle the red LED Req2: When SW2 is pressed, toggle the yellow LED Req3: Count the switch presses for SW1 and SW2 Req4: Use interrupts for switch press detection All of the switches on our board are attached to port 8 (see schematic) SW1 = p8_3 => Interrupt 1 SW2 = p8_2 => Interrupt 0 SW3 = p8_1 => (see schematic) Button presses are “negative logic” so the interrupt will be based on the negative edge (1 -> 0) of the press. Building a Program – Start with the basics
ISR Task Global Variable System Tasks and Data Flow Main (does initialization, then does nothing) INT1ISR YellowCount INT0ISR RedCount
Write the algorithms/architecture: switch1_isr will be the interrupt service routine called when SW1 is pressed, triggering int1 switch2_isr will be the interrupt service routine called when SW2 is pressed, triggering int0 init_switches will be the subroutine to set the ports connected to SW1, SW2 and SW3 to inputs init_LEDs will be the subroutine to set the ports connected to the LEDs to outputs init_ints will be the subroutine to initialize the controller for interrupts 0 & 1 Building a Program – Break into Pieces
IT IS ALWAYS BEST TO START SIMPLE!!!!!!! Verify that each part of the basic system runs as you build software. Easier to debug – easier to exclude potential sources of problems, so bugs can be found faster Use an incremental approach to verify system works Initialize ports for LEDs and switches Test 1: Verify LEDs work – Turn on all LEDs Test 2: Verify switches work – light LEDs based on switches Test 3: Add interrupts and test they work Do LEDs toggle? Set breakpoints – do counts increase correctly? Use #defined symbols rather than “magic numbers” to help convey meaning of operation Start with the Basics, and Trust Nothing
Defining Names and Connections // How LEDs are connected #define RED_LED (p8_0) #define RED_LED_DIR (pd8_0) #define YEL_LED (p7_4) #define YEL_LED_DIR (pd7_4) #define GRN_LED (p7_2) #define GRN_LED_DIR (pd7_2) // dir selection for GPIO #define DIR_IN (0) #define DIR_OUT (1) // control for LEDs. Since // LEDs are active low, // 0 is ON, 1 is OFF #define LED_ON (0) #define LED_OFF (1) // polarity selection for // interrupts #define FALLING_EDGE (0) #define RISING_EDGE (1) // identify which switch is connected to which input #define SW1 (p8_3) #define SW1_DIR (pd8_3) #define SW2 (p8_2) #define SW2_DIR (pd8_2) #define SW3 (p8_1) #define SW3_DIR (pd8_1) int red_count; // count SW1 presses int yellow_count; // count SW2 presses void init_switches(void) { // set up GPIO bits for switches to // be inputs SW1_DIR = SW2_DIR = SW3_DIR = DIR_IN; } void init_LEDs(void) { RED_LED_DIR = YEL_LED_DIR = GRN_LED_DIR = DIR_OUT; RED_LED = YEL_LED = GRN_LED = LED_OFF; red_count = yellow_count = 0; }
Testing LEDs and Switches void init_LEDs(void) { RED_LED_DIR = YEL_LED_DIR = GRN_LED_DIR = DIR_OUT; RED_LED = YEL_LED = GRN_LED = LED_ON; RED_LED = YEL_LED = GRN_LED = LED_OFF; red_count = yellow_count = 0; } void test_switches(void) { for(;;) { // infinite loop if (!SW1) RED_LED = LED_ON; else RED_LED = LED_OFF; if (!SW2) YEL_LED = LED_ON; else YEL_LED = LED_OFF; if (!SW3) GRN_LED = LED_ON; else GRN_LED = LED_OFF; } } Test LEDs here. Step throughwith debugger, since LEDs would be on for less than amicrosecond at normal speed Test switches here. Can run code at normal speedsince it echoes user behavior
sect30_26skp.inc .glb _switch2_isr .lword _switch2_isr ; INT0 (vector 29) .glb _switch1_isr .lword _switch1_isr ; INT1 (vector 30) Adding and Testing Interrupts /** Sets INT0 and INT1 to priority * level 7, triggering on falling * edge. */ void init_ints(void) { // set interrupt priority level // for int0 to 7 (binary 111) ilvl0_int0ic = 1; ilvl1_int0ic = 1; ilvl2_int0ic = 1; // set int0 to trigger on // negative edge (1->0) pol_int0ic = FALLING_EDGE; // set interrupt priority level // for int1 to 7 (binary 111) ilvl0_int1ic = 1; ilvl1_int1ic = 1; ilvl2_int1ic = 1; // set int1 to trigger on // negative edge (1->0) pol_int1ic = FALLING_EDGE; } #pragma INTERRUPT switch1_isr void switch1_isr(void) { red_count++; if(red_count % 2) RED_LED = LED_ON; else RED_LED = LED_OFF; } #pragma INTERRUPT switch2_isr void switch2_isr(void) { yellow_count++; if(yellow_count % 2) YEL_LED = LED_ON; else YEL_LED = LED_OFF; }
Main Function void main(void) { init_switches(); init_LEDs(); init_ints(); RED_LED = LED_ON; // remove once the program works test_switches(); // remove once the program works _asm("fset i"); // enable interrupts while (1) { // can do other work here, and the LEDs will still // toggle on a switch press, because the interrupt will // interrupt any work being done here. } }
Comparing Functions and ISRs void normal_function(void) { _normal_function: count++; ENTER #00H } ADD.W #1H,0400H EXITD #pragma INTERRUPT isr _isr: void isr(void) { PUSHM R0,R1,R2,R3,A0,A1 count++; ENTER #00H } ADD.W #1H,0400H POPM FB POPM R0,R1,R2,R3,A0,A1 REIT #pragma INTERRUPT/B reg_bank_b_isr _reg_bank_b_isr: void reg_bank_b_isr(void) { FSET B count++; ENTER #00H } ADD.W #1H,0400H POPM FB REIT