Download
1 / 32
320 likes | 343 Vues
Streamline person search, data entry, and record reconciliation with fuzzy searches, demographics, locators, and condition tracking in multiple languages. Add, view, update persons in a user-friendly interface.

E N D
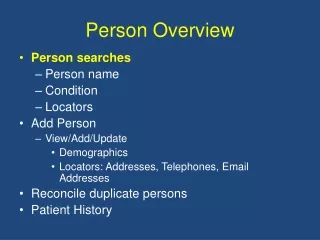
Person Overview • Person searches • Person name • Condition • Locators • Add Person • View/Add/Update • Demographics • Locators: Addresses, Telephones, Email Addresses • Reconcile duplicate persons • Patient History
Minimum Person Search Use “fuzzy” searches for persons (parties) in WebSurv. Searches should begin with 4-5 letters of the last name and 1-2 letters of the first name. To add a person to WebSurv, the first and last name must be entered before saving.
Hide Search Tips Conduct a fuzzy search
Entry of Person Without Full Name If a first or last name of a person cannot be obtained – enter “UNKNOWN” in the appropriate name field.
Change fuzzy search or Click correct person or or Click correct person Check address(s) or or Change fuzzy search Check Address(s) Search MOHSAIC or Search MOHSAIC Change fuzzy search Or Click on correct person Or Check address Or Search MOHSAIC
Search Conditions/Notification • Date Type • Entry Date, Notification Date, Report Date • Managed or Counted • Condition Status • Confirmed, Probable, No Case, etc. • Identifier: Number (Condition ID # or NETSS#) • Identifier Type • Condition (CID #) or NETSS (ID# submitted to CDC) • Once notifications are returned several functions are available • Sort by a variety of variables • Enter individual case reports • Print a CD1 or Print the Line Listing of reports
Results based on search by date - you can search up to 90 days Click on ConditionName, Print CD1 or Print Listing
Select the Locator link on Person tab to search by locator Can search by address or telephone
Search results based on address Links to Yahoo Maps
Locators Guidance • Street names – do not use abbreviations. Ex. – use Martin L King instead of MLK. • Numbered streets should be entered as a number instead of spelled out. Ex. – 1st, 2nd, instead of first or second. • City names – use names in dropdown list. No punctuation or abbreviations are used.
Locators Enter begin and end dates for parties. • Use the date of report or the current date as the begin date (as of date). Use end date when adding a second address. This will help identify the current address when multiple address entries are present.
Person Overview • Person searches • Person name • Condition • Locators • Add Person • View/Add/Update • Demographics • Locators: Addresses, Telephones, Email Addresses • Reconcile duplicate persons • Patient History
If no matches are found during your search, a new person can be added
Note the required fields! Don’t forget to Save!!!
After new person is added and data is entered and saved, this verification screen will appear.
Click Locators link to get this address page Click Add Address button to add a new address
Geocoding When a party address is entered WebSurv will attempt to “geocode” or map the address. • If the system recognized the address it will automatically assign the county. • Unfortunately, there are times when the county assigned is not correct. • Live near the county line, rural areas, others • Ex. address is a town that is in one county though the actual home is the neighboring county. • Contact the DHSS Staff for assistance (contact information provided at the end of the manual)
Once all data is entered, click Add to List. You can add multiple phone numbers. Don’t forget to save your work! Adding an email address works the same way
Editing Locators • Search person • Select the correct person to open their record • Click the + on the tree next to the Locators tab • Click the link that corresponds with the data you want to edit • Click the Edit tab next to the data variable you want to edit (can edit address type, begin/end date and primary/sensitive status). • To change an address • place an end date on the old address, add new address and save as primary. • Save your work!
Click Address link Click Edit to edit the existing address
Person Overview • Person searches • Person name • Condition • Locators • Add Person • View/Add/Update • Demographics • Locators: Addresses, Telephones, Email Addresses • Reconcile duplicate persons • Patient History
Click Reconciliation link • Search and add the person’s “Primary” name • Search and add the non primary name • Once both names are added and correct, click the Process Reconciliation button to complete
This screen will appear if the reconciliation was successful
Person Overview • Person searches • Person name • Condition • Locators • Add Person • View/Add/Update • Demographics • Locators: Addresses, Telephones, Email Addresses • Reconcile duplicate persons • Patient History
Patient History • The information in the Patient History tab is specific to the patient (not the condition) and will generally not be used for most conditions. • There are some variables (i.e. Hospitalized, Medications) that are also in the condition specific screens. • Make sure to enter the information regarding the condition in the condition specific screens and not in Patient History!
When to Use Patient History • The contacts screen should be used to document the parent/guardian information. • Information regarding immunizations from MOHSAIC will be available through the vaccinations link. • Make sure vaccine information is entered into MOHSAIC.
Note the History Tab is collapsed! Do not enter condition specific information into the History Tab Fields! The History Tab will not be used for most cases and therefore you can usually leave the tab collapsed and skip over to the conditions!