Design Example
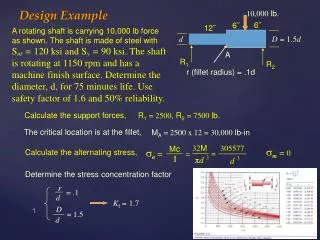
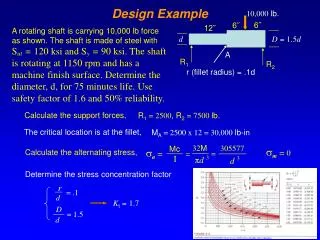
Calculate the support forces, . R 1 = 2500 , R 2 = 7500 lb. The critical location is at the fillet,. M A = 2500 x 12 = 30,000 lb-in. 32 M. 305577. Mc. a =. Calculate the alternating stress,. =. =. I. π d 3. d 3. Determine the stress concentration factor. D. r. = 1.5. = .1.

Design Example
E N D
Presentation Transcript
Calculate the support forces, R1= 2500, R2= 7500 lb. The critical location is at the fillet, MA= 2500 x 12 = 30,000 lb-in 32M 305577 Mc a= Calculate the alternating stress, = = I πd 3 d 3 Determine the stress concentration factor D r = 1.5 = .1 Kt = 1.7 d d 10,000 lb. 6˝ 6˝ 12˝ A rotating shaft is carrying 10,000 lb force as shown. The shaft is made of steel withSut = 120 ksi and Sy = 90 ksi. The shaft is rotating at 1150 rpm and has a machine finish surface. Determine the diameter, d, for 75 minutes life. Use safety factor of 1.6 and 50% reliability. d D = 1.5d A R1 R2 r (fillet radius) = .1d m= 0 Design Example
Using r = .1and Sut = 120 ksi, q (notch sensitivity) = .85 Csurf = A (Sut)b = 2.7(120)-.265 = .759 0.3 in. < d ≤ 10 in. Csize = .869(d)-0.097 = .869(1)-0.097 = .869 Assume d = 1.0 in Kf= 1 + (Kt – 1)q = 1 + .85(1.7 – 1) = 1.6 Calculate the endurance limit Cload = 1 (pure bending) Crel = 1 (50% rel.) Ctemp= 1 (room temp) Design Example ′ Se = Cload Csize Csurf Ctemp Crel (Se) = (.759)(.869)(.5x120) = 39.57 ksi
39.57 ( ) log ⅓ .9x120 86250 ( ) Sn 39.57 = = 56.5 ksi 106 Sn 56.5 305577 n = a= = .116 < 1.6 = = 305.577 ksi Kfa 1.6x305.577 d 3 So d = 1.0 in. is too small Se ( ) .9Sut log ⅓ Assume d = 2.5 in N ( ) Se Sn = All factors remain the same except the size factor and notch sensitivity. 106 Using r = .25and Sut = 120 ksi, q (notch sensitivity) = .9 Kf= 1 + (Kt – 1)q = 1 + .9(1.7 – 1) = 1.63 Se =36.2 ksi → Design life, N = 1150 x 75 = 86250 cycles Design Example Csize = .869(d)-0.097 = .869(2.5)-0.097 = .795
36.2 ( ) log ⅓ .9x120 86250 ( ) Sn 36.20 = = 53.35 ksi 305577 a= 106 = 19.55 ksi (2.5)3 Sn 53.35 n = = 1.67 ≈ 1.6 = Kfa 1.63x19.55 d=2.5 in. Check yielding Sy 90 n= 2.8 > 1.6 okay = = Kfmax 1.63x19.55 Se =36.2 ksi → Design Example
6˝ 6˝ 12˝ d D = 1.5d A R1 R2 = 7500 Sn r (fillet radius) = .1d 56.5 n = Calculate an approximate diameter = .116 < 1.6 = Kfa 1.6x305.577 Sn 56.5 n = → d = 2.4 in. = = 1.6 So d = 1.0 in. is too small Kfa 1.6x305.577/d 3 Check the location of maximum moment for possible failure So, your next guess should be between 2.25 to 2.5 Mmax (under the load) = 7500 x 6 = 45,000 lb-in Design Example – Observations MA (at the fillet) = 2500 x 12 = 30,000 lb-in But, applying the fatigue stress conc. Factor of 1.63,Kf MA = 1.63x30,000 = 48,900 > 45,000
Fillet r 4 = .16 = 25 d Kt = 1.76 D 35 = = 1.4 d 25 A section of a component is shown. The material is steel with Sut = 620 MPa and a fully corrected endurance limit of Se = 180 MPa. The applied axial load varies from 2,000 to 10,000 N. Use modified Goodman diagram and find the safety factor at the fillet A, groove B and hole C. Which location is likely to fail first? Use Kfm = 1 Pm = (Pmax + Pmin) / 2 = 6000 N Pa = (Pmax – Pmin) / 2 = 4000 N Example
Calculate the alternating and the mean stresses, Pa 4000 a= 1.65 = 52.8 MPa Kf = A 25x5 Pm 6000 m= = 48 MPa = A 25x5 Fatigue design equation a m 1 Infinite life = + 1 n Sut 52.8 48 Se n = 2.7 → = + n 180 620 Using r = 4and Sut = 620 MPa, q (notch sensitivity) = .85 Kf= 1 + (Kt – 1)q = 1 + .85(1.76 – 1) = 1.65 Example
d 5 → Kt= 2.6 = = .143 w 35 Using r = 2.5and Sut = 620 MPa, q (notch sensitivity) = .82 Calculate the alternating and the mean stresses, Pm 6000 m= = 40 MPa = A 30x5 Pa 4000 a= 2.3 = 61.33 MPa Kf = A (35-5)5 1 61.33 40 n = 2.5 → = + n 180 620 Hole Kf= 1 + (Kt – 1)q = 1 + .82(2.6 – 1) = 2.3 Example
Using r = 3and Sut = 620 MPa, q (notch sensitivity) = .83 Calculate the alternating and the mean stresses, Pm 6000 m= = 41.4 MPa = A 29x5 Pa 4000 a= 2.1 = 58.0 MPa Kf = A (35-6)5 1 58.0 41.4 n = 2.57 → = + n 180 620 Groove r 3 = .103 = 29 d → Kt= 2.33 D 35 = = 1.2 d 29 Kf= 1 + (Kt – 1)q = 1 + .83(2.33 – 1) = 2.1 Example The part is likely to fail at the hole, has the lowest safety factor
Fa= (Fmax – Fmin) / 2=7.5 lb. Fm= (Fmax + Fmin) / 2=22.5 lb. Ma=7.5 x 16 = 120 in - lb Mm=22.5 x 16 = 360 in - lb 32Ma 32(120) Mc a= = = 23178.6 psi = I πd 3 π(.375)3 32Mm 32(360) Mc m= = 69536 psi = = I πd 3 π(.375)3 The figure shows a formed round wire cantilever spring subjected to a varying force F. The wire is made of steel with Sut = 150 ksi. The mounting detail is such that the stress concentration could be neglected. A visual inspection of the spring indicates that the surface finish corresponds closely to a hot-rolled finish. For a reliability of 99%, what number of load applications is likely to cause failure. Example MAE dept., SJSU
A95= .010462d 2 (non-rotating round section) dequiv= √ A95 / .0766 = .37d = .37 x.375 = .14 1 23178.6 69536 n = .7< 1 → a → m = + 1 n 24077 150000 = + Finite life n Sut Se Find Sn, strength for finite number of cycle a m 23178.6 69536 Sn = 43207 psi → 1 → = 1 + = + Sut Sn Sn 150000 Calculate the endurance limit Csurf = A (Sut)b = 14.4(150)-.718 = .394 Cload = 1 (pure bending) Ctemp= 1 (room temp) Crel= .814 (99% reliability) dequiv= .14 < .3 → Csize = 1.0 Se = Cload Csize Csurf Ctemp Crel (Se) = (.394)(.814)(.5x150) = 24.077 ksi Example
24.077 ( ) log ⅓ .9x150 N ( ) 24077 = → 43207 106 Se ( ) .9Sut log ⅓ N ( ) Se Sn = 106 N = 96,000 cycles Example

