Class
Class. Class หมายถึง โครงสร้างของ object ซึ่งมีการจัดกลุ่มของโครงสร้างจากคุณสมบัติที่เราสนใจว่ามี Attribute และ Method อะไรบ้าง ชนิดของ Class Concrete Class คือ Class ทั่วไปที่เรียกใช้ได้เลย Abstract Class คือ Class ใช้งานในแบบลำดับชั้น


Class
E N D
Presentation Transcript
Classหมายถึง โครงสร้างของ object ซึ่งมีการจัดกลุ่มของโครงสร้างจากคุณสมบัติที่เราสนใจว่ามี Attribute และ Method อะไรบ้าง ชนิดของ Class • Concrete Classคือ Class ทั่วไปที่เรียกใช้ได้เลย • Abstract Classคือ Class ใช้งานในแบบลำดับชั้น • Interfaceคือ ใช้สำหรับรวบรวมค่าคงที่ (Constant) และ Abstract method ไว้ด้วยกัน
class ClassName { …….. } • การประกาศ Class ในจาวา จะมีรูปแบบดังต่อไปนี้ • โปรแกรม Java 1 โปรแกรม สามารถมีโครงสร้างที่ประกอบด้วย Class ตั้งแต่ 1 Class ขึ้นไปได้ และเมื่อมีการ Compile โปรแกรม จะทำให้ได้ไฟล์ที่มีนามสกุลเป็น .class สำหรับแต่ละ Class ออกมาที่มีชื่อไฟล์เหมือนกับชื่อ Class
ข้อกำหนดในการตั้งชื่อไฟล์และชื่อ Class 1) กรณีที่ Class ไม่มี modifier (เช่น ‘public’ หรือ ‘private’) ระบุอยู่หน้า ‘class’ ชื่อของ Class ไม่จำเป็นต้องเกี่ยวข้องกับชื่อของไฟล์โปรแกรม จะสร้างตั้งชื่อไฟล์โปรแกรมเป็นชื่ออะไรก็ได้ เช่น จะเห็นว่าไฟล์โปรแกรมชื่อ class1.java แต่ชื่อ Class เป็น Class1, Class2 และ Class3 เมื่อมีการ Compile จะทำให้ได้ไฟล์ Class1.class, Class2.class และ Class3.class เกิดขึ้น // class1.java class Class1 { } class Class2 { } class Class3 { }
2) ถ้า Class มี modifier คือ ‘public’อยู่หน้าคำว่า ‘class’ จะต้องตั้งชื่อไฟล์ให้เหมือนกับชื่อ Class และจำเป็นต้องมี ‘public’ ได้ไม่เกิน 1 class เท่านั้น ดังนั้นตัวอย่างต่อไปนี้จะไม่ถูกต้อง 3) โดยทั่วไปแล้ว ถ้าไฟล์นั้นมีเพียง Class เดียว ก็ควรตั้งชื่อไฟล์และชื่อ Class ให้เหมือนกัน // class1.java public class Class1 { } // Test3.java public class Test3 { } public class Class1 { }
4) ถ้าเป็นไฟล์ของ Application Programที่มีหลาย Class จะต้องมี 1 class ที่มีเมธอด main() อยู่ภายใน และจะต้องตั้งชื่อ class ที่มี main() อยู่นั้นให้เหมือนกับชื่อไฟล์ (ยกเว้นว่า ถ้าทุก Class ไม่มี modifier อยู่ข้างหน้า ก็จะตั้งชื่อไฟล์เป็นอะไรก็ได้) 5) การตั้งชื่อ class นิยมขึ้นต้นด้วยตัวอักษรตัวใหญ่ ส่วนชื่อของ variables, method และ instance จะขึ้นต้นด้วยตัวอักษรตัวเล็ก
Declaring and Creating Objects • Class เปรียบเสมือนกับเป็นพิมพ์เขียว(Blueprint) ที่ใช้เป็นต้นแบบในการสร้าง Objects • ข้อมูล(Data) และ Method ของ Objects จะต้องถูกสร้างอยู่ภายใน Class • ใน Java การสร้าง Object ก็คือการสร้าง Instanceของ Class หรือเรียกได้อีกอย่างว่าเป็นการ “Instantiating a class”
การสร้าง Instance ของ class ใน Java จะมีรูปแบบดังต่อไปนี้ Rectangle rect; rect = new Rectangle(); • หรือสามารถเขียนได้อีกรูปแบบหนึ่งคือ ClassName objectName = new ClassName(); เช่น Rectangle rect = new Rectangle();
การสร้าง Instance ข้างต้น จะประกอบด้วยขั้นตอนการทำงาน 3 ขั้นตอนคือ 1. Declarationได้แก่ Rectangle rect - rect จะเป็นตัวแปรที่เรียกว่า Reference Variableหรือ Object ที่จะประกาศให้ Compiler รู้ว่า rect จะถูกใช้ในการอ้างอิง ถึง Object Rectangle - ให้สังเกตว่าชื่อ Class สามารถถูกใช้เป็นชนิดตัวแปรได้ด้วย
2. Instantiation :ได้แก่ การใช้ Operatornew - เป็นการสร้าง Object ใหม่ขึ้นมาคือ Rectangle ซึ่งจะมีการจองเนื้อ ที่หน่วยความจำให้สำหรับ Object ที่สร้างขึ้นมานี้ด้วย 3. Initialization :ได้แก่ Rectangle() - เป็นการกำหนดค่าเริ่มต้นของ Object โดยผ่าน Constructor ชื่อ Rectangle() (จากตัวอย่างนี้จะไม่มีการกำหนดค่าเริ่มต้นให้แก่ Object Rectangle)
สามารถแทนการประกาศและการสร้าง Object ด้วยรูปภาพดังนี้ Class ประกาศ สร้าง Reference Variables หรือ Object Name Objects อ้างถึง
การอ้างถึง Attibute และ Method • หลังจากที่ Object ถูกสร้างขึ้นมาแล้ว การจะเข้าถึงข้อมูลและ Method ของ Object ได้ จะทำได้โดยการใช้สัญลักษณ์ dot(.) ดังนี้ objectName.attribute ==> เป็นการอ้างถึงข้อมูลของ Object objectName.method ==> เป็นการอ้างถึง Method ของ Object
ตัวอย่างการสร้างและการใช้งาน Object 1 class Testclass{ public static void main(String[] args){ Method_return x = new Method_return (); int m = x.fac(5); System.out.println(“The factory is "+m); } } The factory is 120
class Method_return{ int fac( int n) { int f = 1; for (int i=1;i<=n;i++) f*=i; return f; } }
ตัวอย่างการสร้างและการใช้งาน Object2 class TestRectangle {public static void main(String[] args) {Rectangle rect = new Rectangle(); System.out.println(“Width is ”+rect.width+ “ Height is ”+rect.height); System.out.println(“Area of Rectangle is ”+rect.findArea()); }}class Rectangle { double width = 100.0; double height = 50.0;double findArea() { return (width * height); }} Width is 100.0 Height is 50.0 Area of Rectangle is 5000.0
ตัวอย่างการสร้างและการใช้งาน Object3 class TestStudent{ public static void main(String[] args){ Student z = new Student(); z.id= 46001; z.setName("Malee"); z.setGpa (4.00); System.out.println(z.id +" "+ z.getName()+" "+ z.getGpa()); } } 46001 Malee 4.00
class Student{ public int id; private String name; private double gpa; public void setName(String n){ name = n; } public String getName(){ return name; } public void setGpa(double g){ gpa = g; } public double getGpa(){ return gpa; } }
Method • การเรียกใช้งาน Method • Method ที่ถูกสร้างจะทำงานได้ ก็ต่อเมื่อมีการเรียกใช้งาน • ในการเรียกใช้งาน Method ทำได้โดยการอ้างถึงชื่อ Method นั้นโดยตรง ดังตัวอย่างต่อไปนี้ ตัวอย่างนี้เป็น การเรียกใช้ Method ชื่อ maxValue ในขณะเดียวกันก็จะส่งข้อมูลที่เป็น argumentหรือ actual parameterอันได้แก่ ตัวเลข 3 และ 4 ไปให้กับ Method maxValue ด้วย ผลลัพธ์ที่ถูกส่งกลับมาจาก Method maxValue จะถูกนำไปเก็บไว้ในตัวแปร large ที่มีชนิดข้อมูลเป็น integer int large = maxValue(3,4);
Pass by Value • เมื่อมีการเรียกใช้งาน Method ที่มี parameter ที่เป็น primitive data type เช่น int ค่าของ argument จะถูกส่งไปยัง Method ที่ถูกเรียก และเก็บไว้ใน parameterของ Method • การเปลี่ยนแปลงค่าข้อมูลภายใน parameterจะไม่มีผลกระทบกับค่าของ argumentแต่อย่างใด ลักษณะการส่งข้อมูลแบบนี้จะเรียกว่า “pass by value”
argment parameter Copy by value • ก่อนการส่งค่าจะเกิดขึ้น argumentsจะถูกคำนวณให้ได้ผลลัพธ์ก่อน แล้วค่านั้นจะถูกส่งให้แก่ parameter • จะมีการกำหนดค่าแบบ copy by value คือ ค่าในกล่อง value ของargumentถูก copy ให้แก่ parameter
var1 = 5; var2 = 5; System.out.println("var1(before) = " +var1); System.out.println("var2(before) = " +var2); objA.methodA(var1, var2); System.out.println("var1(after) = " + objA.x); System.out.println("var2(after) = " + objA.y); } } Class A { int x = 10, y =10; void methodA (int a, int b) { x = a; y = b; } } class TestPassByValue { public static void main (String args[]) { int var1, var2; A objA = new A(); • ตัวอย่าง Pass by Value var1(before)=5 var2(before)=5 var1(after)= 10 var2(after)=10
Pass by Refference • argument ต้องเป็น ตัวแปรเท่านั้น • เมื่อเกิดการเรียก method ค่า address ของตัวแปรที่ เป็น argument จะถูกส่งให้แก่ parameter • ใช้การกำหนดค่าแบบ copy by reference คือ ค่าในกล่อง address ของ argument ถูก copy ให้แก่ parameter argument parameter Copy by reference
class A { int x = 10, y = 10; void methodA (B objB) { objB.var1 = x; objB.var2 = y; } } class B { int var1, var2;} class TestPassByValue1 { public static void main(String args[]) { B objB = new B(); A objA = new A(); objB.var1 = 5; objB.var2 = 5; System.out.println("var1(before)="+objB.var1); System.out.println("var2(before)="+objB.var2); objA.methodA(objB); System.out.println("var1(after)="+objB.var1); System.out.println("var2(after)="+objB.var2); } } • ตัวอย่าง Pass by reference var1(before)=5 var2(before)=5 var1(after)=10 var2(after)=10
Constructor • Java จะยอมให้มีการกำหนดค่าเริ่มต้นให้กับข้อมูลของ Object ในขณะที่สร้าง Object ขึ้นมาได้ โดยใช้สิ่งที่เรียกว่า Constructor • Constructor ก็คือ Method ที่มีชื่อเหมือนกับ class นั้น และจะถูกเรียกให้มีการทำงานเสมอเมื่อมีการสร้าง Object ขึ้นมา • ค่า Accessibility ของ Constructor มี 2 ค่า คือ public และ default เท่านั้น • Header ของConstructor ต้องไม่มีค่า return_data_type หรือ key word void
Constructor สามารถถูก overloaded ได้ โดยการเรียก Constructor ที่มีชื่อเหมือนกัน แต่ส่ง argument ที่เป็นค่าเริ่มต้นของข้อมูลที่แตกต่างกันให้แก่ Constructor ได้ • การใช้งาน Overloaded Constructorนั้นทำได้โดยการเรียก Constructor และส่ง argument ที่ต้องการให้ เพื่อใช้กำหนดค่าเริ่มต้นสำหรับการสร้าง instance ซึ่ง compiler จะเป็นตัวตัดสินใจเองว่า constructor ใดจะถูกทำงาน โดยพิจารณาจาก argument ที่ส่งให้ • Constructor จะไม่ใช่ Method และจะไม่มีการ return ค่าข้อมูลใดๆกลับไป
ถ้าไม่มีการกำหนด Constructor ให้แก่ class ใดๆ compiler จะทำการ สร้าง “default constructor” ให้โดยอัตโนมัติเมื่อมีการสร้าง Instance แต่ละครั้ง ซึ่งจะไม่มีการทำงานใดๆใน default constructor นี้ • เช่น class Test{ Test(){} } Constructor
class TestConstructor { public static void main(String[] args){ Rectangle rect; rect = new Rectangle(); System.out.println("Second area = "+rect.FindArea()); rect= new Rectangle(100.0,50.0); System.out.println(”First area = "+rect.FindArea()); } } Second area =1.0 ตัวอย่างการใช้ Constructor1 First area =5000.0
class Rectangle { double width, height; Rectangle(double w, double h) { width = w; height = h; } Rectangle() { width = 1.0; height = 1.0; } double FindArea() { return (width * height); } }
ตัวอย่างการใช้ Constructor 2 public class TestStudent{ public static void main(String args[]) { Student x = new Student(); Student y = new Student("John Rambo“,3.50); Student z = new Student(y); System.out.println(x.getName()+" "+x.getGpa()); System.out.println(y.getName()+" "+y.getGpa()); System.out.println(z.getName()+" "+z.getGpa()); } } null 0.0 John Rambo 3.50 John Rambo 3.50 y.setName(“John Rambo”); y.setGpa(3.50); System.out.println(y.getName()+" "+y.getGpa());
public void setName(String n) { name = n; } public String getName() { return name; } public void setGpa(double g) { gpa = g;} public double getGpa() { return gpa; } } class Student { private String name; private double gpa; public Student() { name = null; gpa = 0.0; } public Student(String n,double g) { name = n; gpa = g; } public Student(Student s) { name = s.name; gpa = s.gpa; }
Overloading มี 2 แบบคือ 1.Overloading Method - Java จะอนุญาตให้ Method มากกว่า 1 Method มีชื่อที่เหมือนกันได้ แต่ต้องมี parameter ที่แตกต่างกัน ซึ่งเรียกว่า Overloading Methods เช่น MyMethod(1); MyMethod(1,2);
- Java Compiler สามารถที่จะตรวจสอบได้ว่า Method ใดถูกเรียกขึ้นมาทำงาน ซึ่งมันจะดูจากจำนวนและชนิดข้อมูลของ parameter ที่ถูกส่งให้กับ Method นั่นเอง - Java Compiler ไม่อนุญาต ให้ Method ที่เป็น Overloading มี return type ที่ต่างกัน เช่น public String Getdate(); public int Getdate();
ตัวอย่างการใช้ Overloading Method public class MaxOverCons{ public static void main(String args[]) { FindMax maxval = new FindMax(); System.out.prinln(“The Max value1 is ” + maxval.max(3,4)); System.out.prinln(“The Max value2 is ” + maxval.max(4.5,7.9)); } } The Max value1 is 3 The Max value1 is 7.9
int max(int n1, int n2){ if (n1>n2) return n1; else return n2; } } Class FindMax{ double max(double n1, double n2){ if (n1>n2) return n1; else return n2; }
2.Overloading Constructor - Overloading Constructor จะคล้ายกับ Overloading Method ตรงที่ใช้ชื่อเหมือนกัน แต่parameter ต่างกัน - Overloading Constructor จะไม่มีการคืนค่า คือไม่มีคำว่า return เช่น public Circle(double a, double b, double c) public Circle(double c) public Circle(Circle aCircle)
public void setName(String n) { name = n; } public String getName() { return name; } public void setGpa(double g) { gpa = g;} public double getGpa() { return gpa; } } class Student { private String name; private double gpa; public Student() { name = null; gpa = 0.0; } public Student(String n,double g) { name = n; gpa = g; } public Student(Student s) { name = s.name; gpa = s.gpa; }
ตัวอย่างการใช้ Overloading Constructor public class Student_Cons1{ public static void main(String args[]) { Student x = new Student(); Student y = new Student("John Rambo“,3.50); Student z = new Student(y); System.out.println(x.getName()+" "+x.getGpa()); System.out.println(y.getName()+" "+y.getGpa()); System.out.println(z.getName()+" "+z.getGpa()); } } null 0.0 John Rambo 3.50 John Rambo 3.50
This References • เพื่อใช้ในการเรียกสมาชิกภายในคลาสได้ทันทีโดยไม่ต้องมีประโยคประกาศใดๆ • this นี้จะใช้ได้ภายในคลาสของตัวเองเท่านั้น • เพื่อให้เกิดความแตกต่างของตัวแปรระหว่าง class และ ภายใน method
การใช้ This อ้างถึงตัวแปรของ class จะใช้ในการอ้างถึงชื่อสมาชิกในคลาสนั้นเพื่อให้แตกต่างจากชื่ออื่น เนื่องจากสมาชิกของคลาสอาจมีชื่อเหมือนกับชื่อพารามิเตอร์ของบาง Method ในคลาส หรือมีชื่อเหมือนกับสมาชิกในคลาสอื่นที่ถูกอ้างถึงในคลาสนั้น รูปแบบ this.attribute
ตัวอย่างการใช้ This Attribute1 Class Complex { private double r,i; Complex(double r, double i) { this.r = r; this.i = i} public void add(Complex c) { r += c.r; // หรือ this.r +=c.r; i += c.i; // หรือ this.i+=c.i; } }
ตัวอย่างการใช้ This Attribute2 class Rectangle { double width, height; Rectangle(double width, double height) { this.width= width; this.height= height; } Rectangle() { width = 1.0; height = 1.0; } double FindArea() { return (width * height); }
การใช้ This อ้างถึง Constructor • ใช้ในการส่ง instance ของตัวเองไปให้กับ instance หนึ่งเพื่อให้ instance นั้นอ้างถึงหรือเรียกกลับมาที่ตัวเองอีกครั้งหนึ่ง • จะต้องเรียกใช้ภายใน Constructor เท่านั้น • จะต้องเรียกเป็นคำสั่งแรกใน Constructor • ใน Constructor หนึ่งจะเรียกใช้ได้ This ครั้งเดียวเท่านั้น
ตัวอย่างการใช้ This Constructor1 Class Complex { private double r,i; Complex() {this(0.0,0.0);} Complex(double r, double i) { this.r = r; this.i = i} Complex(Complex c) {this(c.r, c.i);} public void add(Complex c) { this.r += c.r; this.i += c.i; } }
ตัวอย่างการใช้ This Constructor2 class Rectangle { double width, height; Rectangle(double width, double height) { this.width = width; this.height = height; } Rectangle() {this(1.0,1.0); } double FindArea() { return (width * height); }
FindMinMax FindMinMax() min(n:int,n1:int,n2:int) : int min(n:double,n1:double,n2:double) : double max(n:int,n1:int,n2:int) : int max(n:double,n1:double,n2:double) : double TestMinMax + main():void แบบฝึกหัด 1. จงเขียนโปรแกรมหาค่า min, max โดยการเปรียบเทียบค่า 3 ค่า
FindMinMax() ใช้ในการพิมพ์ This is program for find Minimum and Maximum • min(n:int,n1:int,n2:int) ใช้หาค่าน้อยกว่าเป็น int • min(n:double,n1:double,n2:double) ใช้หาค่าน้อยกว่าเป็น double • max(n:int,n1:int,n2:int) ใช้หาค่ามากกว่าเป็น int • max(n:double,n1:double,n2:double) ใช้หาค่ามากกว่าเป็น double ผลการ RUN This is program for find Minimum and Maximum Minimum value between 23 87 59 is 23 Minimum value between 35.54 93.5 9.67 is 9.67 Maximum value between 23 87 59 is 87 Maximum value between 35.54 93.5 9.67 is 93.5
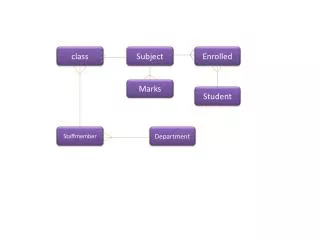
2. จากตัวอย่าง Overloading Construtor จงปรับปรุง Student String id,String name, int age, int year Student() Student(id:String,name:String,age:int,year:int) setName(name:String) : void setId(id:String) : void setAge(age:int) : void setYear(year:int) : void getName() : String getId() : String getAge() : int getYear() : int TestStudent + main():void
Student() ใช้ในการพิมพ์ ID Student Age Year • Student(id:int,name:String,age:int,year:int) กำหนดรายละเอียดข้อมูลนักศึกษา • setName(name:String) ใช้เก็บ Name นิสิต • setId(id:String) ใช้เก็บ ID นิสิต • setAge(age:int) ใช้เก็บ Age นิสิต • setYear(year:int) ใช้เก็บ Year นิสิต • getName() ใช้ return ชื่อ • getId() ใช้ returnID • getAge() ใช้ returnAge • getYear() ใช้ returnYear
ผลรัน ID Student Age Year 470001 Somchat Meedee21 3 490028 Anun Pondee19 1 480052 Bundit Jongdee 20 2 460034 Porntip Dongdang 25 4 หมายเหต 2 คนแรก ให้เรียกโดยใช้ Constructor 2 คนสุดท้าย ให้เรียกโดยใช้ Method