Download
1 / 20
200 likes | 412 Vues
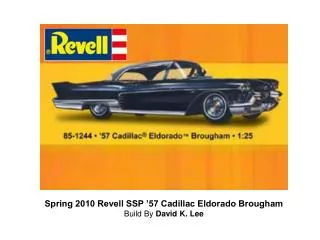
Spring 2010 Revell SSP ’57 Cadillac Eldorado Brougham Build By David K. Lee. This is a build-up from a 1996 Revell SSP reissue of the ’57 Eldorado. I built it straight out of the box, using only spray can paint and minor Additional details. No body filler was used in this build.

E N D
Spring 2010 Revell SSP ’57 Cadillac Eldorado Brougham Build By David K. Lee
This is a build-up from a 1996 Revell SSP reissue of the ’57 Eldorado. I built it straight out of the box, using only spray can paint and minor Additional details. No body filler was used in this build.
When you open the box, you’ll immediately notice the multi-piece body. Test fit these parts before solvent bonding them together. You may need to preassemble, mask and paint, then complete the body assembly. Read The instructions and see where you may need to complete assemblies Prior to painting.
I selected Testors arctic blue metallic spray enamel for the body, Silver metallic and gloss clear for the roof, and dark blue gloss for The interior. The kit features a lower body shell, into which interior parts such as the seats and side panels glue into.
Once the interior is installed, the upper body, dashboard, side trim, and Bumpers are attached, hiding some of the seams. Once the assembly Dried, I added sheets of BMF over the side trim and lower body. This Takes a bit of time to burnish into recesses, but really adds to the look!
This a vintage 1950’s kit, so there may be a sink mark on the rear fenders. I built it right out of the box and didn’t catch it till it was too late! The newer Reissue may have resolved this in the tooling. Note the fit of the rear bumper. This may need some massaging and trim work to properly align.
The front bumper is chrome plated, including running lamps and wraps around the side of the body. Attach front “V” using white glue. The license plate was printed onto ink jet paper and glued to the bumper recess.
Chromed headlamps glue into the upper body, with detail painting The front grille, running lamps, and “dagmar” rubber tips.
The rear bumpers are separate left and right chromed parts. These May be a little tricky to locate, so be prepared to do a little sanding And test fitting before gluing in place. The rear license plate was an ink jet print out, trimmed and glued in place.
The tail lamps on the vertical fins require some freehand painting for The red lens, with amber and white paint for the lower tail lamps. Use Matte black paint for the lower exhaust tips.
The front bumper may require additional support. Add a short length Of styrene tube stock between the front of the chassis and backside Of the chromed front bumper.
Once the underside chassis axles and wheels are installed, care must Taken assembling the front and rear windows, vent windows, and crowned roof.
Clean both clear window parts and apply either silver paint or bare metal foil. BMF application will really make this model shine! Once burnished and trimmed, set aside to rest.
Paint the roof metallic silver and clear gloss, this will simulate the stainless Steel roof and keep it looking clean. To join all 3 parts, they all must be Assembled together at the same time, then attached to the upper body. Use white glue for this task as it dries clear and won’t burn into the body paint.
Next comes detail painting the chromed rims with a wash of matte black Red, and gold. The tires provide a recess for painting in a white wall Stripe. Use Flat White paint for this detail-tip for an even stripe is to hold Your wet brush in one place, while rotating the tire 360 degrees!
I forgot to mention that the upper and lower body halves leave a seam Along the sides of the car. Add a thin length of styrene rod stock and Tack glue it along the seam. Once set, apply BMF to make it shine!
While your Eldo is resting, assemble the two plastic figures. These Parts require a bit of clean up, so carefully use your hobby knife (wear goggles) and sanding tools to remove flash and sprue tabs. Solvent bond the halves and allow to dry thoroughly.
I first sanded the base of each figure to assure they would stand level. Next, I primered each figure Flat White, then applied paints beginning With lighter colors, flesh tones, ending with the darkest colors. Browse The web for Period-correct fashions and colors!
2010 Revell SSP 1957 Cadillac Eldorado Brougham 1:25th Scale Parts: Approx. 40 Build Specifications Paints: Testors Trim: Evergreen Plastic Trim: Bare Metal Foil Solvent: Ambroid Plastic Weld Glues: Elmers White Glue By: David K. Lee