Ex. 9: Appendicular skeleton
This file reviews materials in Exercises 9, 10, 11 and it prepares students for the coming lab test . Ex . 9 (Appendicular skeleton ) Ex . 10 (Fetal skeleton) Ex . 11 (Articulations and body movements ) by Dr. Shaw, Zoology 251 Lab Coordinator, x7176; donalds@utm.edu.

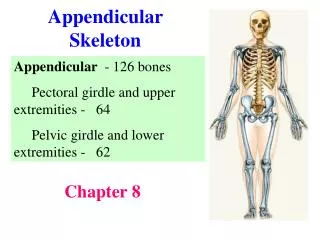
Ex. 9: Appendicular skeleton
E N D
Presentation Transcript
This file reviews materials in Exercises 9, 10, 11 and it prepares students for the coming lab test.Ex. 9 (Appendicular skeleton) Ex. 10 (Fetal skeleton) Ex. 11 (Articulations and body movements) by Dr. Shaw, Zoology 251 Lab Coordinator, x7176; donalds@utm.edu
Required bones and markings are highlighted in 3 different colors-- 1. Individual bones in green 2. Articulations, extensions, and projections in yellow (condyle, crest, facet, process, etc.) 3. Depressions, passages, and cavities in red (fissure, foramen, fossa, sinus, etc.) 3
Rightvs. Left--In order to determine if a scapula is right or left, orient it so the glenoid cavity (articulating surface) faces laterally (outward) and the spine is posterior (toward back) and superior (upper). The coracoid process should be anterior and superior. The spine points at 2 o’clock (Right side of the clock) for the right scapula, and at 10 o’clock(Left side of the clock) for the left scapula. Superior border Superior angle Suprascapular notch Acromion Acromion Supraspinous fossa Coracoid process Lateral angle Spine Glenoid Cavity (Fossa) Posterior surface Anterior surface Lateral border Medial border Inferior angle The right scapula; Anterior view The right scapula; Posterior view 4
Right scapula • Name the bone above: _________; • left or right side of body? ________; Practice 01 5
Rightvs.Left-- Orient the clavicle so the smooth (no grooves and ridges) superior surface faces up. Then, the rounded sternal (medial) end should face medially while the broad and flat acromial (lateral) end faces laterally. Finally, the medial half of the clavicle should bulge OUT (convex anteriorly) first followed by its lateral half bulges IN (concave posteriorly). Acromial (lateral) end Sternal end Is the above clavicle from the left or right side of the body? Right
A right scapula or left scapula (as shown below)? Right scapula and left clavicle A right clavicle or left clavicle (as shown above)? Practice 02 7
Greater tubercle Greater tubercle Head Lesser tubercle Anatomical neck Surgical neck Intertubercular sulcus Nutrient foramen Deltoid tuberosity Deltoid tuberosity Medial supracondylar ridge Coronoid fossa Radial fossa Lateral supracondylar ridge Medial epicondyle Lateral epicondyle Lateral epicondyle Capitulum Olecranon fossa Trochlea Humerus; anterior view Humerus; posterior view 8
Name the bone above. ____________ Practice 03 9
Rightvs.Left-- First orient the bones so that the rounded head is superior (up) and pointing medially (toward the body's midline). Then you will need to determine the anterior vs. posterior side. On the humerus, look for the deep olecranon fossa on the posterior side (where the olecranon process of the ulna fits in when the elbow is straightened). The specimen below is from the right side. 10
Olecranon (process) Olecranon (process) Trochlear notch Radial notch of ulna Head of radius Head of radius Coronoid process Neck of radius Neck of radius Ulnar tuberosity Radial tuberosity Ulna Radius Interosseous borders Interosseous membrane Ulnar notch of radius Head of ulna Styloid process Styloid process Styloid process Articular facets 11 (a) Anterior view (b) Posterior view
Practice 04 (b) Posterior view 12 (a) Anterior view
The right wrist and hand, anterior (palmar, ventral) view Distal phalanx II Key to carpal bones Distal row Middle phalanx II Proximal row Phalanges (fingers) Proximal phalanx II Distal phalanx I Head Pollex Body Proximal phalanx I Base Head V IV III II Metacarpals (palms) I-V First metacarpal Body I Base Trapezium Hamulus of hamate Hamate Carpals (wrist) bones Carpal bones Trapezoid Pisiform Capitate Triquetrum Scaphoid Lunate Mnemonic for carpal bones– Sally Left The Party (proximal row); To Take Charlie Home (distal row) 13
Practice 05 The right wrist and hand, anterior (palmar, ventral) view Key to carpal bones Distal row Proximal row 14
The pelvis (two coxal/hip bones and the sacrum); anterosuperior view Iliac crest Iliac fossa Base of sacrum Ilium Sacroiliac joint Anterior superior iliac spine Pelvic surface of sacrum Anterior inferior iliac spine Pelvic inlet Coccyx Ischial spine Acetabulum Ischium Body Interpubic disc Ischial ramus Obturator foramen Superior ramus Pubis Inferior ramus Body Pubic crest Pubic symphysis Each coxal/hip bone is formed by three bones: the ilium, ischium, and pubis. 15
The pelvis (two coxal/hip bones and the sacrum); anterosuperior view ID this bone— ID this bone— Practice 06 16
Male Female Pelvic brim Pelvic inlet Obturator foramen Pubic arch 80-90° 50-60° 17
Rightvs.Left-- In order to determine if a hip bone is right or left, place the bone on yourself with the iliac crest superior, hold it with acetabulum facing laterally (outward), and the obturator foramen inferior (down). Now all you need to do is determine which side is anterior vs. posterior, which can be done by looking for the rough pubic symphysis (anterior) that is at the midline to meet its fellow hip bone of the other side. A right or left hip bone (as shown)? Right hip bone Practice 07 18
Ilium Ischium Pubis Iliac crest Anterior gluteal line Inferior gluteal line Anterior superior iliac spine Posterior gluteal line Posterior superior iliac spine Posterior inferior iliac spine Anterior inferior iliac spine Greater sciatic notch Body of ilium Acetabulum Superior ramus of pubis Ischial spine Body of pubis Lesser sciatic notch Inferior ramus of pubis Body of ischium Obturator foramen Ischial tuberosity Ischial ramus Right coxal bone, lateral view 19
Ilium Ischium Pubis Right coxal bone, lateral view Practice 08 20
Iliac crest Iliac fossa Anterior superior iliac spine Posterior superior iliac spine Arcuate line Auricular surface Anterior inferior iliac spine Posterior inferior iliac spine Greater sciatic notch Ischial spine Pubic crest Location of pubic symphysis Obturator foramen Ischial ramus Right coxal bone, medial view 21
Right coxal bone, medial view Practice 09 22
Fovea capitis Greater trochanter Greater trochanter Head Neck Intertrochanteric crest Lesser trochanter Intertrochanteric line Spiral line Gluteal tuberosity Linea aspera Shaft Medial supracondylar line Lateral supracondylar line Popliteal surface Lateral epicondyle Medial epicondyle Lateral epicondyle Lateral condyle Patellar surface Intercondylar fossa Medial condyle Patella Articular facets Apex of patella (b) Posterior view (a) Anterior view 23
Rightvs.Left-- In order to distinguish right from left, first orient the bones so that the rounded head is superior (up) and pointing medially (toward the body's midline). Then you will need to determine the anterior vs. posterior side. On the femur, look for the patellar surface, which is anterior. Also note how the articulating surfaces of the condyles extends far back on the posterior side (since the knee bends back but not forward). The specimen below is from the right side. ID the bone— Practice 10 24 Posterior view
Intercondylar eminence Medial condyle Lateral condyle Apex Head of fibula Tibial tuberosity Proximal tibiofibular joint Interosseous membrane Lateral surface Anterior border (crest) Mnemonic for location of tibia and fibula: The fibuLAisLAteral. Tibia Fibula Distal tibiofibular joint Medial malleolus Lateral malleolus Lateral malleolus (a) Anterior view (b) Posterior view 25
Rightvs.Left-- You need to tell right from left for the tibia. To do so, first orient the tibia so that the larger flatter end is superior (up). The anterior border (crest or shin) should of course be anterior (front). Finally, the medial side can be determined by the medial malleolus (remember that the malleoli bracket the ankle and since the tibia is the medial bone of the lower limb, its malleolus must be medial). A right tibia is shown below. Anterior view Practice 11 26
Superior (dorsal) view Distal phalanx I Hallux Distal phalanx V Proximal phalanx I Middle phalanx V Proximal phalanx V Metatarsal II I III IV V Medial cuneiform Intermediate cuneiform Lateral cuneiform Cuboid Navicular Talus Calcaneus Tarsal bones Trochlear surface of talus Key to tarsal bones Distal group Proximal group Tuberosity of calcaneus Mnemonic for tarsal bones– CAnTALentedNAValMEDIcsINTERestLAzyCUBscouts? 27
Superior (dorsal) view Key to tarsal bones Distal group Proximal group Practice 12 28
Coronal suture Frontal bone Parietal bone Sphenoid fontanel Lambdoid suture Nasal bone Squamous suture Maxilla Occipital bone Zygomatic bone Mastoid fontanel Mandible Sphenoid bone Temporal bone (a) Lateral view 30
Metopic suture Anterior fontanel Sagittal suture Parietal bone Posterior (occipital) fontanel (b) Superior view 31
(a) Lateral view Practice 13 32 (b) Superior view
Ex. 11: Articulations and body movements Required structures are highlighted.
Proximal phalanx Ligament Joint cavity containing synovial fluid Articular cartilages Fibrous capsule Periosteum Joint capsule Bone Synovial membrane Middle phalanx 34
Femur Patellar surface Medial condyle Lateral condyle Posterior cruciate ligament Fibular collateral ligament Anterior cruciate ligament Lateral meniscus Medial meniscus Tibial collateral ligament Transverse ligament Patellar ligament (cut) Fibula Tibia (a) Anterior view 35
Practice 14 (a) Anterior view 36
Femur Medial condyle Anterior cruciate ligament Tibial collateral ligament Fibular collateral ligament Medial meniscus Lateral meniscus Articular cartilage of tibia Posterior cruciate ligament Fibula Tibia (b) Posterior view 37
Quadriceps femoris Quadriceps femoris tendon Femur Suprapatellar bursa Bursa under lateral head of gastrocnemius Prepatellar bursa Joint capsule Patella Articular cartilage Synovial membrane Joint cavity Meniscus Infrapatellar fat pad Superficial infrapatellar bursa Patellar ligament Tibia Deep infrapatellar bursa (c) Sagittal section 38
Lateral meniscus Posterior cruciate ligament Medial meniscus Synovial membrane Medial condyle of tibia Anterior cruciate ligament Lateral condyle of tibia (d) Superior view of tibia and menisci 39
Ball-and-socket joints– • Features: Smooth hemispherical head fits within a cuplike depression • Examples: • (shoulder) head of humerus into glenoid cavity of scapula (shown below) • (hip) head of femur into acetabulum of hip bone Head of humerus Scapula 40
2. Condylar joints– • Features: Oval convex surface on one bone fits into a similarly shaped depression on the next • Examples: • radiocarpal joint of the wrist • metacarpophalangeal joints at the bases of the fingers (shown below) Metacarpal bone Phalanx 41
3. Saddle joints– • Features: Each articular surface is shaped like a saddle, concave in one direction and convex in the other bone (like a sitting rider) • Example: • trapeziometacarpal joint at the base of the thumb (as shown below) Trapezium Metacarpal bone 42
4. Gliding (plane) joints— • Features: Flat articular surfaces in which bones slide over each other • Examples: • between the carpal bones of the wrist (shown below) • the tarsal bones of the ankle • articular processes of the vertebrae Carpal bones 43
5. Hinge joints— • Features: One bone with convex surface that fits into a concave depression on other bone • Examples: • ulna and humerus at elbow joint (trochlea of the humerus fits into the trochlear notch of the ulna) (shown below) • femur and tibia at knee joint (tibiofemoral) Humerus Ulna 44
6. Pivot joints– • Features: One bone rotates on its longitudinal axis relative to the other • Examples: • proximal radioulnar joint; the radius pivots during pronation and supination (as shown below) • atlantoaxial joint (dens of axis to atlas) Ulna Radius 45
Hyperextension Flexion Extension Extension Flexion (a) (b) Flexion Hip flexion Hyperextension (c) Knee flexion Extension (d) 46
Identify the body movements below. (a) Abduction (b) Adduction Practice 15 47
Identify the body movements below. (a) Medial (internal) rotation (b) Lateral (external) rotation Practice 16 48
Identify the body movements below. Circumduction Practice 17 49
Identify the body movements below. (a) Supination (b) Pronation Practice 18 50