Sand Casting
Sand Casting. Bellwood-Antis Technology Education Department Bellwood-Antis High School Mr. Mackereth Mr. Crowell. SAND CASTING vs. OTHER CASTING METHODS. S and casting has THREE ADVANTAGES compared to other casting methods :


Sand Casting
E N D
Presentation Transcript
Sand Casting Bellwood-Antis Technology Education Department Bellwood-Antis High School Mr. Mackereth Mr. Crowell
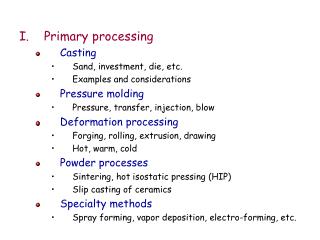
SAND CASTING vs.OTHER CASTING METHODS Sand casting has THREE ADVANTAGES compared to other casting methods: (1) Sand casting is easier for shop students to make high quality castings. (2) The casting sand is reusable over and over again if properly maintained (3) Sand casting is relatively inexpensive to make the casting molds.
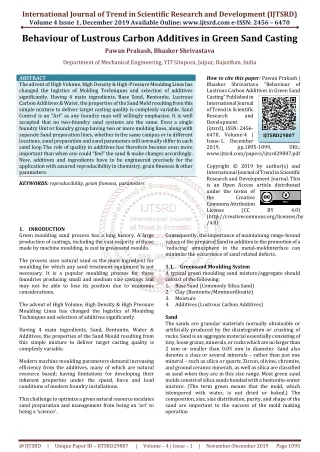
COMMON CASTING TERMS • Mold- A cavity or opening in the sand the size & shape of the desired item. • Pattern-The object placed in sand (then removed) to form the cavity in the mold. • Flask- A two-piece container that holds the sand mold in place for pouring. • Cope- The TOP half of the flask. • Drag-The BOTTOM half of the flask
COMMON CASTING TERMS Parting Compound-A very fine silica powder that allows for separation of the cope & drag when removing the pattern Riser & Sprue-Vertical “tube” openings where metal is poured into the mold Runners & Gates-Openings between pattern pieces in the mold providing a smooth path for the flow of molten metal
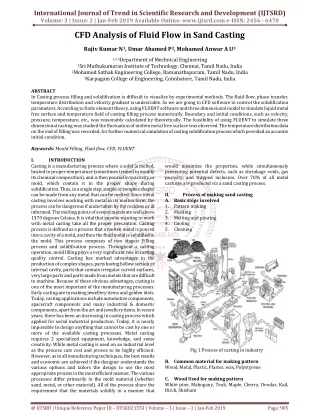
COMMON TOOLS / MACHINES USED IN SAND CASTING • Bench Rammer • Flask (2 pieces) • Cope (top half) • Drag (bottom half) • Crucible Furnace • Crucible • Gate Cutter • Bellows • Sprue & Riser • Riddle • Slick & Oval • Strikeoff Bar • Trowell • Parting Compound PLEASE REFER TO THE ATTACHED DIAGRAM IN YOUR NOTEBOOK
STEPS FOR MAKING A SAND CASTING MOLD (DRAG HALF) (1) Place the DRAG on a molding board UPSIDE DOWN (with pins pointing down) (2) Place the PATTERN PIECE(S) down on the on the molding board. (3) LIGHTLYsprinkle the board and pattern with PARTING COMPOUND. (4) Cover the pattern with 1” of FINELY SIFTED SAND through the RIDDLE.
STEPS FOR MAKING A SAND CASTING MOLD (DRAG HALF) (5) PACKsifted sand around the pattern with a BENCH RAMMER. PACK FIRM! (6) Place MORE SAND in the drag, and pack it FIRMLY with a bench rammer. (7) When packed full to the top, clean off the sand with the STRIKEOFF TOOL. (8) CAREFULLY flip the drag RIGHT SIDE UP on the bottom board.
STEPS FOR MAKING A SAND CASTING MOLD (COPE HALF) (1) Place theCOPEon the top of the DRAG(line up the pins & holes.) (2) Sprinkle PARTING COMPOUND LIGHTLY on the other side of the pattern. (3) Insert the SPRUE and RISER tubes into the packed sand in the drag. (4) Cover the pattern with at least 1” of finely sifted sand through the RIDDLE.
STEPS FOR MAKING A SAND CASTING MOLD (COPE HALF) (5)CAREFULLY PACK sifted sand with bench rammer. Also pack around the sprue & riser. CAUTION: DO NOT PACK THE COPE TOO MUCH! It will sink the pattern pieces down into the drag half of the mold (6) Place more sand in the cope, and pack it firmly with the bench rammer. (7) When packed to the top of the cope, clean off the sand with the STRIKEOFF TOOL.
PATTERN REMOVAL & FINISHING THE MOLD (1) CAREFULLY remove the COPE and set it on its side off to the side. CAREFULLY ! ! ! (2) Cut GATES & RUNNERS (A COMPLETE PATH) through the sprue, pattern, & riser. (3) MAKE SURE GATES / RUNNERS WILL GIVE YOU A GOOD FLOW! (4) CAREFULLY remove the pattern from the DRAG half of the mold.
PATTERN REMOVAL & FINISHING THE MOLD (5) Firm up any weak spots in the sand with the TROWELand the SLICK & OVAL. (6) Blow away any loose sand with the BELLOWS & clean the edge of the drag. (7) Make a FINAL CHECK of the mold & CAREFULLY place cope on top of drag. (8) CAREFULLY set the mold on the floor. The teachers will pour at a later time.