Photography - 101
Photography - 101. (the very basics). Before we get started…. - These are only very simple explanations - I could be wrong! - Mainly aimed at digital users - Slideshow will be up on LUPS website. Let there be light!. All photography is based on light.


Photography - 101
E N D
Presentation Transcript
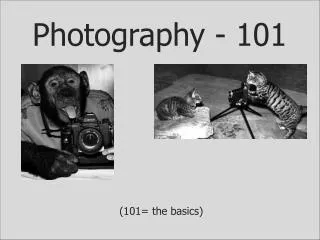
Photography - 101 (the very basics)
Before we get started… - These are only very simple explanations - I could be wrong! - Mainly aimed at digital users - Slideshow will be up on LUPS website
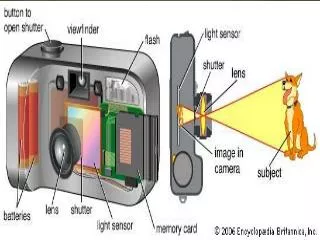
Let there be light! All photography is based on light Exposure is the total amount of light allowed to fall on the film/image sensor
Too much light creates an over-bright image with white spots: parts of the image are Over-Exposed Too little light creates an under-bright image with black spots: parts of the image are Under-Exposed Getting the ‘best’ exposure can be difficult in scenes with contrasting light
Exposure can be controlled mainly through two lens settings: Aperture… … and Shutter Speed
Aperture is the size of the gap light is let through in the lens – similar to an eye’s pupil Low f-stop = High aperture = Large gap = More light = Higher Exposure - Aperture is measured in f-stop numbers (e.g. f/2.1 or f/8.3) - The higher the f-stop, the lower the aperture, the smaller the gap (and vice versa) High f-stop = Low aperture = Small gap = Less light = Lower Exposure
Shutter Speed is the length of time the camera’s lens shutter is open – in other words, how long the camera spends taking the picture Long Shutter Speed Short Shutter Speed - Long shutter speeds spend more time letting light in, which can help in dark environments and create artistic blur effects with movement - Short shutter speeds spends less time letting light in, which allows for quicker pictures and the ability to ‘freeze time’ in great detail
- To get a good exposure on manual mode, you have to make sure the aperture and shutter speed balance each-other out correctly for the sort of photo you want - Most digital compacts/SLRs on automatic mode will judge the aperture and shutter speed for you when taking a picture – but you can still change an exposure compensation setting to alter what it thinks is ‘correct’ if it gets it wrong On most SLRs you can switch on: Aperture Priority (you pick the aperture, the camera picks the shutter speed), or - Shutter Priority (you pick the shutter speed, the camera picks the aperture – compacts usually have this too) - depending on which is most convenient for what you want Remember:Practice makes perfect!
Blurry Blues Have to be careful – blur is not always obvious at first! Can be caused by low light, fast movement, unsteady camera, falling out of focus, using long zoom, slow shutter speed…
Use a tripod or lean against something firm • - Switch on self-timer or use a remote control • (some cameras have anti-shake technology) Switch on macro mode (and use a macro lens on SLRs) when shooting close-ups Focus Make sure you’re in focus and focusing on the right part: auto-focus sometimes gets confused No Macro Macro
The longer a picture is being taken, the more chance there is that movement/unsteady camera will cause it to blur – so a fast shutter speed is desirable for sharp snapshots (remember you will have to compensate the aperture to keep it in good exposure) No flash Flash Using flash creates enough light to allow a fast shutter speed – very good for capturing movement, but short range and can lose background ISO affects the camera’s sensitivity to light: Low ISO = less sensitive to light, slower shutter speed (likely to blur in low light, but little grain) High ISO = more sensitive to light, faster shutter speed (less likely to blur, but more grain) High ISO Low ISO
Getting the Light Right Getting a picture that’s not too bright or dark is about getting the right exposure – so make sure your aperture and shutter speed are suitable for the situation (and balancing each-other ‘correctly’) Shorter Shutter Speed - Shorter Exposure Longer Shutter Speed - Longer Exposure Longer shutter speeds (or long exposure) capture more detail in dark scenes and can allow for more elaborate ‘light trail’ effects (though you might not want one or the other, in which case you could balance it with the aperture differently)
Low ISO Low ISO, Long Exposure High ISO, Long Exposure Remember aperture, shutter speed, flash and ISO all combine to affect the image – be careful not to forget what you’ve set them to! No Flash Flash • Digital cameras sometimes get confused trying to recreate colours, and the picture goes a different tint because the camera’s idea of white is off – so we can change the white balance settingto compensate: • Automatic: Usually guesses correctly, but not always • Custom: Focus on something white for it to remember • Tungsten: Indoors, under tungsten/incandescent/bulb lighting • Fluorescent: Under fluorescent lighting • Daylight/Sunny: Outdoors on a bright day • Cloudy: Outdoors on a cloudy day • Flash: To compensate for flash • Shade: In shaded areas Flash can be essential for getting snapshots in the dark, but can lose shadows, reflect off surfaces and lose ‘depth’ of colour
Framing the Scene - Digital screens/viewfinders tend to be more accurate in framing the pictures you take - Don’t always (or never) shoot your subject in the centre of the shot – laying the scene out according to thirds can be more interesting/satisfying - You can use Photoshop or other digital imagery software to crop unwanted bits out of your photos
- Vary between landscape and portrait - Try to keep the horizon/background objects lined up straight (unless you are throwing them off for artistic effect) - Try zooming/not zooming where it might not be expected - Rather than capturing the whole of something, try taking a strange angle and shooting just part of it (perhaps close up in macro mode)
Final things to remember… These are only guidelines – every rule has an exception! Always remember your framing and exposure! There’s a lot more to learn and discover! PRACTICE MAKES PERFECT!