Download
1 / 27
280 likes | 490 Vues
Photography - 101. (101= the basics). Before we get started…. “ Failure is a crucial part of the creative process. Authentic success arrives only after we have mastered failing better.” George Bernard Shaw

E N D
Photography - 101 (101= the basics)
Before we get started… “Failure is a crucial part of the creative process. Authentic success arrives only after we have mastered failing better.” George Bernard Shaw “You can learn more from your mistakes than you can from your successes if you pay attention to those mistakes.” Paul Smith
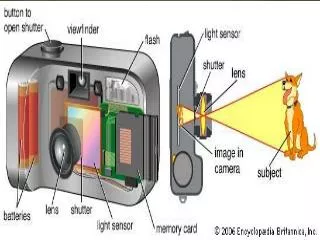
How is an image created? WithLIGHT “Light makes photography. Embrace light. Admire it. Love it. But above all, know light. Know it for all you are worth, and you will know the key to photography.” George Eastman
Many Different Types of Light/ Light Sources
Types of Light • Sunlight • Moonlight • Good Light • Bad Light • Soft Light • Harsh Light • Storm Light • Flash Light • Incandescent • U.V. Light • Black Light • Fluorescent • Indirect/Bounce • Highlights
Exposure is the total amount of light allowed to fall on the film/image sensor Too much light creates an over-bright image with white spots: parts of the image are Over-Exposed Too little light creates an under-bright image with black spots: parts of the image are Under-Exposed Getting the ‘best’ exposure can be difficult in scenes with contrasting light
Exposure can be controlled mainly through two camera settings: Aperture… … and Shutter Speed
Aperture is the size of the opening in the lens that allows light through the lens – similar to an eye’s pupil Low f-stop = High aperture = Large opening = More light = Higher Exposure High f-stop = Low aperture = Small opening = Less light = Lower Exposure
Apertures Aperture, measured in f stops, determines the size of the opening in your lens, which controls how much light strikes your filming during an exposure. The smaller the number, the larger the opening. The larger the number, the smaller the opening. Aperture also determines depth of field smaller the aperture, the greater the depth of field. Oo o o o oo f2.8 f4 f5.6 f8 f11 f16 f22 Each f stop change lets in either 2 times or ½ the amount of light, depending on whether you are opening up or stopping down. Open up means to make the opening larger (but a smaller number). Stop down means selecting an aperture that is smaller in size (but bigger in number)
Shutter Speed • Shutter speeds appear as whole numbers, but are really fractions: • 1/60 sec., 1/125 sec., 1/250 sec., 1/500 sec. • Therefore 1/60 is a slower shutter speed than 1/125, etc. • When you change 1 stop in Shutter speed, you are letting in either 2 times or ½ the amount of light- - Long shutter speeds spend more time letting light in, which can help in dark environments and create artistic blur effects with movement
- Short shutter speeds spends less time letting light in, which allows for quicker pictures and the ability to ‘freeze time’ in great detail So Shutter Speed is the length of time the camera’s lens shutter is open – in other words, how long the camera spends taking the picture
What is a Reciprocal relationship between Aperture and Shutter Speed? • If a correct exposure for a given lighting condition is 1/60 @ 11, then 1/125 @ f8 will let in the same amount of light. If 1/125 @f8 is correct, then 1/250 @f5.6 will let in the same amount of light.
- To get a good exposure on manual mode, you have to make sure the aperture and shutter speed balance each-other out correctly for the sort of photo you want - Most SLRs on automatic mode will judge the aperture and shutter speed for you when taking a picture – but you can still change an exposure compensation setting to alter what it thinks is ‘correct’ if it gets it wrong On most SLRs you can switch on: Aperture Priority (you pick the aperture, the camera picks the shutter speed), or - Shutter Priority (you pick the shutter speed, the camera picks the aperture – compacts usually have this too) - depending on which is most convenient for what you want Remember:Practice makes perfect!
35mm Film (size) Film speed is the measure of a photographic film's sensitivity to light, determined by meters and measured on various numerical scales, the most recent being the ISO system. lower numbers = slower films = need more light = longer exposureshigher numbers = faster films = need less light = shorter exposures
Film Speed Film speed uses stops, just like shutter and apertureFor example, going from ISO50 to ISO200 buys you 2 stops more light. Slower films are less sensitive and generally require longer exposures / more light. Faster films react rapidly, and can be used in low light situations. Film Speed vs. Contrast and GrainThe trade-off between slow and fast films is quality. Slow films generally produce sharper, more detailed images, while faster films often have higher contrast and grain.
Somewhat insensitive film, with a equally lower speed index requires more exposure to light to produce the same image density as a more sensitive film, and is thus termed a slow film. Highly sensitive films are termed fast films. The ISO system is also used to measure the sensitivity of digital imaging systems. In both digital and film photography, the exposure of higher sensitivities generally leads to reduced image quality (via coarser film grain or higher image noise of other types). In short, the higher the film speed, the grainier the image will be. Remember aperture, shutter speed, and film speed (ISO) all combine to affect the image – be careful not to forget what you’ve set them to! Low ISO Low ISO, Long Exposure High ISO, Long Exposure
Photographic paper (printing) • Have 5 elements • Base: Fiber or Resin Coated(RC) • Contrast: Variable (multiple) or Graded • Surface: Glossy, Satin/pearl or Matt • Size: postcard to 24x28 • Emulsion: Monochromatic or Panchromatic and others
Blurry Blues Have to be careful – blur is not always obvious at first! Can be caused by low light, fast movement, unsteady camera, falling out of focus, using long zoom, slow shutter speed…
Use a tripod or lean against something firm • Switch on self-timer or use a remote control • Hold camera with arms pressed against body • Take a breath and then blow it out and then push shutter release • 50% of all student failed photos are due to blur Focus Make sure you’re in focus and focusing on the right part: turn off auto-focus : it sometimes takes over and confuses the photographer
Make an outline below to help you review for the quiz (worth 25 points)
The longer a picture is being taken, the more chance there is that movement/unsteady camera will cause it to blur – so a fast shutter speed is desirable for sharp photos (remember you will have to compensate the aperture to keep it in good exposure) No flash Flash Using flash creates enough light to allow a fast shutter speed – very good for capturing movement, but short range and can lose background ISO affects the camera’s sensitivity to light: Low ISO = less sensitive to light, slower shutter speed (likely to blur in low light, but little grain) High ISO = more sensitive to light, faster shutter speed (less likely to blur, but more grain) High ISO Low ISO
Framing the Scene - Digital screens/viewfinders tend to be more accurate in framing the pictures you take - Don’t always (or never) shoot your subject in the centre of the shot – laying the scene out according to thirds can be more interesting/satisfying - You can use Photoshop or other digital imagery software to crop unwanted bits out of your photos
- Vary between landscape and portrait - Try to keep the horizon/background objects lined up straight (unless you are throwing them off for artistic effect) - Try zooming/not zooming where it might not be expected - Rather than capturing the whole of something, try taking a strange angle and shooting just part of it (perhaps close up in macro mode)
Final things to remember… These are only guidelines – every rule has an exception! Always remember your framing and exposure! There’s a lot more to learn and discover! PRACTICE MAKES PERFECT!