Sputter head arm
Sputter coating made easy. Sputter head arm. IMPORTANT! If this is the first time you are going to use the sputter coater , then talk to Nader. Do NOT proceed. Check the height of the plate, where the sample is placed [1]. It should be 35 or 50 mm, there is a plastic scale bar [2]

Sputter head arm
E N D
Presentation Transcript
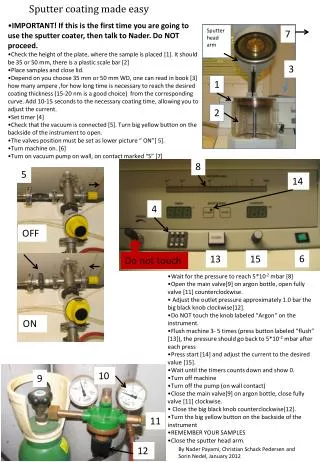
Sputter coating made easy Sputter head arm • IMPORTANT! If this is the first time you are going to use the sputter coater, then talk to Nader. Do NOT proceed. • Check the height of the plate, where the sample is placed [1]. It should be 35 or 50 mm, there is a plastic scale bar [2] • Place samples and close lid. • Depend on you choose 35 mm or 50 mm WD, one can read in book [3] how many ampere ,for how long time is necessary to reach the desired coating thickness (15-20 nm is a good choice) from the corresponding curve. Add 10-15 seconds to the necessary coating time, allowing you to adjust the current. • Set timer [4] • Check that the vacuum is connected [5]. Turn big yellow button on the backside of the instrument to open. • The valves position must be set as lower picture “ ON”[ 5]. • Turn machine on.[6] • Turn on vacuum pump on wall, on contact marked “S” [7] 7 3 1 2 5 8 14 4 OFF 6 13 15 Do not touch • Wait for the pressure to reach 5*10-2 mbar [8] • Open the main valve[9] on argon bottle, open fully valve [11] counterclockwise. • Adjust the outlet pressure approximately 1.0 barthe big black knob clockwise[12]. • Do NOT touch the knob labeled “Argon“ on the instrument. • Flush machine 3- 5 times(press button labeled “flush” [13]), the pressure should go back to 5*10-2mbar after each press • Press start [14] and adjust the current to the desired value [15]. • Wait until the timers counts down and show 0. • Turn off machine • Turn off the pump (on wall contact) • Close the main valve[9] on argon bottle, close fully valve [11] clockwise. • Close the big black knob counterclockwise[12]. • Turn the big yellow button on the backside of the instrument • REMEMBER YOUR SAMPLES • Close the sputter head arm. ON 10 9 11 12 By Nader Payami, Christian Schack Pedersen and Sorin Nedel, January 2012