Download
1 / 34
360 likes | 767 Vues
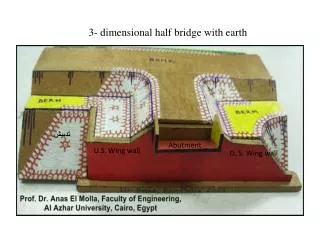
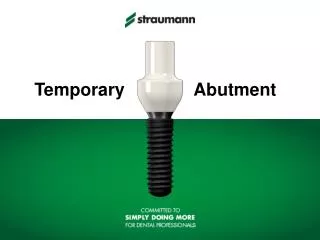
LOCATOR ® Overdenture Direct Cure (chairside) Technique Version 01/2006 John Bain DDS, General Dentist Practice: Farmington, Arkansas drbain@implantsandsmiles.com. Remove Healing Abutment. Loosen With Hemostats. Healing Abutments Removed. Locator ® Attachment Packets. Locator ® Tool.

E N D
LOCATOR®Overdenture Direct Cure (chairside) TechniqueVersion 01/2006John Bain DDS, General DentistPractice: Farmington, Arkansasdrbain@implantsandsmiles.com
Important Note !If any portion of the Locator® abutment shows under the white Block-out Ring,cover that portion of the abutment with a flexible block-out material.
Load Clear or Pink Light Cure Acrylic Gel Into Receptor Sites
Paint Triad VLC Bonding Agent Onto Housings, then Brush on Light-Cured Gel
Light Cure Facial Of HousingsPatient Closes Lightly Into OcclusionCure incrementally (5 secs) to control heat generated
Light Cure Lingual Of Housings incrementally to control heat generated
What if the Patient Can Flip Up the 2-implant Locator Overdenture with the Tongue? • Realize that there are ONLY 2 points of retention – the tongue most likely will always be able to lift it up. • Lingual flange extension – too short and the tongue finds it easily. • Lingual flange extension – too long and any tongue movement will lift it. • Thin the border of the Lingual Flange
What if the Patient Can Flip Up the 2-implant Locator Overdenture with the Tongue? • Make a depression in the Lingual Flange midway between the border and the teeth for the tongue to rest in. • Increase Retention – The ‘clear’ Locator males are 5 lbs retention apiece. • Place acrylic button in anterior as a tongue distraction. • Add more implants and Locators.