Histograms
Mathematics for Business Decisions, part I. Histograms. Math 115a. Math 115a. Histograms.

Histograms
E N D
Presentation Transcript
Mathematics for Business Decisions, part I Histograms Math 115a Math 115a
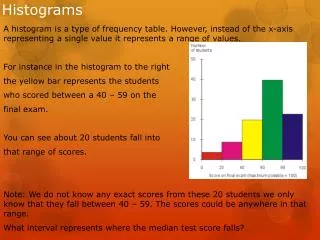
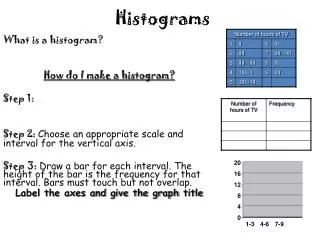
Histograms Histograms • A histogram is a table/graph that sorts data into pre-specified categories, or bins. Math 115a
Histograms Histograms, Excel 2003 • You can find Histograms in Excel 2003 under: • Tools • Data Analysis • Histograms • If you don’t see “Data Analysis” under Tools: • Go to Add Ins… under Tools • Select both Analysis Toolpak and Analysis Toolpak-VBA (you may need your original installation disc) Math 115a
Histograms Histograms, Excel 2007 • You can find Histograms in Excel 2007 under: • Data tab • Analysis group, Data Analysis • Histograms • If you don’t see the Analysis groupin the Data tab: • Go to Add Ins… in Excel Options under the Office button • Select both Analysis Toolpak and Analysis Toolpak-VBA (you may need your original installation disc) Math 115a
Histograms Histogram • You’ll need to specify: • Input Range • Bin Range • Labels (if applicable) • Output Range Math 115a
Histograms Histogram window • Input Range: • This is the range of cells that contains the data you want to sort. • Enter this as a typical cell range in Excel: A2:A101, e.g. Math 115a
Histograms Histogram Window • Bin Range: • The range of cells that contain your pre-specified bin ranges (i.e. your categories). • Enter this as a typical cell range in Excel: H2:H10, e.g. Math 115a
Histograms Bins in Excel • Again, “bins” are your categories that you want to sort your data into. • You must specify the intervals that you want, or else you’ll get some odd endpoints! • Let’s say you want to sort the test scores into the categories 40-49, 50-59, 60-69, … , 90-99. • You will designate these intervals by the right endpoint for each interval: 49, 59, 69, …, 99 Math 115a
Histograms Bins in Excel • Excel will read it as the following: Math 115a
Histograms Histogram Window • Labels • You MUST be consistent: • Check the box: ONLY if you included the column headers for both the input and bins. • Leave unchecked: ONLY if your ranges contained only the data, and no headers. Math 115a
Histograms Histogram Window • Output Range • Input only the cell in which you want the output to START. You should have several clear columns to the right of this cell, and several empty cells below this. • NOTE: By default, “New Worksheet Ply:” is selected. When you choose “Output Range” it will automatically highlight the “Input Range” space. BE CAREFUL! You click in the box by “Output Range” before selecting a cell. Math 115a
Histograms Output • The output from Excel repeats your bin limits, and also gives the frequency count. • “More” should be zero. If not, your bin limits did not go high enough to accommodate your data. Math 115a
Histograms Choosing appropriate bin limits • Bins do not need to start at zero! • Find the range of your data • range = maximum – minimum • Your first bin limit should be reasonably above your minimum data point • Good rule-of-thumb: your first bin limit should be equal to your minimum value + bin width • Your last bin limit should be greater than your maximum data point Math 115a
Histograms Choosing the bin size • Rule of thumb: start your bin size by the calculation: range of data 10 • Make your endpoints nice numbers, but make sure every bin has the same size interval • See how your histogram looks: • If it’s too “blocky”, increase the number of bins by decreasing the bin size • If it’s too detailed, decrease the number of bins by increasing the bin size Math 115a
Histograms Graphing the histogram • Histograms are typically shown as a column graph. • Use Excel’s Chart Wizard • Select Column Graph as the type • In “Data Range” select only the non-More Frequency cells. • Click on the “Series” tab and enter the range of cells for labels for “X-axis labels” Math 115a
Histograms Graphing window: Data Math 115a
Histograms Graphing window: Series Math 115a
Histograms Labels • NOTE: Labels will always be centered under each column. Therefore it is not a good idea to label a column by its right endpoint. Labeling by the full interval (i.e. “40-49”) is acceptable only if you have enough room, and not too many bins. Usually it is best to have a column of midpoints for each interval, and label with these. (Remember, the label is centered under each column!) Math 115a
Histograms Spacing • We know grades can range from 0-100. Therefore, it makes sense to demonstrate this continuum of grades by no space between columns: Math 115a
Histograms Spacing • Right-click on any column • Select “Format Data Series” • Select the “Options” tab • Set “Gap width” to zero Math 115a