3. Sequential Logic Design
Learn the principles of sequential logic design from Dr. Anilkumar K.G, including latches, flip-flops, bistable elements, and SR latches. Sequential circuits, state variables, behavior analysis, and practical applications are discussed in detail.


3. Sequential Logic Design
E N D
Presentation Transcript
3. Sequential Logic Design Dr. Anilkumar K.G
Introduction • From the previous topic, we have studied combinational logic. • The output of combinational logic depends only on current input values. • Given a specification in the form of a truth table or Boolean equation, we can create an optimized circuit to meet the specification. • In this topic, we will analyze and design sequential logic. • The outputs of sequential logic depend on both current and prior input values. Dr. Anilkumar K.G
Introduction • Hence, sequential logic has memory. • Sequential logic might explicitly remember certain previous inputs, or it might distill the prior inputs into a smaller amount of information called the state of the system. • The state of a digital sequential circuit is a set of bits called state variables that contain all the information about the past necessary to explain the future behavior of the circuit. • The topic begins by studying latches and flip-flops, which are simple sequential circuits that store one bit of state. Dr. Anilkumar K.G
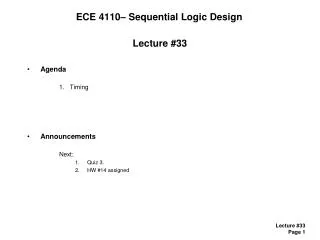
Latches and Flip-Flops • The fundamental building block of memory is a bistable element, an element with two stable states. • Figure 3.1(a) shows a simple bistable element consisting of a pair of inverters connected in a loop. • Figure 3.1(b) shows the same circuit redrawn to emphasize the symmetry. • The inverters are cross-coupled, meaning that the input of I1 is the output of I2 and vice versa. • The circuit has no inputs, but it does have two outputs, Q and Dr. Anilkumar K.G
Latches and Flip-Flops Dr. Anilkumar K.G
Latches and Flip-Flops • Analyzing this circuit is different from analyzing a combinational circuit because it is cyclic: Q depends on , and depends on Q. Consider the two cases, Q is 0 or Q is 1. Working through the consequences of each case, we have: ▶ Case I:Q = 0 As shown in Figure 3.2(a), I2 receives a FALSE input, Q, so it produces a TRUE output on . I1 receives a TRUE input, , so it produces a FALSE output on Q. This is consistent with the original assumption that Q = 0, so the case is said to be stable. ▶ Case II:Q = 1 As shown in Figure 3.2(b), I2 receives a TRUE input and produces a FALSE output on . I1 receives a FALSE input and produces a TRUE output on Q. This is again stable. Dr. Anilkumar K.G
Latches and Flip-Flops • Because the cross-coupled inverters have two stable states, Q = 0 and Q = 1, the circuit is said to be bistable. • An element with N stable states conveys log2N bits of information, so a bistable element stores one bit. • The state of the cross-coupled inverters is contained in one binary state variable, Q. • The value of Q tells us everything about the past that is necessary to explain the future behavior of the circuit. • Specifically, if Q = 0, it will remain 0 forever, and if Q = 1, it will remain 1 forever. • The circuit does have another node, , but does not contain any additional information because if Q is known, is also known. Dr. Anilkumar K.G
Latches and Flip-Flops Dr. Anilkumar K.G
Latches and Flip-Flops • When power is first applied to a sequential circuit, the initial state is unknown and usually unpredictable. • It may differ each time the circuit is turned on. • Although the cross-coupled inverters can store a bit of information, they are not practical because the user has no inputs to control the state. • However, other bistable elements, such as latches and flip-flops, provide inputs to control the value of the state variable. Dr. Anilkumar K.G
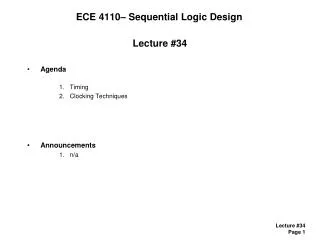
SR Latch • One of the simplest sequential circuits is the SR latch, which is composed of two cross-coupled NOR gates, as shown in Figure 3.3. • The latch has two inputs, S and R, and two outputs, Q and • The SR latch is similar to the cross-coupled inverters, but its state can be controlled through the S and R inputs, which set and reset the output Q. Dr. Anilkumar K.G
SR Latch Consider the four possible combinations of R and S: ▶ Case I: R = 1, S = 0 N1 sees at least one TRUE input, R, so it produces a FALSE output on Q. N2 sees both Q and S FALSE, so it produces a TRUE output on ▶ Case II: R = 0, S = 1 N1 receives inputs of 0 and . Because we don’t yet know ,we can’t determine the output Q. N2 receives at least one TRUE input, S, so it produces a FALSE output on . Now we can revisit N1, knowing that both inputs are FALSE, so the output Q is TRUE. Dr. Anilkumar K.G
SR Latch • Case III: R = 1, S = 1 N1 and N2 both see at least one TRUE input (R or S), so each produces a FALSE output. Hence Q and are both FALSE. ▶ Case IV: R = 0, S = 0 N1 receives inputs of 0 and . Because we don’t yet know , we can’t determine the output. N2 receives inputs of 0 and Q. Because we don’t yet know Q, we can’t determine the output. Now we are stuck. This is reminiscent of the cross-coupled inverters. But we know that Q must either be 0 or 1. So we can solve the problem by checking what happens in each of these subcases. Dr. Anilkumar K.G
SR Latch Case IVa: Q = 0 Because S and Q are FALSE, N2 produces a TRUE output on , as shown in Figure 3.4(a). Now N1 receives one TRUE input, , so its output, Q, is FALSE, just as we had assumed. ▶ Case IVb: Q = 1 • Because Q is TRUE, N2 produces a FALSE output on , as shown in Figure 3.4(b). Now N1 receives two FALSE inputs, R and , so its output, Q, is TRUE, just as we had assumed. Dr. Anilkumar K.G
SR Latch • Putting this all together, suppose Q has some known prior value, which we will call Qprev, before we enter Case IV. Qprev is either 0 or 1, and represents the state of the system. When R and S are 0, Q will remember this old value, Qprev, and will be its complement, . This circuit has memory. Dr. Anilkumar K.G
SR Latch • The truth table in Figure 3.5 summarizes these four cases. The inputs S and R stand for Set and Reset. To set a bit means to make it TRUE. To reset a bit means to make it FALSE. The outputs, Q and Q, are normally complementary. Dr. Anilkumar K.G
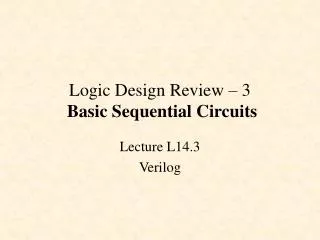
D Latch • The SR latch is awkward because it behaves strangely when both S and R are simultaneously asserted (TRUE). • Moreover, the S and R inputs conflate the issues of what and when. • Designing circuits becomes easier when these questions of what and when are separated. • The D latch in Figure 3.7(a) solves these problems. It has two inputs. The data input, D, controls what the next state should be and the clock input, CLK, controls when the state should change. • We analyze the latch by writing the truth table, given in Figure 3.7(b). For convenience, we first consider the internal nodes , S, and R. If CLK = 0, both S and R are FALSE, regardless of the value of D. If CLK = 1, one AND gate will produce TRUE and the other FALSE, depending on the value of D. Dr. Anilkumar K.G
D Latch • Putting it all together, we see that the clock controls when data flows through the latch. • When CLK = 1, the latch is transparent. • The data at D flows through to Q as if the latch were just a buffer. • When CLK = 0, the latch is opaque. It blocks the new data from flowing through to Q, and Q retains the old value. Hence, the D latch is sometimes called a transparent latch or a level-sensitive latch. • The D latch symbol is given in Figure 3.7(c). • The D latch updates its state continuously while CLK = 1. Dr. Anilkumar K.G
D Latch Dr. Anilkumar K.G
D FIip-Flop • A D flip-flop can be built from two back-to-back D latches controlled by complementary clocks, as shown in Figure 3.8(a). • The first latch, L1, is called the master and the second latch, L2, is called the slave. • The node between them is named N1. A symbol for the D flip-flop is given in Figure 3.8(b). When the Q output is not needed, the symbol is often condensed as in Figure 3.8(c). • When CLK = 0, the master latch is transparent and the slave is opaque (slave has no change in its outputs and holds previous values) • Therefore, whatever value was at D propagates through to N1. When CLK = 1, the master goes opaque and the slave becomes transparent. • Data state is determined by 0-1 Clock transition of the Flip-Flop. Dr. Anilkumar K.G
D FIip-Flop • The value at N1 propagates through to Q, but N1 is cut off from D. Hence, whatever value was at D immediately before the clock rises from 0 to 1 gets copied to Q immediately after the clock rises. • At all other times, Q retains its old value, because there is always an opaque latch blocking the path between D and Q. • In other words, a D flip-flop copies D to Q on the rising edge of the clock (0-1 Clock transition), and remembers its state at all other times. • The rising edge of the clock is often just called the clock edge for brevity. • The D input specifies what the new state will be. The clock edge indicates when the state should be updated. Dr. Anilkumar K.G
D FIip-Flop A D flip-flop is also known as a master-slave flip-flop, an edge-triggered flip-flop, or a positive edge-triggered flip-flop. The triangle in the symbols denotes an edge-triggered clock input. The output is often omitted when it is not needed. Dr. Anilkumar K.G
Register • An N-bit register is a bank of N flip-flops that share a common CLK input, so that all bits of the register are updated at the same time. • Registers are the key building block of most sequential circuits. • Figure 3.9 shows the schematic and symbol for a four-bit register with inputs D3:0 and outputs Q3:0. D3:0 and Q3:0 are both 4-bit busses. Dr. Anilkumar K.G
Register Dr. Anilkumar K.G
Enabled Flip-Flop • An enabled flip-flop adds another input called EN or ENABLE to determine whether data is loaded on the clock edge. • When EN is TRUE, the enabled flip-flop behaves like an ordinary D flip-flop. When EN is FALSE, the enabled flip-flop ignores the clock and retains its state. • Enabled flip-flops are useful when we wish to load a new value into a flip-flop only some of the time, rather than on every clock edge. • Figure 3.10 shows two ways to construct an enabled flip-flop from a D flip-flop and an extra gate. Dr. Anilkumar K.G
Enabled Flip-Flop • In Figure 3.10(a), an input multiplexer chooses whether to pass the value at D, if EN is TRUE, or to recycle the old state from Q, if EN is FALSE. • In Figure 3.10(b), the clock is gated. If EN is 1, the CLK input to the flip-flop toggles normally. • If EN is 0, the CLK input is also 0 and the flip-flop retains its old value. • Notice that EN must not change while CLK = 1, lest the flip-flop see a clock glitch (switch at an incorrect time). • The symbol for an enabled flip-flop is given in Figure 3.10(c). Dr. Anilkumar K.G
Enabled Flip-Flop Dr. Anilkumar K.G
Resettable Flip-Flop • A resettable flip-flop adds another input called RESET. When RESET is 0, the resettable flip-flop behaves like an ordinary D flip-flop. • When RESET is 1, the resettable flip-flop ignores D and resets the output to 0. • Resettable flip-flops are useful when we want to force a known state (i.e., 0) into all the flip-flops in a system when we first turn it on. • Figure 3.11(a) shows how to construct a synchronously resettable flip-flop from an ordinary D flip-flop and an AND gate. Dr. Anilkumar K.G
Resettable Flip-Flop Dr. Anilkumar K.G
Putting It All Together • Latches and flip-flops are the fundamental building blocks of sequential circuits. • Remember that a D latch is level-sensitive, whereas a D flip-flop is edge-triggered. • The D latch is transparent when CLK = 1, allowing the input D to flow through to the output Q. • The D flip-flop copies D to Q on the rising edge of CLK. At all other times, latches and flip-flops retain their old state. • A register is a bank of several D flip-flops that share a common CLK signal. Dr. Anilkumar K.G
Synchronous Logic Design • The rules of synchronous sequential circuit composition teach us that a circuit is a synchronous sequential circuit if it consists of interconnected circuit elements such that ▶ Every circuit element is either a register or a combinational circuit ▶ At least one circuit element is a register. ▶ All registers receive the same clock signal. ▶ Every cyclic path contains at least one register. • Sequential circuits that are not synchronous are called asynchronous. Dr. Anilkumar K.G
Synchronous Logic Design • A flip-flop is the simplest synchronous sequential circuit. It has one input, D, one clock, CLK, one output, Q, and two states, {0, 1}. The functional specification for a flip-flop is that the next state is D and that the output, Q, is the current state, as shown in Figure 3.20. Dr. Anilkumar K.G
Finite State Machines • Synchronous sequential circuits can be drawn in the forms shown in Figure 3.22. These forms are called finite state machines (FSMs). • They get their name because a circuit with k registers can be in one of a finite number (2k) of unique states. An FSM has M inputs, N outputs, and k bits of state. • An FSM consists of two blocks of combinational logic, next state logicand output logic, and a register that stores the state. • On each clock edge, the FSM advances to the next state, which was computed based on the current state and inputs. Dr. Anilkumar K.G
Finite State Machines • There are two general classes of finite state machines, characterized by their functional specifications. • In Moore machines, the outputs depend only on the current state of the machine. • In Mealy machines, the outputs depend on both the current state and the current inputs. • Finite state machines provide a systematic way to design synchronous sequential circuits given a functional specification. Dr. Anilkumar K.G
FSM Design Example • To illustrate the design of FSMs, consider the problem of inventing a controller for a traffic light at a busy intersection on a University Campus. • Several serious injuries have already occurred at the intersection of these two roads, and the Dean asks Ben to install a traffic light before there are more fatalities. • Ben decides to solve the problem with an FSM. He installs two traffic sensors, TA (on Academic-Ave lane) and TB (on Bravado-Blvd lane) as shown in Figure 3.23. • Each sensor indicates TRUE if students are present in the lane and FALSE if there are no students. • He also installs two traffic lights, LA and LB, to each path of the junction to control traffic. Dr. Anilkumar K.G
FSM Design Example • Each light receives digital inputs specifying whether it should be green, yellow, or red. • Hence, his FSM has two inputs, TA and TB, and two outputs, LA and LB. • Ben provides a clock with a 5-second period. On each clock tick (rising edge), the lights may change based on the traffic sensors. • He also provides a reset button so that Physical Plant technicians can put the controller in a known initial state when they turn it on. • Figure 3.24 shows a black box view of the state machine. Dr. Anilkumar K.G
FSM Design Example Dr. Anilkumar K.G
FSM Design Example • Ben’s next step is to sketch the state transition diagram, shown in Figure 3.25, to indicate all the possible states of the system and the transitions between these states. • When the system is reset, the lights are greenon Academic Ave. and redon Bravado Blvd. Every 5 seconds, the controller examines the traffic pattern and decides what to do next. • As long as traffic is present on Academic Ave., the lights do not change. • When there is no longer traffic on Academic Ave., the light on Academic Ave. becomes yellow for 5 seconds before it turns red and Bravado Blvd.’s light turns green. Dr. Anilkumar K.G
FSM Design Example • Similarly, the Bravado Blvd. light remains green as long as traffic is present on the boulevard, then turns yellow and eventually red. Dr. Anilkumar K.G
FSM Design Example • In a state transition diagram, circles represent states and arcs represent transitions between states. • The transitions take place on the rising edge of the clock; we do not bother to show the clock on the diagram, because it is always present in a synchronous sequential circuit. • Moreover, the clock simply controls when the transitions should occur, whereas the diagram indicates which transitions occur. • The arc labeled Reset pointing from outer space into state S0 indicates that the system should enter that state upon reset, regardless of what previous state it was in. If a state has multiple arcs leaving it, the arcs are labeled to show what input triggers each transition. Dr. Anilkumar K.G
FSM Design Example • For example, when in state S0, the system will remain in that state if TA is TRUE and move to S1 if TA is FALSE. If a state has a single arc leaving it, that transition always occurs regardless of the inputs. • For example, when in state S1, the system will always move to S2. The value that the outputs have while in a particular state are indicated in the state. For example, while in state S2, LA is red and LB is green. Dr. Anilkumar K.G
FSM Design Example • Ben rewrites the state transition diagram as a state transition table (Table 3.1), which indicates, for each state and input, what the next state, S′, should be. Note that the table uses don’t care symbols (X) whenever the next state does not depend on a particular input. • Also note that Reset is omitted from the table. Instead, we use resettable flip-flops that always go to state S0 on reset, independent of the inputs. • The state transition diagram is abstract in that it uses states labeled {S0, S1, S2, S3} and outputs labeled {red, yellow, green}. Dr. Anilkumar K.G
FSM Design Example Dr. Anilkumar K.G
FSM Design Example • To build a real circuit, the states and outputs must be assigned binary encodings. Ben chooses the simple encodings given in Tables 3.2 and 3.3. • Each state and each output is encoded with two bits: S1:0, and L1:0 • Ben updates the state transition table to use these binary encodings, as shown in Table 3.4 (which is the Modified form of the table 3.1 with the values of Table 3.2). • The revised state transition table is a truth table specifying the next state logic. It defines next state, S′, as a function of the current state, S, and the inputs. Dr. Anilkumar K.G
FSM Design Example Dr. Anilkumar K.G
FSM Design Example • The equations (Eq.3.1) can be simplified using Karnaugh maps, but often doing it by inspection is easier. For example, the TB and TB terms in the S′1 equation are clearly redundant. • Thus S′1 reduces to an XOR operation. Equation 3.2 gives the simplified next state equations. Dr. Anilkumar K.G
FSM Design Example • Similarly, Ben writes an output table (Table 3.5) indicating, for each state, what the output should be in that state. Again, it is straightforward to read off and simplify the Boolean equations for the outputs. • For example, observe that LA1 is TRUE only on the rows where S1 is TRUE. Dr. Anilkumar K.G
FSM Design Example • Finally, Ben sketches his Moore FSM in the form of Figure 3.22(a). First, he draws the 2-bit state register, as shown in Figure 3.26(a). On each clock edge, the state register copies the next state, S′1:0, to become the state S1:0. The state register receives a synchronous or asynchronous reset to initialize the FSM at startup. Then, he draws the next state logic, based on Equation 3.2, which computes the next state from the current state and inputs, as shown in Figure 3.26(b). • Finally, he draws the output logic, based on Equation 3.3, which computes the outputs from the current state, as shown in Figure 3.26(c). Dr. Anilkumar K.G