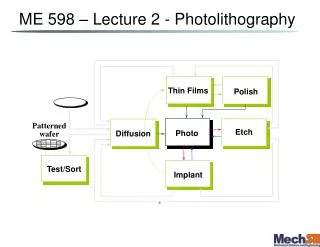
Patterning - Photolithography
Patterning - Photolithography. UV light. mask. Oxidation Photoresist (PR) coating Stepper exposure Photoresist development and bake Acid etching Unexposed (negative PR) Exposed (positive PR) Spin, rinse, and dry Processing step Ion implantation Plasma etching Metal deposition

Patterning - Photolithography
E N D
Presentation Transcript
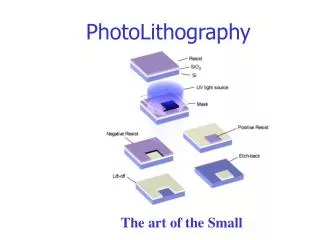
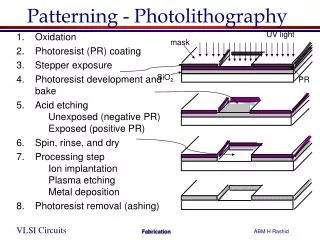
Patterning - Photolithography UV light mask • Oxidation • Photoresist (PR) coating • Stepper exposure • Photoresist development and bake • Acid etching Unexposed (negative PR) Exposed (positive PR) • Spin, rinse, and dry • Processing step Ion implantation Plasma etching Metal deposition • Photoresist removal (ashing) SiO2 PR
Chemical or plasma etch Hardened resist SiO 2 Si-substrate Si-substrate Silicon base material 4. After development and etching of resist, chemical or plasma etch of SiO2 Photoresist SiO2 Si-substrate Hardened resist 1&2. After oxidation and deposition of negative photoresist SiO2 Si-substrate UV-light 5. After etching Patterned optical mask Exposed resist SiO2 Si-substrate Si-substrate 8. Final result after removal of resist 3. Stepper exposure Example of Patterning of SiO2
Diffusion or Ion Implantation • Area to be doped is exposed (photolithography) • Diffusion or Ion implantation
Deposition and Etching • Pattern masking (photolithography) • Deposit material over entire wafer • CVD (Si3N4)chemical deposition (polysilicon) sputtering (Al) • Etch away unwanted material wet etching dry (plasma) etching
Physical structure NMOS layout representation: • Implicit layers: • oxide layers • substrate (bulk) • Drawn layers: • n+ regions • polysilicon gate • oxide contact cuts • metal layers NMOS physical structure: • p-substrate • n+ source/drain • gate oxide (SiO2) • polysilicon gate • CVD oxide • metal 1 • Leff<Ldrawn (lateral doping effects)
Physical structure PMOS layout representation: • Implicit layers: • oxide layers • Drawn layers: • n-well (bulk) • n+ regions • polysilicon gate • oxide contact cuts • metal layers PMOS physical structure: • p-substrate • n-well (bulk) • p+ source/drain • gate oxide (SiO2) • polysilicon gate • CVD oxide • metal 1
CMOS fabrication sequence 0. Start: • For an n-well process the starting point is a p-type silicon wafer: • wafer: typically 75 to 230mm in diameter and less than 1mm thick 1. Epitaxial growth: • A single p-type single crystal film is grown on the surface of the wafer by: • subjecting the wafer to high temperature and a source of dopant material • The epi layer is used as the base layer to build the devices
CMOS fabrication sequence 2. N-well Formation: • PMOS transistors are fabricated in n-well regions • The first mask defines the n-well regions • N-well’s are formed by ion implantation or deposition and diffusion • Lateral diffusion limits the proximity between structures • Ion implantation results in shallower wells compatible with today’s fine-line processes
CMOS fabrication sequence 3. Active area definition: • Active area: • planar section of the surface where transistors are build • defines the gate region (thin oxide) • defines the n+ or p+ regions • A thin layer of SiO2 is grown over the active region and covered with silicon nitride
CMOS fabrication sequence 4. Isolation: • Parasitic (unwanted) FET’s exist between unrelated transistors (Field Oxide FET’s) • Source and drains are existing source and drains of wanted devices • Gates are metal and polysilicon interconnects • The threshold voltage of FOX FET’s are higher than for normal FET’s
CMOS fabrication sequence • FOX FET’s threshold is made high by: • introducing a channel-stop diffusion that raises the impurity concentration in the substrate in areas where transistors are not required • making the FOX thick 4.1 Channel-stop implant • The silicon nitride (over n-active) and the photoresist (over n-well) act as masks for the channel-stop implant
CMOS fabrication sequence 4.2 Local oxidation of silicon (LOCOS) • The photoresist mask is removed • The SiO2/SiN layers will now act as a masks • The thick field oxide is then grown by: • exposing the surface of the wafer to a flow of oxygen-rich gas • The oxide grows in both the vertical and lateral directions • This results in a active area smaller than patterned
CMOS fabrication sequence • Silicon oxidation is obtained by: • Heating the wafer in a oxidizing atmosphere: • Wet oxidation: water vapor, T = 900 to 1000ºC (rapid process) • Dry oxidation: Pure oxygen, T = 1200ºC (high temperature required to achieve an acceptable growth rate) • Oxidation consumes silicon • SiO2 has approximately twice the volume of silicon • The FOX is recedes below the silicon surface by 0.46XFOX
CMOS fabrication sequence 5. Gate oxide growth • The nitride and stress-relief oxide are removed • The devices threshold voltage is adjusted by: • adding charge at the silicon/oxide interface • The well controlled gate oxide is grown with thickness tox
CMOS fabrication sequence 6. Polysilicon deposition and patterning • A layer of polysilicon is deposited over the entire wafer surface • The polysilicon is then patterned by a lithography sequence • All the MOSFET gates are defined in a single step • The polysilicon gate can be doped (n+) while is being deposited to lower its parasitic resistance (important in high speed fine line processes)
CMOS fabrication sequence 7. PMOS formation • Photoresist is patterned to cover all but the p+ regions • A boron ion beam creates the p+ source and drain regions • The polysilicon serves as a mask to the underlying channel • This is called a self-aligned process • It allows precise placement of the source and drain regions • During this process the gate gets doped with p-type impurity
CMOS fabrication sequence 8. NMOS formation • Photoresist is patterned to define the n+ regions • Donors (arsenic or phosphorous) are ion-implanted to dope the n+ source and drain regions • The process is self-aligned • The gate is n-type doped
CMOS fabrication sequence 9. Annealing • After the implants are completed a thermal annealing cycle is executed • This allows the impurities to diffuse further into the bulk • After thermal annealing, it is important to keep the remaining process steps at as low temperature as possible
CMOS fabrication sequence 10. Contact cuts • The surface of the IC is covered by a layer of CVD oxide • The oxide is deposited at low temperature (LTO) to avoid that underlying doped regions will undergo diffusive spreading • Contact cuts are defined by etching SiO2 down to the surface to be contacted • These allow metal to contact diffusion and/or polysilicon regions
Design rules • Contacts and vias: • minimum size limited by the lithography process • large contacts can result in cracks and voids • Dimensions of contact cuts are restricted to values that can be reliably manufactured • A minimum distance between the edge of the oxide cut and the edge of the patterned region must be specified to allow for misalignment tolerances (registration errors)
CMOS fabrication sequence 11. Metal 1 • A first level of metallization is applied to the wafer surface and selectively etched to produce the interconnects
CMOS fabrication sequence 12. Metal 2 • Another layer of LTO CVD oxide is added • Via openings are created • Metal 2 is deposited and patterned
CMOS fabrication sequence 13. Over glass and pad openings • A protective layer is added over the surface: • The protective layer consists of: • A layer of SiO2 • Followed by a layer of silicon nitride • The SiN layer acts as a diffusion barrier against contaminants (passivation) • Finally, contact cuts are etched, over metal 2, on the passivation to allow for wire bonding.
Yield • Yield • The yield is influenced by: • the technology • the chip area • the layout • Scribe cut and packaging also contribute to the final
Design rules • The limitations of the patterning process give rise to a set of mask design guidelines called design rules • Design rules are a set of guidelines that specify the minimum dimensions and spacings allowed in a layout drawing • Violating a design rule might result in a non-functional circuit or in a highly reduced yield • The design rules can be expressed as: • A list of minimum feature sizes and spacings for all the masks required in a given process • Based on single parameter that characterize the linear feature (e.g. the minimum grid dimension). base rules allow simple scaling
Design rules • Minimum line-width: • smallest dimension permitted for any object in the layout drawing (minimum feature size) • Minimum spacing: • smallest distance permitted between the edges of two objects • This rules originate from the resolution of the optical printing system, the etching process, or the surface roughness
Design rules • MOSFET rules • n+ and p+ regions are formed in two steps: • the active area openings allow the implants to penetrate into the silicon substrate • the nselect or pselect provide photoresist openings over the active areas to be implanted
Design rules • Gate overhang: • The gate must overlap the active area by a minimum amount • This is done to ensure that a misaligned gate will still yield a structure with separated drain and source regions • A modern process has may hundreds of rules to be verified • Programs called Design Rule Checkers assist the designer in that task
Other processes • P-well process • NMOS devices are build on a implanted p-well • PMOS devices are build on the substrate • P-well process moderates the difference between the p- and the n-transistors since the P devices reside in the native substrate • Advantages: better balance between p- and n-transistors
Other processes • Twin-well process • n+ or p+ substrate plus a lightly doped epi-layer (latchup prevention) • wells for the n- and p-transistors • Advantages, simultaneous optimization of p- and n-transistors: • threshold voltages • body effect • gain
Other processes • Silicon On Insulator (SOI) • Islands of silicon on an insulator form the transistors • Advantages: • No wells denser transistor structures • Lower substrate capacitances
Electromigration (EM) Scanning Electron Microscope (SEM) picture of EM
Latchup Latch is the generation of a low-impedance path in CMOS chips between the power supply and the ground rails due to interaction of parasitic pnp and npn bipolar transistors. These BJTs for a silicon-controlled rectifier with positive feedback and virtually short circuit the power and the ground rail. This causes excessive current flows and potential permanent damage to the devices. Origin of Latchup in CMOS process
Latchup • Some causes for latch-up are: • Slewing of VDD during start-up causing enough displacement currents due to well junction capacitance in the substrate and well. • Large currents in the arasitic silicon-controlled rectifier in CMOS chips can occur when the input or output signal swings either far beyond the VDD level or far below VSS level, injecting a triggering current. Impedance mismatches in transmission lines can cause such disturbances in high speed circuits. • Electrostatic Discharge stress can cause latch-up by injecting minority carriers from the clamping device in the protection circuit into either the substrate or the well. • Sudden transient in power or ground buses may cause latch-up.
Preventing Lacthup • Fab/Design Approaches • Reduce the gain product 1 x 2 • move n-well and n+ source/drain farther apart increases width of the base of Q2 and reduces gain beta2 > also reduces circuit density • buried n+ layer in well reduces gain of Q1 • Reduce the well and substrate resistances, producing lower voltage drops • higher substrate doping level reduces Rsub • reduce Rwell by making low resistance contact to GND • guard rings around p- and/or n-well, with frequent contacts to the rings, reduces the parasitic resistances.
Preventing Latchup Systems Approaches Make sure power supplies are off before plugging a board Carefully protect electrostatic protection devices associated with I/O pads with guard rings. Electrostatic discharge can trigger latchup. Radiation, including x-rays, cosmic, or alpha rays, can generate electron-hole pairs as they penetrate the chip. These carriers can contribute to well or substrate currents. Sudden transients on the power or ground bus, which may occur if large numbers of transistors switch simultaneously, can drive the circuit into latchup. Whether this is possible should be checked through simulation.
A Four Line Gray to Binary Code Converter A0=G0A1+G0A1 A1=G1A2+G1A2 A2=G2A3+G2A3 A3=G3 G3 G2 G1 G0 A1 A0 A3 A2