Photolithography
470 likes | 668 Vues
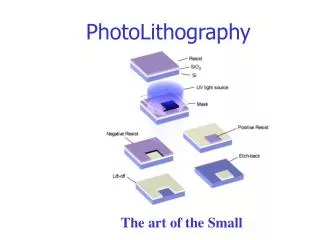
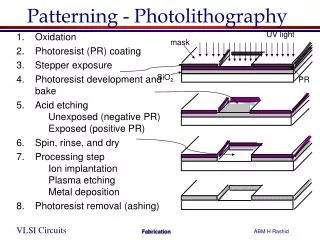
Photolithography is a vital process in microelectronics where circuit elements like resistors and diodes are formed on the surface of a silicon wafer. This technique involves several steps: oxidizing the wafer, applying a photoresist layer, aligning a mask, exposing the photoresist to UV light, developing the resist, and etching to create desired patterns. By controlling the doping of silicon and forming metal interconnections, photolithography enables the fabrication of complex microelectronic devices essential for modern technology.

Photolithography
E N D
Presentation Transcript
Photolithography D. Boolchandani Department of ECE Malaviya National Institute of Technology Jaipur
Photolithography • In a microelectronic circuit, all the circuit elements (resistors, diodes, transistors, etc.) are formed in the top surface of a wafer (usually silicon). • These circuit elements are interconnected in a complex, controlled, patterned manner. • Consider the simple case of a silicon p-n junction diode with electrical contacts to the p and n sides on the top surface of the wafer. Photolithography
SiO2 Al Cross section: n p-type substrate Top view: Photolithography • Silicon p-n junction diode with both electrical contacts on the top surface of the wafer: • Can you draw the diode symbol on this diagram? Photolithography
Photolithography • In order to produce a microelectronic circuit, portions of a silicon wafer must be doped with donors and/or acceptors in a controlled, patterned manner. • Holes or “windows” must be cut through insulating thin films in a controlled, patterned manner. • Metal “interconnections” (thin film “wires”) must be formed in a controlled, patterned manner. • The process by which patterns are transferred to the surface of a wafer is called photolithography. Photolithography
SiO2 Al Cross section: n p-type substrate Top view: Photolithography • Consider the fabrication of a silicon p-n junction diode with both electrical contacts on the top surface of the wafer: Photolithography
SiO2 Cross section: p-type substrate Top view: Photolithography • We start with a bare silicon wafer and oxidize it. (The bottom surface also gets oxidized, but we’ll ignore that.): Photolithography
SiO2 Cross section: p-type substrate Top view: Photolithography • We first need to open a “window” in the SiO2 through which we can diffuse a donor dopant (e.g., P) to form the n-type region: Photolithography
Photolithography • The starting point for the photolithography process is a mask. • A mask is a glass plate that is coated with an opaque thin film (often a metal thin film such as chromium). • This metal film is patterned in the shape of the features we want to create on the wafer surface. Photolithography
glass plate Photolithography opaque metal,e.g.,Cr • For our example, our mask could look like this: Cross section: Top view: Photolithography
SiO2 Cross section: p-type substrate Top view: Photolithography • Recall that we start with a bare silicon wafer and oxidize it. (The bottom surface also gets oxidized, but we’ll ignore that.): Photolithography
Photolithography • The wafer is next coated with “photoresist”. • Photoresist is a light-sensitive polymer. • We will initially consider positive photoresist (more about what this means soon). • Photoresist is usually “spun on”. • For this step, the wafer is held onto a support chuck by a vacuum. • Photoresist is typically applied in liquid form (dissolved in a solvent). • The wafer is spun at high speed (1000 to 6000 rpm) for 20 to 60 seconds to produce a thin, uniform film, typically 0.3 to 2.5 mm thick. Photolithography
Photoresist Cross section: p-type substrate Top view: Photolithography • After coating with photoresist, the wafer looks like this: Photolithography
Photoresist Cross section: p-type substrate Top view: Photolithography • The wafer is baked at 70 to 90°C (soft bake or pre-bake) to remove solvent from the photoresist and improve adhesion. Photolithography
Mask glass plate Cross section: p-type substrate Top view: Photolithography • The mask is “aligned” (positioned) as desired on top of the wafer. Photolithography
Mask glass plate Cross section: p-type substrate Top view: Photolithography • The photoresist is “exposed” through the mask with UV light. UV light breaks chemical bonds in the photoresist. Photolithography
Cross section: p-type substrate Top view: Photolithography • The photoresist is “developed” by immersing the wafer in a chemical solution that removes photoresist that has been exposed to UV light. Photolithography
Cross section: p-type substrate Top view: Photolithography • The wafer is baked again, but at a higher temperature (120 to 180°C). This hard bake or post-bake hardens the photoresist. Photolithography
Cross section: p-type substrate Top view: Photolithography • The unprotected SiO2 is removed by etching in a chemical solution containing HF (hydrofluoric acid), or by “dry” etching in a gaseous plasma, containing CF4 , for example. Photolithography
“window” SiO2 Cross section: p-type substrate Top view: Photolithography • The photoresist has done its job and is now removed (“stripped”) in a liquid solvent (e.g., acetone) or in a “dry” O2 plasma. Photolithography
“window” SiO2 Cross section: n-type p-type substrate Top view: Photolithography • Phosphorous is next diffused through the window to form an n-type region. The SiO2 film blocks phosphorus diffusion outside the window. Photolithography
new mask glass plate Cross section: n-type p-type substrate Top view: Photolithography • Another photolithography step must be performed in order to open another window in the SiO2 so we can make an electrical contact to the p-type substrate from the top surface of the wafer. Photolithography
SiO2 Cross section: n p-type substrate Top view: Photolithography • The steps will not be shown in detail, but after photolithography, SiO2 etching, and photoresist stripping, the wafer structure is shown below. Photolithography
Al SiO2 Cross section: n p-type substrate Top view: Photolithography • The wafer surface is next coated with aluminum by evaporation or sputtering. The window outlines may still be visible. Photolithography
Al SiO2 Cross section: n p-type substrate Top view: Photolithography • Photolithography is used to pattern photoresist so as to protect the aluminum over the windows: Photolithography
Al SiO2 Cross section: n p-type substrate Top view: Photolithography • What must the mask look like in order to pattern the aluminum film? Assume that we’re still using positive photoresist. Photolithography
Al SiO2 Cross section: n p-type substrate Top view: Photolithography • The aluminum is etched where it is not protected by photoresist. Wet or dry etchants can be used. Photolithography
Al SiO2 Cross section: n p-type substrate Top view: Photolithography • Then the photoresist is stripped. Photolithography
Al SiO2 Cross section: n p-type substrate Top view: Photolithography • The final step is to anneal (heat treat) the wafer at ~ 450°C in order to improve the electrical contact between the aluminum film and the underlying silicon. Photolithography
Photolithography • So far we have only considered positivephotoresists. • For positive resists, the resist pattern on the wafer looks just like the pattern on the mask • There are also negative photoresists. • Ultraviolet light crosslinks negative resists, making them less soluble in a developer solution. • For negative resists, the resist pattern on the wafer is the negative of the pattern on the mask. Photolithography
Photolithography • In order to align a new pattern to a pattern already on the wafer, alignment marks are used. • Various exposure systems • Contact printing, • Proximity printing, • Projection printing, and • Direct step-on-wafer (step-and-repeat projection). Photolithography
Photolithography • A complete photolithography process (photoresist + exposure tool + developing process) can be characterized by the smallest (finest resolution) lines or windows that can be produced on a wafer. • This dimension is called the minimum feature size or minimum linewidth. • The limitations of optical lithography are a consequence of basic physics (diffraction). Photolithography
Photolithography • For a single-wavelength projection photo-lithography system, the minimum feature size or minimum linewidth is given by the Rayleigh criterion: • l is the wavelength. • NA is the numerical aperture, a measure of the light-collecting power of the projection lens. • k depends on the photoresist properties and the “quality’ of the optical system. Photolithography
Photolithography • So how do we reduce wmin ? • Reduce k. • Reduce l. • Increase NA. Photolithography
Photolithography • Even for the best projection photolithography systems, NA is less than 0.8. • The theoretical limit for k (the lowest value) is about 0.25. Photolithography
Photolithography • Lenses with higher NA can produce smaller linewidths. • This linewidth reduction comes at a price. • The depth of focus decreases as NA increases. • Depth of focus is the distance that the wafer can be moved relative to (closer to or farther from) the projection lens and still keep the image in focus on the wafer. Photolithography
Photolithography • Depth of focus is given by: • Depth of focus decreases (bad) as l decreases. • Depth of focus decreases (bad) as NA increases. Photolithography
Photolithography • Numerous light sources are (and will be) used for optical lithography: Photolithography
Photolithography • Complex devices require the photolithography process to be carried out over 20 times. Þ “over 20 mask levels” • Any dust on the wafer or mask can result in defects. Þ Cleanrooms are required for fabrication of complex devices. • Even if defects occur in only 10% of the chips during each photolithography step, fewer than 50% of the chips will be functional after a seven mask process is completed. • How is this yield calculated? Photolithography
Photolithography • Other lithographic techniques will play a role in the future. • Electron beam lithography • Ion beam lithography. • X-ray lithography. Photolithography