An Introduction to Light Microscopy
470 likes | 1.54k Vues
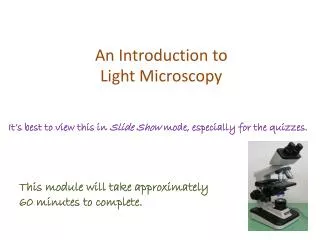
An Introduction to Light Microscopy. It’s best to view this in Slide Show mode, especially for the quizzes. This module will take approximately 60 minutes to complete. After completing this exercise, you should be able to: Understand the parts and use of the light microscope

An Introduction to Light Microscopy
E N D
Presentation Transcript
An Introduction to Light Microscopy It’s best to view this in Slide Show mode, especially for the quizzes. This module will take approximately 60 minutes to complete.
After completing this exercise, you should be able to: • Understand the parts and use of the light microscope • Be able to recognize major features of a tissue in light microscopy • Cell • Nucleus • Cytosol (cytoplasm) • Extracellular matrix • Become familiar with the procedures used to prepare a specimen for visualization with the light microscope • Be able to describe the most common histological stains, including the basic principle of the stain, the colors of the stain, the cellular components that are stained, and how variations in staining can provide clues about the structure and function of cells and tissues • Hematoxylin and Eosin (H&E) • Periodic Acid Schiff (PAS) • Understand how tissue preparation affects the appearance of a tissue, and how those features may provide clues as to the structure and function of the cells or tissues in that specimen
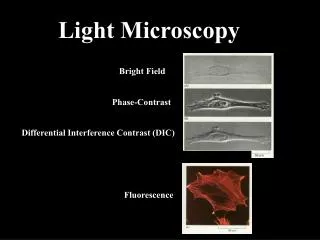
The Light Microscope A light microscope is designed to magnify the image of a tissue mounted on a glass slide. Light is focused with condensers, passes through the tissue specimen, and then through objectives, which magnify the image.
The Light Microscope This image shows a microscope similar to the one you will be using in the laboratory. Your microscope is in good working order, so the following set of slides will focus only on the components involved in standard tissue visualization.
The Light Microscope There is a little screw that locks down the headpiece. Loosen this and the headpiece can be rotated. When you take your microscope out of your locker, it’s likely that the headpiece will be in a position that is 180o from what you see in this image. Before you begin, loosen the screw to rotate the headpiece into the position you see here. You’ll need to loosen it again at the end of lab to return the headpiece to it’s storage position.
The Light Microscope The stage is where you place your glass slide. There is a little specimen holder or clip for your convenience. The stage can move: --up and down (for focusing) --back and forth, right and left (for panning around on the slide) (more on these later)
The Light Microscope There is a bulb in the base of the microscope that is the source of light. The on-off switch also controls the intensity of the bulb. Plug in the microscope, turn the bulb on, and increase the brightness until you can see the image without frying your retinas. If your bulb burns out, you’ll need to replace it. Unplug the microscope, and carefully turn it over. There is a little door on the bottom. Extra bulbs are either on the sink or in the drawer labeled Microscopic Anatomy.
The Light Microscope The condenser that focuses light is underneath the stage. There is a little knob on the left (not visible in this image) that can raise or lower the condenser. It’s likely that the condenser is already in the proper position, which is approximately 1mm below the slide on the stage. If it isn’t, raise it slowly until it touches the bottom of your glass slide, and then lower it 1mm. There will be some instances in which you will be directed to “lower your condenser”. After viewing a slide with the condenser lowered, don’t forget to raise it back up when you are finished with that portion of the exercise.
The Light Microscope The light passes through two objectives before it reaches your eyes. The lower set of objectives is on a revolving headpiece, which you can turn to select the desired magnification. For convenience, and to avoid damaging the objectives and slides, always start with the lowest magnification (4X), focus the image, and then progress to higher magnifications. Our scopes are parfocal, which means that, as you switch magnifications, the image should remain in focus (or at least close to it).
The Light Microscope The eyepieces also magnify the image (usually 10X). It will be very beneficial to use both eyes when looking at your specimens – this will save a lot of headaches (literally). One important adjustment is the inter-pupillary distance. While looking through the microscope, move the eyepieces toward or away from each other until they align with your eyes. (Note: some microscopes have a little roller that moves the eyepieces.) In people, inter-pupillary distances vary, but in most cases not significantly. However, some individuals have unusual spacing, either too narrow or too wide . Your seating assignment is random, so hopefully you and your partner have comparable distances. If not, better luck next lifetime. If it makes you feel better, my PhD advisor had a very narrow distance, so I feel your pain, even though I’m not going to do anything about it.
The Light Microscope A second important adjustment ensures that each eyepiece is focused properly for your eyes. If you look closely, you will see that turning one of the eyepieces moves it in and out (in the direction of the blue double- arrow). By adjusting this eyepiece, you can ensure that both images that you see (with each eye) are in focus. Start by covering the eye corresponding to the adjustable eyepiece and adjust the focus until the image is sharp through the “fixed” eyepiece. Then cover the “fixed” eye and adjust the “knurled diopter ring” (not the focus knob), until the image is sharp through the “adjustable” eyepiece. Again, this is another feature where you may have to compromise with your partner.
The Light Microscope Focusing your specimen is done through knobs that raise or lower the stage. The course knob moves the stage more quickly, and should only be used under low magnification. After an image is focused under low power, switch to higher magnifications and then use the fine focus to “tweak” the image. The higher magnification lenses are longer and, therefore, closer to the glass slides. If you use the course focus with these high magnification lenses, you risk driving the lens through and breaking the slide, or, worse, damaging the objective lens.
The Light Microscope There are two knobs that move the stage along the X and Y axis. In case you aren’t aware, the image you see is upside-down and reversed. This makes the image seen through the lenses move in the opposite direction from the actual movement of the specimen. You won’t notice this when you are looking through the eyepieces, but if you compare your image with what’s actually happening with the stage, you will.
Basic Features of Cells and Tissues If you’re not familiar with cell biology, it’s a good idea to start with a simple drawing of a single cell. We’ll be discussing the structure and function of the cell’s components over the next several weeks. For now, appreciate that: --the outer membrane of the cell, the plasma membrane, separates it from the extracellular matrix --the cell contains many organelles, the most prominent organelle is the nucleus --the portion of the cell excluding the nucleus is referred to as the cytosol (aka cytoplasm, though the two aren’t exactly the same) Technically, cytosol refers to everything in the cell, excluding the nucleus. Cytoplasm is the liquid component of the cytosol, i.e. cytosol minus the organelles. However, these two terms are often used interchangeably. In fact, most cell biologists do not know the difference.
Basic Features of Cells and Tissues This is an image taken from a slide of the liver. The liver is a good place to start because the cells are clearly defined (one cell is outlined in green). The most prominent organelle in the cell, and the only one we can see easily in the light microscope, is the nucleus (blue arrows), which appears blue on this slide. The remainder of the cell (pinkish-purple on this slide) is the cytosol; the organelles within the cytosol are too small to be seen at this resolution. The slight amount of material between the cells is the extracellular matrix. However, this is complicated somewhat in the liver, since the paler pink tissue between the cells includes blood vessels, which are composed of some cells, and other connective tissue cells.
Basic Features of Cells and Tissues Click this link to view the video Video of cells, nuclei, cytosol, extracellular matrix – SL103 Both links only work through UC, either on our computers, or from home using the VPN client. When you click the link to the digital slide, it will open up in your browser. In the upper right, there is a link to ImageScope, which will work if you have ImageScope software installed through Aperio (http://www.aperio.com/ - bottom right links). Although there are a few added features with ImageScope, for simple slide viewing, the web browser version is sufficient. Finally, for some reason, when you click on the digital slides, you may be prompted for a username (guest) and password (guest). Click this link to use the digital slide • Link to SL 103 • Be able to identify: • Cells • Nuclei • Cytosol (cytoplasm) • Extracellular matrix The recommended strategy here is for you to watch the video of me demonstrating features of a slide, and then to open the slide and find those same structures in a different area of the slide (when possible). It may be tempting to skip this second part, but most students who do so have trouble on exams.
Basic Features of Cells and Tissues In the previous slide, it was easy to pick out cell borders. However, this is the exception rather than the rule. The strip of tissue between the green brackets contains approximately 30-50 cells. You know this because you can see approximately that many nuclei (one nucleus bounded by blue arrows). The pink region around, but mostly above, the nucleus is the cytosol. The plasma membranes between the cells are, for the most part, not visible, though you can see them in some locations (black arrows). When cell borders are not obvious, you’ll have to mentally draw them in so that you can imagine the shape and size of the cells. For example, the imaginary outline of a single cell (green) indicates that these cells are columnar in shape (rectangular).
Basic Features of Cells and Tissues Video of cells, nuclei, cytosol, extracellular matrix – SL14 That cool little magnifier I used in the video is not available in the browser version. You’ll see me use it a few times, but I don’t think it’s necessary that you have it available to you for casual slide viewing. Entirely up to you. • Link to SL 014 • Be able to identify: • Cells • Nuclei • Cytosol (cytoplasm) • Extracellular matrix
Basic Features of Cells and Tissues Another image for practice. Here, in the region between the green brackets, most of the cells are cuboidal (square) or round-ish. Identify the nuclei, and then the cytosol. Mentally draw in the borders between the cells (some you can see). FYI, for now….This bottom region below the tissue indicated by the green brackets is slightly different. Here, there are smaller cells with smaller nuclei; the nucleus of one is indicated by the yellow arrow. This type of tissue has more extracellular matrix than the tissue bounded by the green brackets. Therefore, the pink between the nuclei is actually both cytoplasm and extracellular matrix; the border between these is not visible. We’ll look at why the tissues, cells, and nuclei are different in these regions later.
Slide Preparation Although you do not need to know the details of slide preparation, understanding the procedure in general will make it easier for you to interpret the slides that you will look at in the laboratory. The four major steps of slide preparation are: Fixation Embedding Sectioning Staining
Slide Preparation tissue fixation Tissue fixation terminates cell metabolism and prevents tissue degeneration. This can be accomplished with reagents that cross-link adjacent proteins (chemical fixation).
Slide Preparation tissue fixation Chemical fixation is time consuming, and destroys protein structure. In some cases, if time or preservation of enzymatic activity is a concern, tissues can be preserved by quick-freezing. Surgeons can biopsy tissues and send them to the pathology lab for quick analysis. Freezing allows the pathologist to return the results of that analysis rapidly, even while the patient is still on the operating table. Surgical options can then be selected based on the results.
Slide Preparation embedding Fixed tissues are embedded in a medium that allows for easy handling and sectioning. FYI….Embedding is not simply coating the outside of the tissue (left image), but actual perfusion of the embedding substance into the tissue so that the tissue is part of the embedded block (right image, less likely to fall apart on sectioning).
Slide Preparation sectioning The embedded tissue is then sectioned into thin (5-15µm) slices, which are mounted on glass slides. A series of washes now removes the embedding medium, leaving the tissue on the slide. Microtome used to section tissues
Slide Preparation staining Stains are used to enhance the visualization of cellular components. There are a number of procedures that can help you visualize components on a slide; each will highlight a different cellular component. This can range from relatively non-selective staining based on charge, to very specific staining based on antibody-antigen interaction. Here, we will look at two very common staining techniques: --Hematoxylin and Eosin (H&E) --Periodic acid Schiff (PAS) FYI…here is a portion of one of our slides that did not take the stain very well. This image should give you an idea of what an unstained piece of tissue looks like.
Slide Preparation staining Hematoxylin and eosin (H&E) Hematoxylinis a blue dye that localizes to negatively charged cell structures (e.g. DNA, RNA). Structures that bind to hematoxylin are referred to as basophilic. Eosin is a red/pink dye that localizes to positively charged cell structures (e.g. proteins, mitochondria). Structures that bind to eosin are commonly referred to as eosinophilicor, sometimes, acidophilic.
Hematoxylin and eosin (H&E) The liver cells that you looked at previously were stained with H&E. Note that hematoxylin staining of the negatively charged DNA molecules gave the nucleus a blue color, while eosin stained proteins in the cytoplasm pink. Many extracellular components also are eosinophilic.
Hematoxylin and eosin (H&E) Video of H&E staining – SL102 • Link to SL 102 • Be able to identify: • Hematoxylin and Eosin (H&E) staining • Basophilic structures • Eosinophilic structures
Hematoxylin and eosin (H&E) Because ribosomes are composed of RNA, which is basophilic, cells actively synthesizing large amounts of proteins will have some hematoxylin staining in the cytoplasm. This adds blue to the typically pink cytoplasm, a feature referred to as cytoplasmic basophilia.
Hematoxylin and eosin (H&E) Video of H&E staining with cytoplasmic basophilia – SL108 • Link to SL 108 • Be able to identify: • Hematoxylin and Eosin (H&E) staining • Basophilic structures • Cytoplasmic basophilia • Eosinophilic structures
Hematoxylin and eosin (H&E) Another example of cells with cytoplasmic basophilia.
Hematoxylin and eosin (H&E) Cells with abundant cytosolic proteins show more intense eosinophilia. The circled region in the left image shows cells with abundant mitochondria, while the images to the right are from skeletal muscle.
Hematoxylin and eosin (H&E) The staining properties of the nucleus also tells us something about a cell’s relative activity. As you might know, the genetic material, DNA, can be in a condensed (inactive) form called heterochromatin, or in a de-condensed (active) form called euchromatin. Condensed DNA in a cell will result in a smaller, more densely-stained nucleus (the 11 o’clock arrows coming from the S), whereas an active cell will have a larger, paler nucleus (red arrow).
Hematoxylin and eosin (H&E) Video of H&E nucleus – SL102 • Link to SL 102 • Be able to identify: • A cell’s activity based on it’s nuclear profile
Slide Preparation staining Periodic acid Schiff (PAS) Periodic acid Schiff (PAS) is a staining technique that highlights carbohydrates within a tissue. Structures that react with this procedure are referred to as PAS positive, and show up as a bright magenta (purple). The tissue is typically counterstained with a basic dye to highlight the nucleus. PAS+ structures within the cell are the Golgi apparatus, plasma membrane, and the mucus-containing vesicles of goblet cells. You will learn more about these structures in subsequent laboratories.
Periodic acid-Schiff (PAS) stains carbs In this tissue stained with PAS, you can see more clearly defined cell borders due to staining of the carbohydrate component of the lipid bilayer (glycocalyx), an area just above the nucleus where the Golgi apparatus is located, a cell with a lot of secretory vesicles containing glycoproteins, and an extracellular structure called the basement membrane. You will learn more details about all these in upcoming activities.
Periodic acid-Schiff (PAS) Video of PAS – SL19 • Link to SL 019 • Be able to identify: • A tissue stained with Periodic acid-Schiff (PAS)
Slide Preparation artifacts A final topic regarding preparation of slides is artifacts. Artifacts are features of a prepared slide that are not present in the original sample. These are features that are introduced during tissue preparation. The absence of staining in the cytoplasm can sometimes suggest the presence of specific molecules in the tissue! To understand this, note that many cellular components, such as glycogen or lipid droplets, wash away from the sample during tissue fixation. This leaves a clear area, which is a clue of what once existed in the original tissue. Here, the image to the left shows liver cells that previously contained glycogen. The right image is from the adrenal gland; here, the pale cytoplasm “reveals” lipid droplets lost during tissue preparation.
Slide Preparation artifacts Video of H&E cytoplasm – SL102 Video of H&E cytoplasm – SL52 • Link to SL 102and SL 052 • Be able to identify: • A cell’s cytoplasmic contents based on appearance (for now, at least list possibilities of what could be in there, later when you learn about different cell types, you’ll be able to provide more educated guesses)
Slide Preparation artifacts Another artifact of sample preparation is tissue shrinkage. This occurs in most routine preparations of tissue samples, though some procedures can be performed to minimize tissue shrinkage. What is important to remember is that not all tissues in a sample shrink to the same extent. When one tissue shrinks more than an adjacent tissue, the tissues pull away from each other, creating spaces within the sample. For example, in this low power image of cartilage, the extracellular matrix is semi-solid, so shrinks less than the cells (black arrows) that are embedded within it. This creates holes (called lacunae), in which the shrunken cells are located. In many places (blue arrow), the cells have fallen out of their lacuna during sectioning. Extracellular matrix Extracellular matrix So even though your initial thought is that artifacts are bad, in fact, in some cases, features created during tissue preparation can be helpful in tissue identification, since only cartilage and bone have shrunken cells within lacunae.
Slide Preparation artifacts Video of lacunae – SL20 • Link to SL 020 • Be able to identify: • Cells in lacunae
Slide Preparation artifacts Here are a couple of artifacts that are not so helpful. The image to the left is a cross section of an elastic artery. When tissue shrinkage occurred, the vessel folded up on itself, creating dark bands (green arrows) that are not real structures, but simply areas of overlapped tissue (nevertheless, this always causes confusion!) The image to the right features torn tissue (black arrow) and a piece of debris (blue arrow).
The next set of slides is a quiz for this module. You should review the structures covered in this module, and try to visualize each of these in light and electron micrographs. • Understand the parts and use of the light microscope • Be able to recognize major features of a tissue in light microscopy • Cell • Nucleus • Cytosol (cytoplasm) • Extracellular matrix • Become familiar with the procedures used to prepare a specimen for visualization with the light microscope • Be able to describe the most common histological stains, including the basic principle of the stain, the colors of the stain, what cellular components are stained, and how variations in staining can provide clues about the structure and function of cells and tissues • Hematoxylin and Eosin (H&E) • Periodic Acid Schiff (PAS) • Understand how tissue preparation gives rise to specific features in a tissue, and how those features may provide clues as to the structure and function of the cells or tissues in that specimen Normally, a quiz will follow this slide. However, much of what we just covered will be reinforced in the laboratory and large group discussions, so we’ll skip the quiz on this module.