Quick Guide to Replacing On/Off Valve and Tubing with Locksleeve Installation
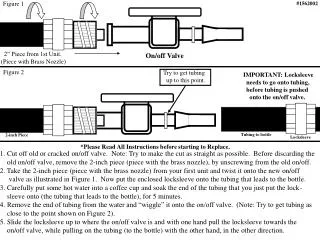
This guide provides step-by-step instructions for replacing the on/off valve and installing tubing with a locksleeve. Start by cutting off the old or cracked on/off valve, ensuring a straight cut. Remove the 2-inch brass nozzle piece from the old valve and attach it to the new one. Place the locksleeve onto the tubing leading to the bottle and soak the tubing end in hot water for five minutes for pliability. Carefully insert the tubing onto the new valve, adjusting to the indicated position. Finally, secure the locksleeve in place.

Quick Guide to Replacing On/Off Valve and Tubing with Locksleeve Installation
E N D
Presentation Transcript
Figure 1 #1562002 2” Piece from 1st Unit. (Piece with Brass Nozzle) On/off Valve Figure 2 Try to get tubing up to this point. IMPORTANT: Locksleeve needs to go onto tubing, before tubing is pushed onto the on/off valve. Tubing to bottle 2-inch Piece Locksleeve *Please Read All Instructions before starting to Replace. 1. Cut off old or cracked on/off valve. Note: Try to make the cut as straight as possible. Before discarding the old on/off valve, remove the 2-inch piece (piece with the brass nozzle), by unscrewing from the old on/off. 2. Take the 2-inch piece (piece with the brass nozzle) from your first unit and twist it onto the new on/off valve as illustrated in Figure 1. Now put the enclosed locksleeve onto the tubing that leads to the bottle. 3. Carefully put some hot water into a coffee cup and soak the end of the tubing that you just put the lock- sleeve onto (the tubing that leads to the bottle), for 5 minutes. 4. Remove the end of tubing from the water and “wiggle” it onto the on/off valve. (Note: Try to get tubing as close to the point shown on Figure 2). 5. Slide the locksleeve up to where the on/off valve is and with one hand pull the locksleeve towards the on/off valve, while pulling on the tubing (to the bottle) with the other hand, in the other direction.