Graphing
Graphing. Module 5. Graphing. Viewing Window Size Graphing Equations Table Values X- and Y-Intercepts. Graphing. Viewing Window Size (Screen size) This key brings up the screen that controls the size of the viewing window. Graphing. Viewing Window Size.

Graphing
E N D
Presentation Transcript
Graphing Module 5
Graphing • Viewing Window Size • Graphing Equations • Table Values • X- and Y-Intercepts
Graphing Viewing Window Size (Screen size) This key brings up the screen that controls the size of the viewing window.
Graphing Viewing Window Size Xmin is the leftmost value on the x-axis Xmax is the rightmost value on the x-axis Xscl is the number of units between tick marks on the x-axis Ymin is the lowest value on the y-axis Ymax is the uppermost value on the y-axis Yscl is the number of units between tick marks on the y-axis Xres indicates how many pixels on the x-axis are skipped before another x-value is used to calculate y
Graphing Viewing Window Size To change the window size, you can go down and manually enter the specific values to be changed or go to a preset screen size. To manually enter new values, move the cursor to where you want a new value and enter the new value.
Graphing To use the preset window values, you can change the viewing window by using the ZOOM menu. Pressing the gives us other common window sizes.
Graphing The ZOOM MENU- 1:ZBox - allows you to draw a box around the part of the screen you want to see in the window. 2:Zoom In - magnifies the graph. You can change the center of the zoomed window by moving the cursor before pressing ENTER (Preset window sizes)
Graphing The ZOOM MENU- 3:Zoom Out – shrinks the graph. You can change the center of the graph by moving the cursor before you press ENTER 4:Zdecimal-sets the window so that each pixel along the x-axis represents one tenth (Preset window sizes)
Graphing 5:Zsquare-sets the window so that the distance between tick marks on the x-axis is the same as the distance between tick marks on the y-axis 6:Zstandard-sets the window to the default window (x’s go from –10 to 10; Y’s go from –10 to 10)
Graphing The ZOOM MENU - (Preset window sizes) • 7:ZTrig-sets the window to show two revolutions and the tick marks to represent multiples of 90 • 8:Zinteger-sets the window so that each pixel along the x-axis represents one • 9:ZoomStat-fits the window to statistical data
Graphing The ZOOM MENU 0:ZoomFit-changes the window so that both the lowest and the highest values of y are shown in the window. This is often an extreme case of zooming in and out and you may lose details 6:ZStandard 0:ZoomFit
Graphing The ZOOM MENU - (Preset window sizes) For most of the things we will do this semester, the Zoom 6:standard option will be the best window viewing size. You can choose this option by pressing
Graphing Graphing Equations In order to graph an equation (they will usually have an x and a y variable), the equation must be solved for y= That is, y must be on a side by itself in order to enter it into the calculator. Yes: y = 3x – 4 No: 2x + 3y = 6
Graphing Graphing Equations Graph the equation y = 3x – 4 Because we have y= form, this equation is ready to enter: • Press
Graphing Graphing Equations The window will show: • Then press And the screen will show:
Graphing Graphing Equations Graph 2x + 3y = 6 This equation is not ready to enter – why not??? You must first solve for y= form and you will get y =
Graphing Graphing Equations Now you are ready to enter y = • Press and enter the expression Make sure you use parentheses in the numerator.
Graphing Graphing Equations The window will show: • Press And the screen will show:
Graphing Graphing Equations The purpose for graphing an equation is to show graphicallyall solutions that the equation has. The graph consists of many, many ordered pairs of the form (x,y). Each of these ordered pairs is a solution to the equation.
Graphing Graphing Equations Often we find several ordered pairs that are solutions to an equation and use the points to determine what the graph looks like. Other times we will have the graph and need to identify specific points on the graph.
Graphing Graphing Equations Once you have the graph on the calculator window, specific points on the line can be found in a couple of different ways: 1. Using the key 2. Using a table of values
Graphing The key Once you have the graph on the window, press to put the cursor on the line. This will give you an x-value and a y-value. For additional values, use the left and right arrow keys to move the cursor forward and back.
Graphing The key In Zoom 6:standard mode, additional values will probably contain many decimal places, however, if you trace in Zoom 8:integer mode, “nicer” values will appear.
Example Graph the line y = 3x – 4 and label at least two points on the line. In ZOOM 6:Standard the window will show:
Example To find some specific points, press The window will show: This gives you one ordered pair that is a solution; that is, X = 0, Y = -4 denoted (0,-4).
Example Use the left and right arrow keys to move the cursor around to different points on the line. This will give you additional points, but they will probably be UGLY. (Remember, try the ZOOM 8:INTEGER mode to get nicer looking numbers.)
Graphing The Table of Values The second way to get specific points on the graph is to use the table of values. In order to do this, you need to have the equation entered as y1. You can create a table for all values of x or for particular values of x.
Graphing The Table of Values The table of values will give you solutions to the equation in a table format. All of these ordered pair solutions will be points on the line. So additional solutions are (-3, -13), (-1,-7), (2,2),…
Graphing The Table of Values So,how do you get to the TABLE of VALUES??
Graphing The Table of Values • Enter the equation as Y1: • Press to graph • Check your table settings
Graphing The Table of Values • Check your table settings You will only need to do this the first time you want to automatically create a table, then you will be able to skip this step. **See next screen for clarification.
Graphing The Table of Values TblStart – tells where to start your values in the table Tbl - tells how much to increase your x-values by each time Independent – AUTO – will automatically compute your table without asking for specific x-values Dependent – AUTO – will automatically compute the y-values for the given x-values
Graphing The Table of Values NOTE: For typical table purposes, you will want Tbl to be 1 and both Independent and Dependent to be on AUTO. TblStart can be anything and can be adjusted later using the up and down arrows.
Graphing The Table of Values Once the table is set up to your liking, • Press • Your window will show • You can get additional values by using the up and down arrow keys
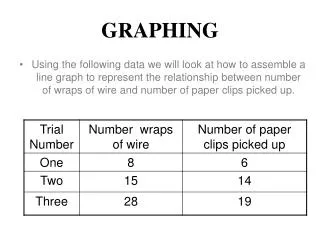
Graphing Additional solutions Example: For the equation y = 2x + 6, list five ordered pairs that are solutions. Use either the trace key or the table of values…
Graphing Additional solutions Example: For the equation y = 2x + 6, list five ordered pairs that are solutions. Enter the equation as y= View the table: Solns: (-3,0), (-2,2), …
Graphing X- and Y-Intercepts Defn: The X-intercept is the point where the line crosses the x-axis. Defn: The Y-intercept is the point where the line crosses the y-axis.
Graphing X- and Y-Intercepts The X- and Y-Intercepts are two points commonly used when labeling a graph. We can use the calculator to find these two points.
Graphing How to find the Y-Intercept Because the y-intercept is located on the y-axis, and because all points on the y-axis have an x coordinate of 0, we are going to calculate the value of y when x is 0. • Enter the equation as y= and graph • Press
Graphing Find the y-intercept of the equation y = 3x – 4
Graphing Enter the equation as y= and graph Press To calculate 1:VALUE Press
Graphing To choose the x-value of 0 Press This gives a y-value of -4, so the y-intercept is the ordered pair (0,-4).
Graphing How to find the X-Intercept Because the x-intercept is located on the x-axis, and because all points on the x-axis have a y coordinate of 0, we are going to find where the y= equation is zero. • Enter the given equation as y1= • Enter y2 = 0 (Recall that y = 0 is the x-axis.) • Graph • Find where the equation (y1) intersects the x-axis (y2)
Graphing Find the x-intercept of the equation y = 3x – 4
Graphing Enter the equation as y1= Enter y2 = 0 Graph Calculate 5:intersect
Graphing Then it gives you the x-value of 1.333333, which means the x-intercept is the ordered pair (1.33333,0).
Graphing DISCLAIMER: All of the equations we will graph in Elementary Algebra will be lines that have at most 1 x-intercept and at most 1 y-intercept. There are additional steps to be taken if there is more than one x-intercept.
Example Find the x-intercept and the y-intercept of the equation
Example Find the x-intercept and the y-intercept of the equation Steps: • Enter as y= • Graph • Find the x-intercept • Find the y-intercept
Example Find the x-int. and the y-int. of the equation • Enter as y1= • Enter y2 = 0 • Graph